Table of Contents
Advertisement
Quick Links
Advertisement
Table of Contents

Related Manuals for Rifton HTS


Summary of Contents for Rifton HTS
-
Page 1: Footboard For Mounting Bar, Tub Base
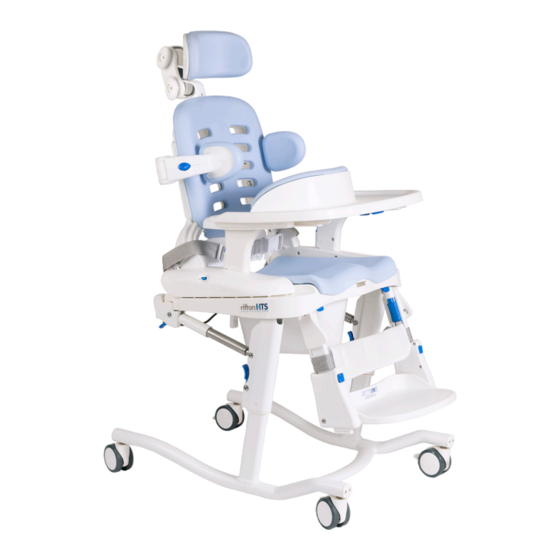
Rifton HTS Hygiene Toileting System Z110, Z120 & Z130 Product Manual... -
Page 2: Table Of Contents
Anterior support / tray Lateral supports, chest strap Hip guides, pan and bowl adapter Deflectors and abductor Calfrest and ankle straps Footboard for mounting bar, tub base Portability base Operation Maintenance, cleaning and warranty Materials and user modifications © 2022 Rifton Equipment... -
Page 3: Safety Messages
○ Immediately remove this product from use when any condition develops that might make operation unsafe. ○ Do not use Rifton components or products for any purpose other than their intended use. ○ Replace or repair components or products that are damaged or appear to be unstable. -
Page 4: Recommended Use
Recommended use The Rifton HTS is a Class 1 medical device. The intended use of the HTS is to compensate for disease, injury, or disability by allowing comfortable toileting and showering, and by providing modification for anatomical positioning. -
Page 5: Item Dimensions
50-74 (127-188) Key user dimension: height The user’s overall height is a general guide to help you select the appropriate size of HTS. Choose the model that allows for growth. Important: Make sure that seat width, depth and height are adequate for each individual user, and that the user’s weight does not exceed the maximum weight recommended. -
Page 6: Check Your Order
Check your order Your Rifton HTS has been shipped according to your specifications. It will require some tool-free assembly. Follow these instructions to ensure that your product is assembled and used correctly. This product manual is comprehensive, and may discuss features not included in your configuration of the HTS. - Page 7 On the small HTS there is an Figure 7d: additional option for seatbelt threading to ensure a more secure positioning for small Figure 7c active users.
-
Page 8: Bases
Armrests To attach the armrest, insert the Figure 8a: bottom of the armrest into the oval slots in the side pieces and press down firmly until it latches into place. To remove the armrest, squeeze the release button (A) and pull the armrest up. Tip: Armrests of different sizes can be retrofitted. - Page 9 (B) at the right rear of the seat to release the two locking gas springs. Tilt adjusts 5° forward and 25° back. It is easy to tilt the HTS with the user in the product. A tilt angle converter kit is available to change the tilt range to 15°...
-
Page 10: Footboard
Caster brakes To apply the brake, step down Figure 10a: on the brake lever (A). To release the brake, raise the lever. Footboard To prevent falls, CAUTION tipping or other injury: Figure 10a • Do not exceed 150 pounds on the footboard. -
Page 11: Mounting Bars
Inspect the toilet stability and seat Figure 11a bolts at regular intervals while the mounting bar is in use. Tip: For the large HTS, only one style The two kinds of mounting Figure 11a: of mounting bar is available. -
Page 12: Components
Components Seat and back pads The seat and back pads are removable for cleaning. They are made of durable, closed-cell polyethylene foam. There are three styles of seat Figure 12a: pad. The rear-open pad has a wide opening rear-open rear-closed no-hole which facilitates rear hygiene care. -
Page 13: Butterfly Harness And Push Handles
Figure 13b Push handles A pair of push handles is Figure 13d: available for the HTS mobile base. They attach using the same extrusion (C) as the laterals at the back of the backrest. Figure 13c Figure 13d... -
Page 14: Anterior Support/Tray
Anterior support/tray To prevent falls, WARNING strangulation or other injuries, always use a seatbelt when the tray is in use. The anterior support has a Figure 14a: padded surface for the user to lean against, which provides an excellent, forward- leaning, toileting position with trunk and arms supported by the tray. -
Page 15: Lateral Supports, Chest Strap
Lateral supports Lateral supports are available Figure 15a: with or without a chest strap for secure upper trunk positioning. They may be adjusted separately in height, angle and width using the knob (A) behind the backrest. Loosen the knob (A) and insert Figure 15a: the key into the slot (B) behind backrest. -
Page 16: Hip Guides, Pan And Bowl Adapter
The bowl adapter Figure 16d: accommodates situations where the hole in the HTS isn’t fully over the hole in the toilet. It is inserted at the front edge of the hole, under the seat pad. A seat pad must be used in conjunction with the bowl Figure 16c adapter. -
Page 17: Deflectors And Abductor
(A) and pulling the abductor out. To minimize risk of CAUTION Figure 17b splash guard infectious disease transmission, the HTS should be cleaned and disinfected between uses by different patients. Inadequate cleaning and disinfecting of equipment may increase the risk of cross contamination. -
Page 18: Calfrest And Ankle Straps
Calfrest This option requires the use of a footboard. The calfrest attaches above Figure 18a: the footboard. It should be removed if the footboard is in the top positions. The calfrest attaches to the Figure 18b: footboard uprights. With the padding toward client, wrap the webbing straps around the uprights and engage both Figure 18a... - Page 19 Figure 19a mounting bar attachment. To attach a footboard to Figure 19a: the HTS when used on the toilet with a mounting bar: Figure 19b: 1. Turn the HTS seat upside down. 2. Insert the small metal tabs at the end of...
-
Page 20: Portability Base
Portability base with carry-bag To prevent falls and WARNING injuries: • The portable base is intended for travel use only and should not be used as the primary base. Ensure adequate stability when using the portable base. • Check that the two pieces of the frame are fully engaged before attaching the seat. -
Page 21: Operation
Operation The Rifton HTS has two main functions: toileting and showering. For toileting, the ideal position Figure 21a: often incorporates forward-leaning of the trunk and a closed hip angle. This can be achieved by angling the backrest slightly forward, adjusting the seat to level or... -
Page 22: Maintenance, Cleaning And Warranty
Pads can be immersed in water, and smaller pads can be machine washed on a warm setting as needed. Warranty Statement If a Rifton product breaks or fails in service during the first year, we will replace it free of charge. -
Page 23: Materials And User Modifications
• Plastic components are injection-molded from a variety of industrial resins. All components are lead free and not made with natural rubber latex. User modifications To prevent serious injury or death, do not modify or alter Rifton WARNING products or components, or use Rifton products or components in conjunction with products from other manufacturers. - Page 24 Use only replacement parts supplied by Rifton Equipment. We are glad to supply replacement parts. Although Rifton makes every effort to supply correct parts and instructions for repairing or refurbishing your equipment, you are responsible to make sure that the repairs or modifications are correctly and safely completed.
Need help?
Do you have a question about the HTS and is the answer not in the manual?
Questions and answers