Advertisement
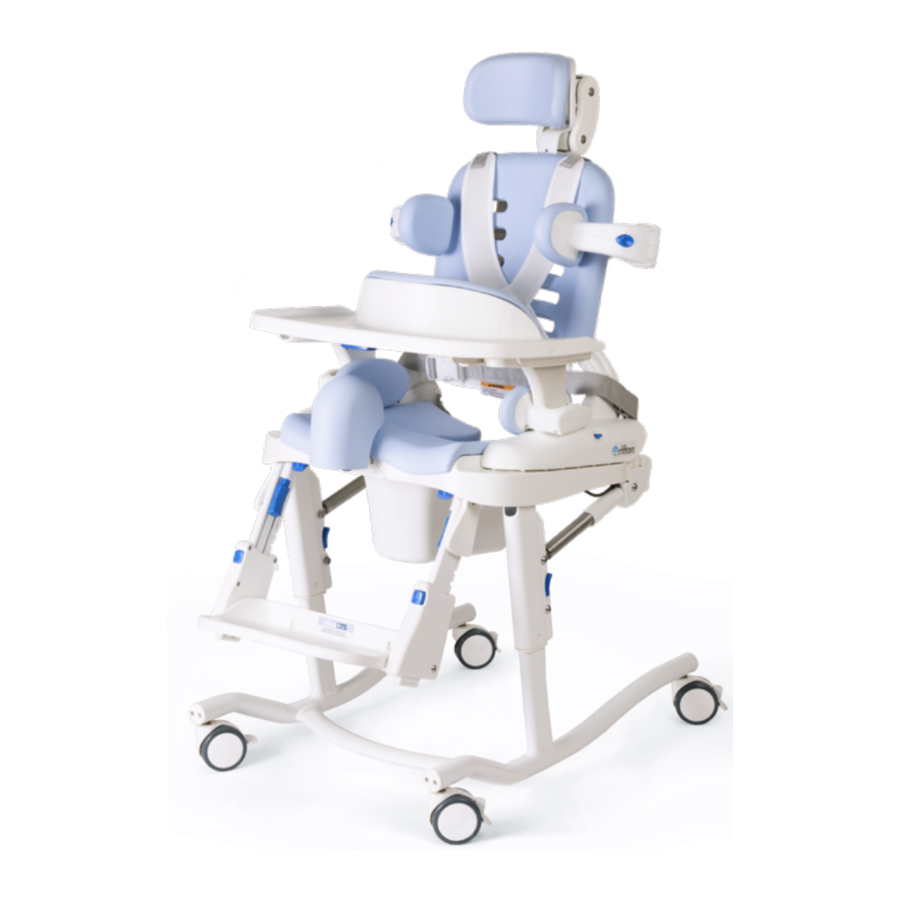
FRAME ADJUSTMENTS
QUICK TIP:
All the adjustment triggers and buttons are bright blue. All adjustment knobs are white.
Seat to base attachment/removal

To attach the seat to the base frame, align the white hooks at back of the seat with slots at the back of the base frame. Press firmly on the front of the seat to lock the seat into place.
To remove the seat from the base frame, use the two blue triggers under the front of the seat and lift up.
Tilt-in-space

Adjust the tilt-in-space by grasping the right back extension of the seat and squeezing the blue trigger firmly. Tilt to desired angle.
Note: The tilt-in-space function is available only on select frames. The chair can be tilted with the client seated in it.
Height adjustment

Note: Adjust chair height when empty.
To raise the seat to the desired height, pull up on the seat while stabilizing the base crosspiece with a foot.
Lower the seat by grasping both upright support columns of the HTS and squeezing the blue triggers simultaneously. Release the levers to latch seat at the desired height.
Locking/unlocking casters

SEAT AND BACKREST ADJUSTMENTS
Backrest angle adjustment

Adjust the backrest angle using the two blue triggers on both sides of the backrest.
Attach/remove backrest

To attach or remove the backrest, tilt the backrest forward to align the white markings indicated on the round moldings. Then insert or remove backrest.
Seat depth adjustment
Note: The HTS has four seat depth adjustment options.

Adjust the seat depth using the two blue triggers on both sides of the seat and slide the seat forward or backward.
To disassemble for cleaning, lift the two blue triggers and continue to slide the seat all the way forward for complete removal.
Seat/back pads

The seat and back pads are easily removed for cleaning or replacement.
Armrests

Press the armrest firmly down into corresponding slot. To remove the armrest, press the blue button and pull up.
Seat belt

Attach the seatbelt by sliding the white plastic ends of the belt into the corresponding slots at the back of the chair. Secure the buckles and adjust the straps for client safety and comfort.
Note: The seatbelt has a padded center section that may be removed and replaced when using the butterfly harness. See butterfly harness installation below.
COMPONENTS
Headrest

Press the blue button at the back of the chair to insert and remove the headrest and adjust headrest height.
Use the white knobs at the back of headrest to adjust angle and depth.
Laterals

The swing-away laterals slide into the groove at the back of the chair. Use the white knob to adjust height, depth and angle of the lateral support.
Press the blue button on the lateral to swing it out of the way for transfers.
Chest strap

Thread the loop of the chest strap onto laterals so the strap runs on the interior side of the laterals. Reinsert the laterals into the groove at the back of the chair.
Note: Always use seatbelt when chest strap is in use.
Butterfly harness
Note: The butterfly harness serves as a seatbelt. Review the seatbelt section prior to installation of the butterfly harness.

Clip the shoulder buckles of the butterfly harness into the buckles at the top back of the backrest.
Remove the middle, padded section of the seatbelt and replace it with the bottom portion of the butterfly harness. Secure the buckles and tighten the straps for client safety and comfort.
Anterior support/tray

Attach, adjust or remove the anterior support using the blue trigger under the front of the tray.
Note: The anterior support has six position options.
Hip guides
Note: The hip guides come in right and left sides. Longer hip guides with thicker pads are available on select sizes.

Thread the armrest through the correct hip guide. Use the two available slots on the hip guide to adjust for width. Reinsert the armrest.
Abductor

Attach or remove the abductor under the front seat pad using the lever indicated.
Deflectors

Standard deflector: Insert the tab into the grooves in the seat pad, as shown.
Note: Use the abductor to hold the standard deflector in place.
The groove inside the front of the seat pad is designed for use with the deflector only.

Dynamic deflector: Squeeze the blue latch indicated to insert into the slot under the front of the seat pad, the same as the abductor.

Splash guard: Use seatbelt or butterfly harness to secure snugly against user.
Footboard

Use the blue buttons to adjust footboard height and the blue triggers to adjust footboard angle.
Flip the footboard up for easy transfers.
Calf rest

Thread calf rest around narrowest part of the footboard support and latch buckles. Use webbing to adjust fit.
Ankle straps

Thread webbing through horizontal slot at the back of the footboard and turn it up into the vertical slot.
Secure strap around user's ankle with the buckle and adjust strap to fit snugly.
Tub base

To attach the seat to tub base, align the white hooks at back of the seat with sockets at the back of the tub base frame. Press firmly on the front of the seat to lock the seat into place.
To remove the seat from the base frame, use the two blue triggers under the front of the seat and lift up.
Portability kit
Note: The portability kit comes with a carry bag for the frame. Seat and backrest are not included, but can be fitted into the bag as well for convenient transfer.

- Connect the square tubing of the two sides of the base. Place the base over the toilet.

- First attach the seat (see seat attachment).

- Then attach the backrest (see backrest attachment) and using the angle triggers, adjust to correct position.

- Add the necessary components and position user in the chair.


To remove, follow instructions above in reverse.
See HTS product manual for more detailed instructions and safety messages.
Documents / ResourcesDownload manual
Here you can download full pdf version of manual, it may contain additional safety instructions, warranty information, FCC rules, etc.
Advertisement


Need help?
Do you have a question about the HTS and is the answer not in the manual?
Questions and answers