Table of Contents
Advertisement
Quick Links
Advertisement
Table of Contents

Related Manuals for Rifton Blue Wave E806


Summary of Contents for Rifton Blue Wave E806
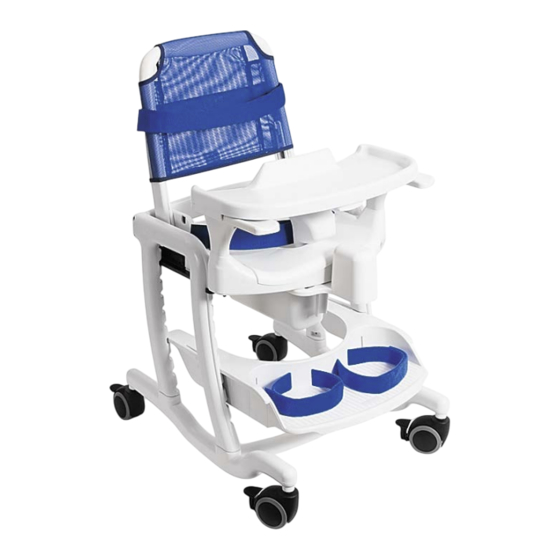
- Page 1 Blue Wave Toileting System E806 & E808 Product Manual ®...
-
Page 2: Table Of Contents
User and item dimensions Basic item Seat Armrests Hip strap and hip strap clips Frame Casters Mounting bar Accessories Backs Anterior support Footboard Abductor and pan Operation Maintenance and cleaning Materials, user modifi cations and warranty © 2013 Rifton Equipment... - Page 3 Technical Users For professionals who order and set up Rifton products. Home Users For caregivers who use Rifton products on a regular basis. Maintenance Personnel For anyone who is responsible for service or reordering of Rifton products and parts.
-
Page 4: Warnings And Important Information
• Restraints – Using straps, trays or supports to restrict a client’s movement is considered behavioral restraint, which may raise ethical and legal issues for your facility. Rifton Equipment is not intended for this use. IMPORTANT •... -
Page 5: Recommended Use
Recommended use The Rifton Toileting System is a Class 1 medical device. The toilet seat is recommended for use in conjunction with domestic or institutional toilets of sturdy construction* and in good condition. * Equipment should comply with the following standards: ANSI A112.19.2M (Toilet bowls, USA), and ANSI Z124.5 (Toilet seats, USA), or BS 5503 (Toilet... -
Page 6: Check Your Order
Check your order The Blue Wave toileting system has been shipped according to your specifi cations. It will require some tool-free assembly. Follow these instructions to insure that your item is put together and used correctly. This product manual is comprehensive and may discuss features not included in your item. -
Page 7: User And Item Dimensions
User and item dimensions User dimensions - inches (cm) small large Height 30-50 (76-127) 48-72 (122-183) Key user dimension: height The user’s overall height is a general guide to help you select the appropriate chair. Choose the model that allows for growth. Important: Make sure that seat width, depth, and height are adequate for each individual user and that the user’s weight does not exceed the maximum weight recommended. -
Page 8: Basic Item
Basic item Seat Seat depth The Rifton toilet seat has two settings of seat depth (A and B): 11½" (29 cm) and 13¾" (35 cm) for the large seat, and 9" (23 cm) and 11" (28 cm) for the small seat. -
Page 9: Armrests
Armrests The armrests fi t into the oval slots on the side of the seat (see Figure 9a). They should be pushed down and clipped in securely. To release, squeeze the black clips under the seat. To get more support at the elbows, swap and rotate positions of the right and left armrests. -
Page 10: Frame
Figure 10a permanently to the toilet. This will not affect normal use of the toilet. It facilitates quick, secure, tool-free attachment and removal of the Rifton toilet seat. Additional mounting bars may be purchased for use on other toilets. Figure 10b... -
Page 11: Accessories
Accessories Backs High back The high back has two chest straps. Low back The low back has one chest strap. Figure 11a Attaching back Place the back horizontally front side down, hook and loop fasteners (A) and triggers (B) up (see Figure 11a). Pull the blue cover part-way off the frame. - Page 12 Adjusting the back angle Lift the two triggers (A) to tilt the back. There are three tilt positions: 5º and 15º backward, and 5º forward. In these positions, the triggers engage fully into slots, making the adjustment secure. Do not use any other tilt positions. Tilt the back all the way forward for storage.
-
Page 13: Anterior Support
Anterior support The anterior support (A) attaches to the armrests of the toilet seat. There are four positions for the latches to engage in. The latch handle (B) is placed at the front under the anterior support. Pull the handle to release. -
Page 14: Abductor And Pan
Abductor and pan The abductor (A) fi ts on the front of the toilet seat by sliding it into the guides (B) beneath the seat (see Figure 14a). Push it in until it engages. To release, push the triggers (C) inwards (see Figure 14b)). The pan slides into the same channels, from either the front or back. -
Page 15: Operation
Over the toilet Raise the seat of the toilet. Adjust the height of the Rifton toilet seat to just clear the top of the toilet. Place the footboard (if required) into the slots for correct positioning. - Page 16 Replace the nuts (B) and tighten fi rmly (see Figure 16a). Figure 16a Adjust the Rifton toilet seat back to the forward leaning position (see Figure 16b). With the front of the seat facing towards you, and tilted up, hook the black plastic hooks (D) at the back of the seat into the holes (C) in the mounting bar.
- Page 17 Components of the Rifton Blue Wave toileting system Large high back Small anterior support Small high back Large low back Large anterior support Headblocks Abductor Frame Footboard with straps Large defl ector Small defl ector Hip strap Large seat cover...
-
Page 18: Maintenance And Cleaning
Inspect the toilet, seat bolts and nuts when using the mounting bar (see pages 4 and 5 for warnings). Cleaning The Rifton Blue Wave toileting system is designed for easy cleaning. All the components can be removed and cleaned, or the whole item can be placed under the shower. -
Page 19: Materials, User Modifi Cations And Warranty
SERIOUS INJURIES. Warranty Statement If a Rifton product breaks or fails in service during the fi rst year, we will replace it free of charge. - Page 20 Use only replacement parts supplied by Rifton Equipment. We are glad to supply replacement parts. Although Rifton makes every effort to supply correct parts and instructions for repairing or refurbishing your equipment, you are responsible to make sure that the repairs or modifi...
Need help?
Do you have a question about the Blue Wave E806 and is the answer not in the manual?
Questions and answers