
Related Manuals for Rifton R820


Summary of Contents for Rifton R820
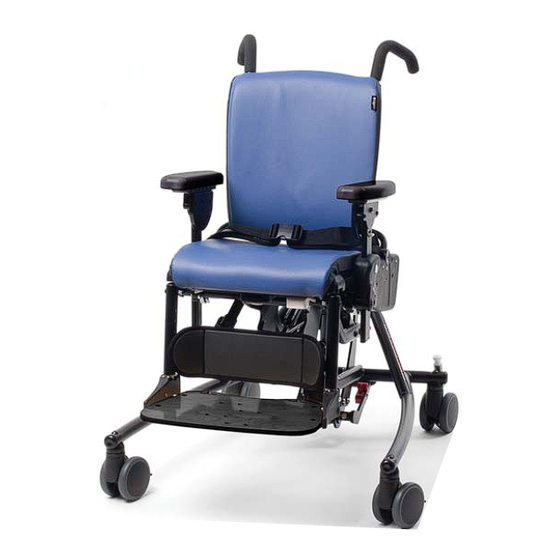
- Page 1 Rifton Activity Chair R820, R830, R840, R850, R860 & R870 Product Manual Standard Base Hi/lo Base ®...
-
Page 2: Table Of Contents
Check your order Basic components Backrest pads Seatbelt 11-12 Arm supports Seat depth Tilt-in-space 14-16 Spring options 17-18 Seat quick-connect Standard base Adjustable legs Seat height Footboard Hi/lo base Seat height Caster brakes and swivel lock Footboard © 2015 Rifton Equipment... - Page 3 Contents continued. . . Accessories Headrests Whitmyer adapter plate Lateral supports Chest strap Butterfl y harnesses Thigh belt Pelvic harness Hip guides Abductor Adductors Leg prompts and ankle straps Sandals and wedges Lumbar and seat support kit Backrest fi ller pad Tray Handhold Push handles...
-
Page 4: Important Information
Use this key to determine which sections of this product manual apply to you. Technical Users For professionals who order and set up Rifton products. Home Users For care-givers who use Rifton products on a regular basis. Maintenance Personnel For anyone who is responsible for service or re-ordering of Rifton products and parts. -
Page 5: Safety Messages
○ Immediately remove this product from use when any condition develops that might make operation unsafe. ○ Do not use Rifton components or products for any purpose other than their intended use. -
Page 6: Recommended Use
Recommended use The Rifton Activity Chair is a Class 1 medical device. It is intended to provide comfortable seating with adjustable support for people with disabilities in the classroom or at home. The chair allows for growth, can be used by multiple users and is available with various accessories that are easily removable as the client gains independence. - Page 7 Medium user and item dimensions User dimensions – inches (cm) R840 Standard base R850 Hi/lo base Height 40–56 (102–142) 40–56 (102–142) Key user dimension: height The user’s overall height is a general guide to help you select the appropriate chair. Choose the model that allows for growth.
- Page 8 Large user and item dimensions User dimensions – inches (cm) R860 Standard base R870 Hi/lo base Height 50–74 (127–188) 50–74 (127–188) Key user dimension: height The user’s overall height is a general guide to help you select the appropriate chair. Choose the model that allows for growth.
-
Page 9: Check Your Order
Check your order Your Rifton chair has been shipped according to your specifi cations. It will require some tool-free assembly. Follow these instructions to insure that your chair is put together and used correctly. This product manual is comprehensive and may discuss features not included in your chair. -
Page 10: Seatbelt
Seatbelt To prevent falls, WARNING strangulation, head entrapment or other injuries, always use seatbelt or pelvic harness when the tray, chest straps, thigh belt, mini trunk support, or butterfl y harness are in use. To attach seatbelt (see Figure 10a), use a pen to press small white button (C) just below one of the slots (B) at the side of the seat. -
Page 11: Arm Supports
Arm supports A pair of either armrests or forearm prompts were purchased with the chair. Insert arm supports into large slots at either side of seat. Both types of arm supports can be removed for side transfers. To insert arm support and adjust its height, press white button (A) just below arm support slot at side of seat. - Page 12 Arm supports continued. . . Forearm prompts adjust fully to facilitate trunk and head control while sitting. Forearm prompts are attached using a clamp and post system (see Figure 12b). The clamp attaches with a knob (F) to any position on the bar, and can be attached on the inside or outside of the bar (G) (see Figure 12a).
-
Page 13: Seat Depth
Seat depth To adjust seat depth, pull white handle located below seat (see Figure 13a). Move seat forward or back to desired position and release handle. Make sure seat audibly locks into place. Seat handle Tilt-in-space Figure 13a To prevent pinching or WARNING crushing, keep hands and limbs away from moving parts when... -
Page 14: Spring Options
Dynamic backrest and seat The dynamic spring option is designed for user-initiated movement allowing the chair to “bounce.” The spring feature can be locked to provide two ranges of Backrest adjustment: forward leaning or active cylinder mode, and reclined or relaxed mode. The dynamic backrest is an option on all chairs. - Page 15 Dynamic backrest The dynamic backrest (if installed) is controlled by the dynamic cylinder behind the backrest (see Figure 15a). The dynamic backrest has three functions (see Figures 15b and 15c): Backrest cylinder Turn the 1. Dynamic spring unlocked. white twist-lock collar clockwise to give 10°...
- Page 16 Dynamic seat (standard base only) The dynamic seat (if installed) is controlled by the dynamic cylinder underneath the seat (see Figure 16a). The dynamic seat has three functions (see Figure 16b and 16c): Turn the 1. Dynamic spring unlocked. twist-lock collar clockwise to allow 10°...
-
Page 17: Seat Quick-Connect
Seat quick-connect The Rifton Activity Chair seat and backrest unit can be detached from its base and re-attached to any other Rifton Activity Chair base of the same size. Tube Thus, a Rifton Activity Chair standard latch base can be converted to a Hi/lo base and vice versa, by ordering the base required. - Page 18 Attaching seat and backrest To prevent falls and WARNING injury, ensure that the seat is fi rmly attached at the front and back before use. If the seat is being installed on a Hi/lo base, raise the base to its full height fi rst. To attach, slide seat hoop (D) under prongs (E) on base, centering backrest column between prongs (see Figure 18a).
-
Page 19: Standard Base
Standard base Adjustable legs To prevent falls and WARNING injury: • Adjust all legs on a chair to the same Holes length. Snap button • Always use four legs of a set together on one chair; do not connect legs of varying lengths or varying features to the same chair. -
Page 20: Hi/Lo Base
Hi/lo base To prevent pinching or WARNING crushing, keep hands and limbs away from moving parts when adjusting chair. Large & medium chair seat height (R850 & R870) To adjust seat height, use foot pedal located at rear of chair. To raise seat, repeatedly pump foot pedal until desired height is achieved. -
Page 21: Caster Brakes And Swivel Lock
Caster brakes To prevent falls and WARNING injury, apply caster brakes prior to transferring clients into or out of the chair. To apply brake, step down on pedal (A) protruding from caster wheel (see Figure 21a). To release brake, lift pedal up. Swivel lock Swivel lock can be used to keep chair Figure 21a... -
Page 22: Footboard
Footboard To prevent falls WARNING and injury, ensure footboard push buttons have engaged Footboard before allowing client to step onto footboard. The footboard supports the user’s feet, when the seat is too high for feet to touch Tube latch the fl oor. It also serves as a base for ankle straps, sandals, and wedges. -
Page 23: Headrests
Accessories Headrests Headrests with a fl at, contoured or adjustable winged headpiece can be purchased (see Figure 23a). The adjustable winged headpiece allows each wing to adjust independently from almost fl at to perpendicular, providing more depth and width possibilities. Figure 23a To attach and adjust headrest height, press white button (A), insert metal headrest... -
Page 24: Whitmyer Adapter Plate
fi eld modifi cation is correctly and safely Figure 24b completed. Rifton does not recommend nor guarantee that the Whitmyer headrest will satisfy the needs of the customer. Rifton is not responsible for the installation or safe use of Whitmyer products. -
Page 25: Lateral Supports
Lateral supports Lateral supports provide comfortable lateral support for the user and are fully adjustable in height, width and angle. They can be purchased either with or without chest strap attached. To attach and/or adjust lateral support (A), loosen black knob (B) and insert the key (C) into extrusion (D) behind backrest (see Figure 25a). -
Page 26: Chest Strap
Chest strap To prevent falls, Chest WARNING strangulation, head strap Lateral Support entrapment or other injuries: • Always use seatbelt or pelvic harness when the tray, chest straps, thigh Loop belt, mini trunk support, or butterfl y harness are in use. Figure 26a •... -
Page 27: Butterfl Y Harnesses
Butterfl y harness Harness pad To prevent falls, WARNING strangulation, head entrapment or other injuries: • Always use seatbelt or pelvic harness when the tray, chest straps, thigh belt, mini trunk support, or butterfl y harness are in use. • Ensure correct adjustment and positioning of the butterfl... -
Page 28: Thigh Belt
Thigh belt To prevent falls, WARNING strangulation, head entrapment or other injuries, always use seatbelt or pelvic harness when the tray, chest straps, thigh belt, mini trunk support, or butterfl y harness are in use. A thigh belt can provide additional support and security for user’s thighs and helps Slide adduct user’s knees. -
Page 29: Pelvic Harness
Pelvic harness Pelvic harness To prevent falls, WARNING strangulation, head entrapment or other injuries, always use seatbelt or pelvic harness when the tray, chest straps, thigh belt, mini trunk support, or butterfl y harness are in use. Slot Clip The pelvic harness may be used in place of a seatbelt as the primary means of securing Buckles a user in the chair. -
Page 30: Hip Guides
Hip guides Armrest Hip guides give additional lateral support to the user’s hips and can be adjusted Hip guide independently for best fi t. Hip guides are clipped to arm supports, either armrests or forearm promps, and White button can be removed along with arm supports for transfers. -
Page 31: Abductor
Abductor The abductor keeps the user’s knees comfortably apart. Abductor Before attaching abductor, remove leg button prompts, if present. Abductor slot To attach abductor, insert abductor post into slot centered directly beneath front of seat. Reach below slot and press white abductor button to insert abductor post into slot (see Figure 31a). -
Page 32: Leg Prompts And Ankle Straps
Leg prompt Leg prompt can be used in place of an abductor providing both abduction and adduction. Leg prompt Before attaching leg prompt, remove abductor, if present. To attach leg prompt, insert leg prompt post (A) into slot (B) centered beneath front of seat. -
Page 33: Sandals And Wedges
Sandals and Wedges Sandals provide positive positioning of the user’s feet and require the footboard. Adding wedges beneath sandals allows for custom fi t of sandal height and tilt. Sandal bases come as a left and right pair. Knob To attach, position sandal base on Sandal base footboard above one of the pairs of screw Screw thread... -
Page 34: Lumbar And Seat Support Kit
Lumbar and seat support kit Backrest pad The lumbar and seat support kit can Lumbar be custom-cut and fi tted to give extra support postural support. Seat pad The lumbar support secures behind the Seat support backrest pad for additional low back support. -
Page 35: Tray
Tray To prevent falls, WARNING strangulation, head Handle entrapment or other injuries, always use seatbelt or pelvic harness when the tray, chest straps, thigh belt, mini trunk Armrest support, or butterfl y harness are in use. The tray provides a work, play and feeding surface and adjusts in height, angle, and Figure 35a depth. -
Page 36: Push Handles
Push handles Push handles provide an ergonomic way for a caregiver to maneuver chair and transport user. Push handle There is a left and right push handle. To attach push handle, press snap button Snap button at bottom of handle and insert it into one of the extrusions at rear of backrest. -
Page 37: Mini Kit
Mini kit (R820 & R830 only) Mini backrest To prevent falls, Mini trunk WARNING insert strangulation, head support entrapment or other injuries: • Always use seatbelt or pelvic harness when the tray, chest straps, thigh belt, mini trunk support, or butterfl y harness are in use. -
Page 38: Maintenance, Cleaning And Warranty
The straps with hook and loop closures may be laundered. Engage the closures before washing. Do not iron. Warranty Statement If a Rifton product breaks or fails in service during the fi rst year, we will replace it free of charge. -
Page 39: Materials And User Modifi Cations
• Plastic components are typically injection molded from a variety of industrial resins. All materials are latex, lead and phthalates free. User modifi cations To prevent serious injury or death, do not modify or alter Rifton WARNING products or components, or use Rifton products or components in conjunction with products from other manufacturers. - Page 40 Use only replacement parts supplied by Rifton Equipment. We are glad to supply replacement parts. Although Rifton makes every effort to supply correct parts and instructions for repairing or refurbishing your equipment, you are responsible to make sure that the repairs or modifi cations are correctly and safely completed.
Need help?
Do you have a question about the R820 and is the answer not in the manual?
Questions and answers