Table of Contents
Advertisement
Quick Links
Advertisement
Table of Contents

Related Manuals for Rifton S420


Summary of Contents for Rifton S420
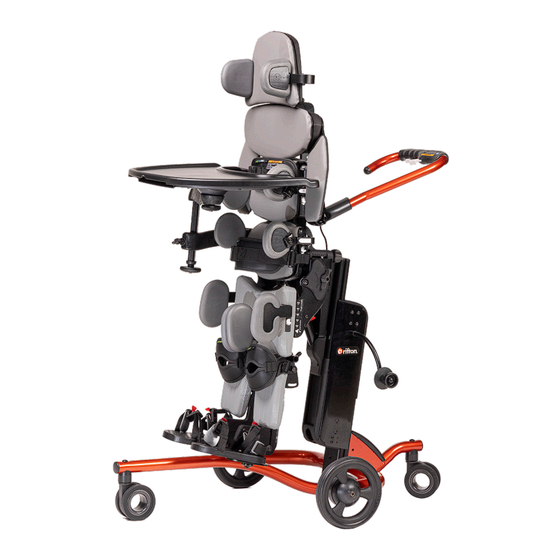
- Page 1 Stander Size 2 Rifton Stander Size 2 S420 Product Manual...
-
Page 2: Table Of Contents
Conversion kits Optional components Tray; Medial/lateral thigh supports 17–18 Head laterals; Headrest adapter plate Butterfly harness; Prone knee cuffs Operation Positioning basics 21– 23 Transfers Prone/Supine conversion 24–25 Materials; Maintenance Cleaning; Warranty; User modifications Contact information © 2023 Rifton Equipment... -
Page 3: Important Information; Check Your Order
Rifton products and parts. Check your order Your Rifton Stander comes assembled in one carton, though you may need to attach some of the components. Check that all required components and the optional components you selected are present. (You may not have ordered all of the available components.) If your shipment is incomplete or in any way damaged on arrival, please call Customer Service, 800.571.8198. -
Page 4: Safety Messages
○ Immediately remove this product from use when any condition develops that might make operation unsafe. ○ Do not use Rifton components or products for any purpose other than their intended use. -
Page 5: Recommended Use; User And Item Dimensions
Recommended use The Rifton Stander is a Class 1 medical device. It is intended to support people with disabilities in standing position, providing the health and therapeutic benefits of supported standing. The Rifton Stander allows for growth and can be configured for prone or supine standing. -
Page 6: Critical Supports
Critical supports To avoid falls or WARNING strangulation, always ensure the correct straps and supports are used in each configuration. The infographic to the right shows the minimum straps and supports required for safe positioning in prone and supine standing. These minimum supports are denoted throughout this guide by for supine and... -
Page 7: Basic Item Frame
Basic item frame Product can tip over WARNING if used incorrectly. Always engage brakes during transfers and standing. Wheels / Brakes Release Lock The wheeled base has two large wheels on the side and casters at the front and rear for excellent maneuverability. When the Stander is loaded, the rear caster is intentionally raised slightly off the floor, which helps when negotiating doorsills or... -
Page 8: Tilt Adjustment; Body Support; Trunk Laterals
Tilt adjustment To prevent falls or WARNING other injury, ensure all straps are secure and knobs tight before tilting user to a standing position. The body support can be adjusted from horizontal to completely vertical (90°). Grasp the caregiver handle Figure 8a: firmly and squeeze the double trigger to adjust the body support angle. -
Page 9: Strap Attachment; Leg Supports
Strap attachment All straps on the body support attach with similar clips. Insert the tip of the clip into Figure 9a: corresponding socket behind the body support and pull forward until it clicks. Pull the clip back away from the pad to remove the strap. -
Page 10: Hip Depth Adjustment; Abduction; Sandals
(A) behind the hip support pad. Read the position on the indicator (B) near the knob. Abduction Figure 10a The Rifton Stander provides independent abduction up to 30° for each leg. Loosen knob (C) behind the Figure 10b: hip joint to adjust hip abduction. -
Page 11: Basic Item Prone
Basic item PRONE See pages 7 – 10 for base frame, body support, leg, sandal, and height adjustments. Trunk strap To prevent falls or WARNING other injury, all users should be secured with a trunk strap (standard or rotation control) in prone standing. -
Page 12: Basic Item Supine
Basic item SUPINE See pages 7 – 10 for base frame, body support, leg, sandal, and height adjustments. Upper trunk support The upper trunk support includes head and arm support and attaches to the top of the body support. Attaching Figure 12a To attach the upper trunk Figure 12a:... -
Page 13: Headrest; Trunk Strap
Headrest The headrest is attached to the Figure 13a: upper trunk support and provides posterior support for the user’s head. Adjust the headrest forward and back using the knob (A) behind it. Attach optional head laterals for additional support (see p. 17). Trunk strap Figure 13a To prevent falls or... -
Page 14: Hip Strap; Knee Straps
Supine hip strap SUPINE ONLY A hip strap (standard or rotation control) is required for supine standing. The padded supine hip strap Figure 14a: provides support around the hips and positions the user securely on the body support. To attach the hip rotation Figure 14a Figure 14b: control strap, detach the bottom end of... -
Page 15: Basic Item Multi-Position
Basic item MULTI-POSITION The multi-position option has all the features and components of both Prone and Supine Standers described above and may include any of the optional components selected as well. The multi- position option enables both prone and supine configurations. Your device can be upgraded from a prone or supine stander to a multi-position stander with the appropriate upgrade kit. -
Page 16: Optional Components
Optional components Tray Attaching The tray has a single mounting Figure 16a: point at the side of the Stander, and may be used in either Prone or Supine standing. To attach the tray, insert the bolt on the tray arm into the socket at the side of the Stander. -
Page 17: Head Laterals; Headrest Adapter Plate
Headrest adapter plate For customers wishing to Figure 17b: mount a different headrest on the Size 2 Rifton Stander, we offer an Adapter Plate. This fits the Whitmeyer M2100-WB Figure 17a headrest mounting bracket or Whitmeyer Onyx Headrest Support System, the Stealth SBM300, as well as other similar mounting systems. - Page 18 Rifton does not recommend or guarantee that another manufacturer’s headrest will safely satisfy the needs of the customer. Rifton is not responsible for the installation or safe use Figure 18a of another manufacturer’s products.
-
Page 19: Butterfly Harness; Prone Knee Cuffs
Butterfly harness To prevent WARNING strangulation, always attach center safety strap and make sure all straps are snug before every use. In supine standing a butterfly Figure 19a: harness may be used in place of a trunk strap. The butterfly harness provides more upper trunk positioning and stabilization. -
Page 20: Operation
Operation The Rifton Stander is intended to allow users who may be unable to stand independently to be positioned safely in prone or supine standing, up to fully vertical as needed. Review the following positioning and transfer information for proper operation of this Stander, and also refer to the safety information on page 4 of this product manual. -
Page 21: Transfers
Transfers Follow these steps for easy transfer into the Stander: Prone transfer 1 (sit-to-stand transfer) Figure 21a: Measure from the center of the user’s knee to the the bottom of their foot and set lower leg length on the Stander to match. Measure from the center of the user’s hip to the center of their knee and set thigh length on the Stander to match. - Page 22 Prone transfer 2 (lifting transfer) Figure 22a: Measure from the center of the user’s knee to the bottom of their foot and set lower leg length on the Stander to match. Measure from the center of the user’s hip to the center of their knee and set thigh length on the Stander to match.
- Page 23 Supine transfer Figure 23a: Measure from the center of the user’s knee to the bottom of their foot and set lower leg length on the Stander to match. Measure from the center of the user’s hip to the center of their knee and set thigh length on the Stander to match.
-
Page 24: Prone/Supine Conversion
PRONE SUPINE conversion Multi-Position Stander only It is very important to configure the product correctly and to ensure that the correct straps and supports are used in each position. Straps have color coded tags. Use GREEN components with tags for supine BLUE positioning, and components with tags for prone positioning. - Page 25 Switching to SUPINE 1. Add upper trunk support Tilt the upper trunk support back 45° from the plane of the body support and insert the stampings into the slots. Squeeze the triggers on the back of the body support to adjust the upper trunk support down to the desired position.
-
Page 26: Materials; Maintenance
• Immediately remove this product from use when any condition develops that might make operation unsafe. • Do not use Rifton components or products for any purpose other than their intended use. • Replace or repair components or products that are damaged or appear to be unstable. -
Page 27: Cleaning; Warranty; User Modifications
Do not machine wash harness or padded straps. Warranty statement If a Rifton product breaks or fails in service during the first year, we will replace it free of charge. User modifications To prevent serious injury or death, do not modify or alter Rifton... -
Page 28: Contact Information
Use only replacement parts supplied by Rifton Equipment. We are glad to supply replacement parts. Although Rifton makes every effort to supply correct parts and instructions for repairing or refurbishing your equipment, you are responsible to make sure that the repairs or modifications are correctly and safely completed.
Need help?
Do you have a question about the S420 and is the answer not in the manual?
Questions and answers