
Related Manuals for Fritsch ANALYSETTE 28 ImageSizer


Summary of Contents for Fritsch ANALYSETTE 28 ImageSizer
- Page 1 Operating instructions PARTICLE SIZER ANALYSETTE 28 IMAGESIZER Valid starting with: 28.2000/00131 Read the instructions prior to performing any task! Translation of the original operating instructions...
- Page 2 Fritsch GmbH Milling and Sizing Industriestrasse 8 D - 55743 Idar-Oberstein Telephone: +49 6784 70-0 Email: info@fritsch.de Internet: www.fritsch.de Version 04/2022 Index 012...
- Page 3 Certifications and CE conformity Certification Fritsch GmbH has been certified by the SGS-TÜV Saar GmbH. An audit certified that Fritsch GmbH conforms to the requirements of the DIN EN ISO 9001:2015. CE Conformity The enclosed Conformity Declaration lists the guidelines the FRITSCH instrument...
-
Page 4: Table Of Contents
Stability of the mains voltage....... . . Preparation of the ANALYSETTE 28 ImageSizer..... - Page 5 Fritsch test powder F16........
- Page 6 Table of contents Maintenance..........Replacing hoses in wet dispersion units.
-
Page 7: Basic Structure
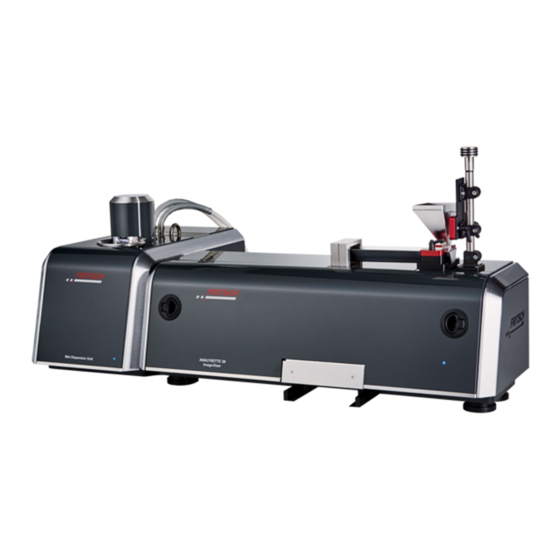
Basic structure Basic structure Funnel Funnel support column Feeder Latches Rotary knob for funnel adjustment Sample collecting vessel Height-adjustable funnel holder Housing flap... - Page 8 Basic structure 5 MP digital camera 13 Window holder 10 Lens holder 14 Falling chute (wet measuring cell holder) 11 Lens 15 Flash unit 12 Lens holder end stop 16 Main switch 17 Mains connection 18 Connection, wet dispersion unit / ultrasonic box 19 USB port...
- Page 9 Basic structure 20 Wet dispersion unit 21 ImageSizer measuring unit 22 Sample bath 23 Wet measuring cell...
-
Page 10: Safety Information And Use
Subject to technical modifications. Scope of application The ANALYSETTE 28 ImageSizer is used for the analysis of the particle shape and size of powders and bulk solids. The particle sizer has an extra-large measuring range of 20 µm to 20 mm! It is therefore an ideal device for uncomplicated quality control in various areas of application. -
Page 11: Information On Hazards And Symbols Used In This Manual
Ensure that the operating manual is always near the device. The ANALYSETTE 28 ImageSizer may exclusively be used within the scope of applications set down in this manual and within the framework of guidelines put forth in this manual. In case of non-compliance or improper use, the customer assumes full liability for the functional capability of the ANALYSETTE 28 Image- Sizer and for any damage or injury arising from failure to fulfil this obligation. - Page 12 Safety information and use NOTICE This symbol and keyword combination points out a possibly hazardous situation that can result in property damage if not avoided. Special safety information To call attention to specific hazards, the following symbols are used in the safety information: DANGER This symbol and keyword combination points out a directly haz-...
-
Page 13: Device Safety Information
Safety information and use CAUTION Risk of entrapment at the lid. Close the lid carefully. Tighten screw. Tips and recommendations This symbol emphasises useful tips and recommendations as wells as information for efficient operation without malfunc- tion. Further designations To emphasise procedure instructions, results, lists, references and other ele- ments, the following designations are used in this manual: Designation Explanation... -
Page 14: Hazardous Points
NOTICE Immediately replace damaged or illegible information signs. ■ Unauthorised alterations will void Fritsch's declaration of conformity to Euro- pean directives and void the guarantee. ■ If after reading the operating manual you still have questions or problems, please do not hesitate to contact our technical specialists. -
Page 15: Electrical Safety
The main switch separates the device from the mains on two poles. ■ Switch off the main switch if the ANALYSETTE 28 ImageSizer is to stand idle for a longer duration (e.g. overnight). In the switched-on state, the switch is illuminated red and the control lamp on... -
Page 16: Technical Data
Technical data Technical data Dimensions ImageSizer: 84 x 20 x 28 cm (width x depth x height without funnel and feed channel) Wet dispersion unit: 32 x 65 x 44 cm (W x D x H) Weight ImageSizer: 36.8 kg net Wet dispersion unit: 20.7 kg Operating noise... -
Page 17: Installation
The ImageSizer must be transported and stored in its packaging and protected from weather and outside influences. Transport over larger distances only in the original Fritsch packaging. We recommend using a forklift or pallet truck for transporting the packed device. -
Page 18: Scope Of Delivery
For lifting, reach under the base plate. Scope of delivery Please check the delivery against your order! If the delivery is incomplete or dam- aged, inform the shipping agent immediately and inform Fritsch GmbH within 24 hours. Any claims received later cannot be considered. 4.3.1... -
Page 19: Accessories Case 1 - Dry
Installation 4.3.2 Accessories case 1 - dry Standard test powder F 70 and/or F 16 13 Feeder Lens 14 Flat brush Funnel 15 Antistatic cloth 10 Lens brush 16 Optics tissue 11 Shaft cover 17 Bellows 12 Spoon spatula... -
Page 20: Accessory Case 2 - Wet Dispersion Unit
Wait for at least two hours after setup before switching on the device. ■ Place the ANALYSETTE 28 ImageSizer on an even and stable surface in an interior room. -
Page 21: Transport Securing Devices
(USB, network connections) are freely accessible. ■ Please store the transport packaging so that it can be reused if you need to return the product. Fritsch GmbH accepts no liability for damage caused by improper packaging (non-original packaging). 4.4.1... -
Page 22: Electrical Connection
10% deviation). For weak or non-interference free mains supplies (voltage peaks through inductive load changes or switched-mode power supplies), we recom- mend connecting via a voltage stabiliser and filter (Art. No. 20.6000.00). Preparation of the ANALYSETTE 28 ImageSizer Open the front flap (7) forwards by lifting up both latches (6). -
Page 23: Connection Of The Camera To The Lens And Insertion
Installation 4.7.1 Connection of the camera to the lens and insertion Remove the caps from the camera and from the screw thread of the lens. Screw the lens hand-tight onto the camera! (a) USB connection for data transmission (b) Flash and current supply control Connect the camera as shown in the picture. - Page 24 Installation Connection, measuring unit Outlet Connection for external pump Inlet for liquids (max. 0.5 bar) Connection for measuring unit (only if the ultrasonic box is used) Mains connection socket (only if the ultrasonic box is used) Connect the supplied data cable to the "Measuring Unit" connection (1) of the dispersion unit and to one of the "Dispersion Units"...
-
Page 25: Mounting The Pressure Reducer
Installation Close the hoses as can be seen in the image to the wet dispersion unit. You can connect an external boost pump with max. 0.5 bar to the "External Pump" connection (3). This is required if you want to feed water as a measuring liquid from a separate canister to the dispersion unit. -
Page 26: Preparation Of The Computer
Installation Preparation of the computer Computers provided by Fritsch GmbH are already equipped with the software you need and can be used directly after the device has been connected. System requirements: − Intel Core i7 Quad Core processor or equivalent −... - Page 27 Installation Install the USB Camera Driver. Establish a USB connection between the ImageSizer, the camera and the PC USB 3.0 port. NOTICE When connecting the USB cable, make sure that the USB plug is in the correct position. Connecting the cable incorrectly to the ANALYSETTE 28 can result in property damage or a connection problem with the PC.
- Page 28 You can now start the installation by clicking on the "Install" button. Finish the installation by clicking on "Close". A FRITSCH ANALYSETTE 28 icon "ISS.exe" has now been placed on the desktop. To start the program without the desktop icon, proceed as follows: ■...
-
Page 29: Checking The Communication Between The Device And The Pc
Installation After initially starting the software you must specify the memory location for the measuring data. 4.10 Checking the communication between the device and the PC You have the possibility in the Image Sizing software to check whether the device has been recognised by the PC and which COM port it is installed on. -
Page 30: Checking The Communication Between The Camera And The Pc
Installation In this window, the interface used and the attached device with specifica- tions are shown automatically. If no device is displayed, a message about the possible cause of the problem appears in the bar at the top. Since the camera is connected via a USB 3.0 interface and the device is connected to the PC via USB, both interfaces are detected and precisely displayed. - Page 31 Installation ‘Setup’ under "Device settings". Then click When the camera has been recognized, you can test the image transfer and the camera function by holding a brush or pencil in the falling chute, whereby the object will be displayed in the "Camera Set-up" window. If this is the case, then the communication between the camera and the PC is functioning correctly.
-
Page 32: Using The Device
Using the device Using the device Dirt on the windows can lead to incorrect measurement results. It is therefore essential that these be cleaned. Check windows for dirt after every measurement. Depending on the type of sample, the lens, the windows and the digital camera lens must be checked for soiling before each measurement or measurement series and cleaned if nec- essary. -
Page 33: Adjusting The Camera Angle
Using the device Tilt the lens backwards and remove the flat rail runner upwards. Unscrew the lens from the camera, attach the rear lens cap and store in the accessory case. Now, as described in ⮫ Chapter 4.7.1 ‘Connection of the camera to the lens and insertion’... -
Page 34: Funnel Holder 250 Ml
Using the device Loosen the two clamping screws and position the feeder under the 2 fasteners. Re-tighten the clamping screws. Pay attention to the falling chute when positioning the feeder. The over- hang of the channel has to be adjusted to the type and size of particles. The scale has to be visible on the front, to the left of the clamp. -
Page 35: Adjusting The Funnel Height
Open the housing flap. Unlock the centring plate and hinge it backwards. Close the housing flap again. Place the wet dispersion unit in front of or next to the ANALYSETTE 28 ImageSizer. Insert the wet measuring cell in the ANALYSETTE 28 ImageSizer . -
Page 36: Selecting The Liquids
Using the device 5.3.2 Selecting the liquids Fritsch GmbH recommends using fresh water of drinking water quality with medium hardness as measuring liquid for the dispersion unit. Your water supplier can inform you about your hater hardness. In order to avoid measurement artefacts, it is recommended to employ salts for water softening in case of high hardness degrees (for example tetrasodium diphosphate). -
Page 37: Filling The Measuring Circuit
Using the device DANGER The following must not be used: Ketones (e.g. acetone, propanone, butanone, cyclohexanone), Ether, chlorofluorocarbons, Amines, freone 21-32, methanol, aniline, benzol Chlorinated hydrocarbons like acetic acid and its derivatives, undiluted acids and bases. DANGER When using harmful liquids be sure to observe the valid safety regulations (MAC values). -
Page 38: Sample Addition
This will indicate contamination or malfunctions in your system. Measure the supplied Fritsch test powder F16 with the ANALYSETTE 28 Image- Sizer as follows: Set the device to I (On) with the main switch. -
Page 39: Fritsch Test Powder F70
This will indicate contamination or malfunctions in your system. Measure the supplied Fritsch test powder F70 with the ANALYSETTE 28 Image- Sizer as follows: Set the device to I (On) with the main switch. - Page 40 Using the device In this project case you can select the SOP "F70 Standard measure" by clicking on "New measurement". SOP refers to a Standard Operating Procedure used in our software. In an SOP, work steps are pre-defined and processed with a single keystroke. Ensure that you select the SOP which is suitable for your device.
-
Page 41: Accessories
You can find this in the ImageSizing Software under Configuration - Device selection! To use the ANALYSETTE 28 ImageSizer for wet measurements, you need the wet dispersion unit with the flow measuring cell (28.2600.00) and the associated lens. The following lenses are available: Telecentric lens for particle sizes from 5 - 1000 µm. -
Page 42: Immersion Pump Set
Accessories 6.2.1 Immersion pump set The immersion pump set (22.2129.00) is required if you would like to connect a separate storage container for measuring liquid to the wet and small volume wet dispersion unit. The set contains: ■ A 12 V immersion pump ■... -
Page 43: Cleaning
Cleaning Cleaning Depending on the type of sample, the lens, the windows and the digital camera lens must be checked for soiling before each measurement or measurement series and cleaned if nec- essary. Also, if smearing or permanent dots can be seen in the picture transmitted by the camera during camera adjustment or when making a measurement, the components mentioned must be checked and cleaned, as described in ⮫ ... -
Page 44: Removing The Window Holder
Cleaning 7.3.1 Removing the window holder The holders for the two windows are attached to the falling chute by four magnets each. Holders with optical glass panes To remove the holders, simply tilt the handle of the holder forwards. In this way, the magnets are released and the holders can be pulled out. On reinsertion, the magnetic attraction ensures correct positioning. -
Page 45: Cleaning The Wet Measuring Cell
Cleaning Set the pump power to maximum and add 10 ml of sand (feed particle size between 1 and 2 mm) to the sample bath. Let the pump run for approx. 2 minutes. Then rinse the system 2 - 3 times to rinse out all the dirt. -
Page 46: Preparation
Cleaning NOTICE When depositing the measuring cell, ensure that the measuring cell glasses do not get scratched. 7.6.2 Preparation Have the following ready: ■ Slotted screwdriver for bits with T20 Torx bit ■ Lens cleaning paper ■ Clean paper towels ■... -
Page 47: Removing The Wet Measuring Cell
Cleaning 7.6.4 Removing the wet measuring cell Although the measuring circuit should be completely without liquid, it is possible that liquid residues remain in the measuring cell itself. As a precaution use a paper towel or similar to immediately collect liquid flowing out. Lift the measuring cell drawer out of the measuring unit and place it on a prepared piece of paper towel. -
Page 48: Sealing Rings
Cleaning 7.6.5.1 Measuring cell glasses The following cleaning method for the measuring cell glasses has proven suc- cessful: Rinse the glasses with a spray bottle, filled with the measuring liquid used, until no more major soiling is visible. Then place the optics tissue on the inside of the glass and moisten it with the measuring liquid and a drop of tenside (Pril ), so that the paper clings to the glass surface. - Page 49 Cleaning To do this start the MaS control software, open the measuring results and select a measurement. The measuring results folder opens. Now click on the "New Measurement" button and select the SOP "Clean / Fill". The system then rinses itself and fills up with measuring liquid.
- Page 50 − Put safety equipment back into operation after mainte- nance or repair work. Die ANALYSETTE 28 ImageSizer is - with the exception of regular cleaning - maintenance-free. We recommend keeping a safety logbook ⮫ Chapter 13 ‘Safety logbook’ on page 58, where all work (maintenance, repairs..) performed on the device is entered.
- Page 51 Repairs Repairs DANGER Mains voltage! − Before beginning with repair work, unplug the mains plug and protect the device against being unintentionally switched back on. − Indicate repair work with warning signs. − Repair work may only be performed by specialised per- sonnel.
- Page 52 Repairs Fault description Cause Remedy Section While setting the camera in the Protective lens cap not removed Remove protective lens cap (see ⮫ "Measurement settings" configura- 4 on page 23 ) tion item, a black image is shown. Camera not connected correctly Check the camera connections! Start the Section 2 on page software again! (see ⮫ ...
- Page 53 FRITSCH is not obliged to take back used FRITSCH devices. FRITSCH declares it is prepared to take back used FRITSCH devices for recycling or disposal free of charge whenever a new device is purchased. The used FRITSCH device must be delivered free of charge to a FRITSCH establishment.
- Page 54 Rectification may take the form of either repair or replacement of the device, at our sole discretion. The guarantee may be redeemed in all countries in which this FRITSCH device is sold with our authorisation.
- Page 55 NOTICE Please note that in the event that the device must be returned, the device must be shipped in the original Fritsch packaging. Fritsch GmbH denies all liability for any damage due to improper packaging (packaging not from Fritsch).
- Page 56 The supplied products as well as this operating manual conform to the current state of the art when they leave the sphere of influence of FRITSCH GMBH.
- Page 57 Neither compliance with this operating manual nor the conditions and methods used during installation, operation, use and maintenance of the product can be monitored by Fritsch GmbH. Improper execution of the installation can result in property damage and thus endanger persons. Therefore, we assume absolutely...
- Page 58 Safety logbook 13 Safety logbook Date Maintenance / Repair Name Signature Date Maintenance / Repair Name Signature...
- Page 59 Safety logbook Date Maintenance / Repair Name Signature...
- Page 60 Wet dispersion unit Fritsch test powder Connections........23 Measuring F16.
- Page 62 © 2013 Fritsch GmbH Milling and Sizing Industriestrasse 8 D - 55743 Idar-Oberstein Telephone: +49 6784 70-0 Email: info@fritsch.de Internet: www.fritsch.de...
Need help?
Do you have a question about the ANALYSETTE 28 ImageSizer and is the answer not in the manual?
Questions and answers