
Subscribe to Our Youtube Channel
Related Manuals for Fritsch PULVERISETTE 11


Summary of Contents for Fritsch PULVERISETTE 11
- Page 1 Operating instructions KNIFE MILL PULVERISETTE 11 Valid starting with: 11.30X0/00001 Read the instructions prior to performing any task! Translation of the original operating instructions...
- Page 2 Fritsch GmbH Milling and Sizing Industriestraße 8 D - 55743 Idar-Oberstein Telephone: +49 6784 70-0 Email: info@fritsch.de Internet: www.fritsch.de Version 07/2022 Index 014...
- Page 3 Certifications and CE conformity Certification Fritsch GmbH has been certified by the SGS-TÜV Saar GmbH. An audit certified that Fritsch GmbH conforms to the requirements of the DIN EN ISO 9001:2015. CE Conformity The enclosed Conformity Declaration lists the guidelines the FRITSCH instrument...
-
Page 4: Table Of Contents
Table of contents Table of contents Basic structure..........Safety information and use. - Page 5 Table of contents Initial start-up..........Switching on.
-
Page 6: Basic Structure
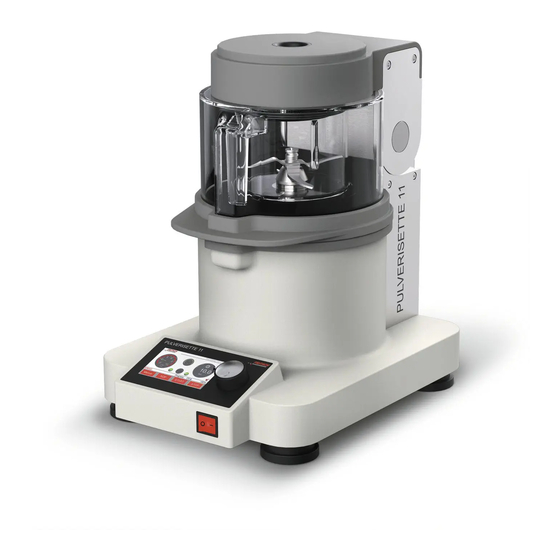
Basic structure Basic structure Silicon lid Transparent screen, hood Knife Hood handle Grinding vessel Knife coupling Bayonet lock 10 Silicon inlay Touchscreen 11 Main switch Dial... -
Page 7: Safety Information And Use
People with health problems or under the influence of medication, drugs, alcohol or exhaustion must not operate this device. The PULVERISETTE 11 may only be operated by authorised persons and serviced or repaired by trained specialists. All commissioning, maintenance and repair work may only be carried out by technically qualified personnel. -
Page 8: Operating Principle
Safety information and use The Knife Mill PULVERISETTE 11 is universally used for fast and gentle commi- nution and homogenisation of wet, oily, greasy soft, medium-hard and fibrous samples. 2.2.1 Operating principle For comminution with the Knife Mill, the knife is screwed to the grinding vessel from below and placed in the PULVERISETTE 11. -
Page 9: Information On Hazards And Symbols Used In This Manual
Safety information and use Information on hazards and symbols used in this manual Safety information Safety information in this manual is designated by symbols. Safety information is introduced by keywords that express the extent of the hazard. DANGER This symbol and keyword combination points out a directly hazardous situation that can result in death or serious injury if not avoided. -
Page 10: Device Safety Information
Safety information and use WARNING This symbol and keyword combination points out a directly hazardous situation due to movable parts. Ignoring information with this designation can result in hand injuries. WARNING This symbol and keyword combination points out a directly hazardous situation due to hot surfaces. -
Page 11: Protective Equipment
European directives and void the guarantee. ■ The PULVERISETTE 11 should only be used when it is in proper working order, as intended and in a safety- and hazard-conscious manner adhering to the operating manual. In particular, immediately rectify any malfunctions that could pose a safety hazard. -
Page 12: Opening The Hood Without Mains Connection
2.6.1 Opening the hood without mains connection Only open the PULVERISETTE 11 in this way if there are prob- lems with your mains supply or with the safety lock. Opening the mill during the grinding process could damage the device. -
Page 13: Electrical Safety
Safety information and use CAUTION Crushing hazard! − Falling accessories during installation! Wear safety shoes! CAUTION Wear safety gloves! Mind the knife blades when installing or removing cutting tools. They are very sharp and pose a cutting hazard. Electrical safety 2.8.1 General information ■... -
Page 14: Technical Data
Technical data Technical data Dimensions 320 x 430 x 480 mm (width x depth x height) Weight Net: 17.6 kg Speed ■ Speeds between 2,000 - 10,000 rpm can be set in increments of 100 via the SOP mode. On the home screen you can set it via dial in increments of 500. ■... -
Page 15: Electrical Fuses
Technical data Electrical fuses 2 x 10 AT 1 x 1 AT 3.10 Material ■ Maximum feed size 40 mm ■ Maximum feed quantity 1300 ml 3.11 Final fineness The final fineness depends highly on the sample and the comminution parame- ters. -
Page 16: Installation
Then lift the device out of the wooden crate or cardboard box. ■ Please store the transport packaging so that it can be reused if you need to return the product. Fritsch GmbH accepts no liability for damage caused by improper packaging (packaging that is not from Fritsch). ■... -
Page 17: Scope Of Delivery
Never operate the mill while it is standing on the transport pallet! Scope of delivery Compare the contents of the delivery with your order and the attached shipping papers. ■ PULVERISETTE 11 ■ Grinding vessel ■ Lid for grinding vessel ■... -
Page 18: Electrical Connection
Installation Electrical connection DANGER Provide short-circuit protection! Risk of damage due to short-circuits. − Make sure that the socket is connected to a mains line protected with a residual current circuit breaker. DANGER Mains voltage! Changes to the connection line may only be made by a quali- fied person. -
Page 19: Initial Start-Up
Clamp the knife with a bayonet lock in the vessel and insert it. ■ Close the hood. ■ Press START or push the dial. ■ Check the set speed and the actual speed. ■ ‘STOP’ button. To stop the PULVERISETTE 11, release the dial or press the... -
Page 20: Using The Device
Using the device Using the device CAUTION If the grinding elements used are not genuine accessories, we assume no guarantee and exclude all liability for damage to the device or for personal injury. DANGER Explosion hazard! − When Comminution oxidisable substances, e.g. metal or coal, there is a risk of spontaneous combustion (dust explosion) if the proportion of fine particles exceeds a certain percentage. -
Page 21: Installing The Cutting Insert
Using the device Installing the cutting insert CAUTION Wear safety gloves! Mind the knife blades when installing or removing cutting tools. They are very sharp and pose a cutting hazard. The grinding vessel with a pre-installed cutting tool can be found next to the machine during unpacking. -
Page 22: Insert The Grinding Vessel
Using the device Insert the grinding vessel NOTICE Before installing the grinding vessel check if the silicon inlay and the motor coupling are installed correctly. First you have to install the silicon inlay and then the motor coupling. (See ) After closing the grinding vessel properly, place it in the Knife Mill. -
Page 23: Special Lid For Cryogenic Comminution
Using the device Insert the locking element (1) through the reduction lid (2) and screw it to the reduction slider (3). Place the lid system on the grinding vessel. Close the hood and insert the plunger (4) through the opening in the hood. -
Page 24: Closing The Hood
Using the device The special lid for cryogenic comminution serves to provide pressure equalisation in the grinding vessel. To ensure this equilibrium, exchange the sieve insert after every grinding. For comminution with liquid nitrogen or dry ice, use the grinding vessel made of stainless steel 316L, the standard knife made of stainless steel and the optionally available special lid for cryogenic comminution. - Page 25 Using the device Reverse mode If the button is shown in green, then the reverse mode is active and the cutting tool spins anticlockwise. The button is grey in the standard mode. The speed is limited to 2,000 rpm in reverse mode! Power display This indicator shows the motor utilisation.
-
Page 26: Editing Sops
Encoders A and B detect the direction of rotation and speed. The login area is intended for Fritsch internal pur- poses and requires a password for access. -
Page 27: Sop Editor
6.6.2 SOP Editor Install the driver from the download package in order to be able to connect to the PULVERISETTE 11. The SOP Editor is available for download at ⮫ www.fritsch.de/p-11/SOP and can be used as follows:... - Page 28 The SOP is loaded in the editor and can be stored on your computer. For example, if you sent a sample to the Fritsch application lab, you can request the SOP used by Fritsch here and import it into your Knife Mill via the SOP Editor. To do this, proceed as follows: Save the SOP in a folder.
-
Page 29: Programming An Interval
6.7.1 Overload If the PULVERISETTE 11 is overloaded, then the power is reduced. Depending on the type of sample material, this may result in a short-term decrease in speed. If the clogging doesn't resolve, then the device is shut down completely. -
Page 30: Switching Off
Using the device If the clogging persists, open the vessel and loosen the clog manually. For wet grinding, add a little more liquid. 6.7.2 Switching off After completing the comminution process and removing the sample material from the vessel, the Knife Mill can be switched off with the hood closed by pressing the main switch on the front panel. - Page 31 Using the device Using liquid nitrogen: ■ Fill about 150 ml liquid nitrogen into the stainless steel vessel and wear protective equipment while swirling the vessel gently. ■ After evaporating the liquid nitrogen (remaining amount approx. 50 ml), fill in the sample material. Make sure that the max. sample quan- tity is not exceeded in volume.
-
Page 32: Accessories
Fritsch standard autoclaving procedure Fritsch accessories marked as autoclavable are tested by us under the following conditions: − The accessories are sterilised by pressurised, saturated water vapour inside an autoclave. -
Page 33: Adapter For Employing The Single-Use Grinding Containers
Accessories Order no.: Article 11.3210.00 Sickle knife with serrated blade made of stainless steel, autoclavable* 11.3215.00 Sickle knife with TiN-coated serrated blade; autoclavable* 11.3270.00 Sickle knife made of stainless steel for use in the grinding vessel made of glass* 11.3271.00 Sickle knife with serrated blade made of stainless steel for use in the grinding vessel made of glass* 11.3272.00 Sickle knife with TiN-coated serrated blade made of stainless steel for use in the grinding vessel... -
Page 34: Grinding Vessel Made Of Glass
Accessories Place the grinding vessel into the adapter. Press the grinding vessel onto the coupling for that and latch it by a slight rotation in clockwise direction. Close the hood. The mill recognises the adapter automatically and thus allows for speeds up to 14,000 rpm in continuous operation. - Page 35 Accessories Fasten the knife bearing with the knurled screw until everything is firm and sealed. Check the correct assembly for leaks outside of the device. Pour 20 ml water into the vessel and check for leaking fluids from underneath.
-
Page 36: Cleaning
Fritsch standard autoclaving procedure Fritsch accessories marked as autoclavable are tested by us under the following conditions: − The accessories are sterilised by pressurised, saturated water vapour inside an autoclave. -
Page 37: Maintenance
Maintenance Maintenance DANGER Mains voltage − Before beginning with maintenance work, unplug the mains plug and protect the device against being uninten- tionally switched back on again! − Indicate maintenance work with warning signs. − Maintenance work may only be performed by specialised personnel. -
Page 38: Knife Coupling Replacement
A knife coupling (item no. 11.3205.16) is used to minimise wear on the knife holder. This knife coupling should be checked depending on the application of the PULVERISETTE 11 and whenever changing the knife. Replace the coupling with the included spare in case of visible wear. -
Page 39: 10 Repairs
‘Safety interlock not Error closing the device Acknowledge the error and check whether the closed’ grinding hood is closed completely. Then re-start the device. If the error persists, contact Fritsch Service. ‘Safety interlock not open’ Message Error closing the device Stop and re-open the device. - Page 40 The device can be used this malfunction after 10 seconds. again for 10 seconds after acknowledging the message. To resolve this problem, contact Fritsch Service. ‘Speed sensor or braking Message The braking process of the mill takes Acknowledge the message and switch off the resistor defective’...
-
Page 41: 11 Disposal
FRITSCH is not obliged to take back used FRITSCH devices. FRITSCH declares it is prepared to take back used FRITSCH devices for recycling or disposal free of charge whenever a new device is purchased. The used FRITSCH device must be delivered free of charge to a FRITSCH establishment. -
Page 42: 12 Guarantee Terms
Rectification may take the form of either repair or replacement of the device, at our sole discretion. The guarantee may be redeemed in all countries in which this FRITSCH device is sold with our authorisation. - Page 43 NOTICE Please note that in the event that the device must be returned, the device must be shipped in the original Fritsch packaging. Fritsch GmbH denies all liability for any damage due to improper packaging (packaging not from Fritsch).
-
Page 44: 13 Exclusion Of Liability
The supplied products as well as this operating manual conform to the current state of the art when they leave the sphere of influence of FRITSCH GMBH. - Page 45 Neither compliance with this operating manual nor the conditions and methods used during installation, operation, use and maintenance of the product can be monitored by Fritsch GmbH. Improper execution of the installation can result in property damage and thus endanger persons. Therefore, we assume absolutely...
-
Page 46: 14 Safety Logbook
Safety logbook 14 Safety logbook Date Maintenance / Repair Name Signature Date Maintenance / Repair Name Signature... - Page 47 Safety logbook Date Maintenance / Repair Name Signature...
-
Page 48: 15 Index
Index 15 Index Accessories......... . 32 List of errors. - Page 50 © 2017 Fritsch GmbH Milling and Sizing Industriestraße 8 D - 55743 Idar-Oberstein Telephone: +49 6784 70-0 Email: info@fritsch.de Internet: www.fritsch.de...
Need help?
Do you have a question about the PULVERISETTE 11 and is the answer not in the manual?
Questions and answers