
Subscribe to Our Youtube Channel
Related Manuals for Exodraft FR


Summary of Contents for Exodraft FR
- Page 1 Accessories FR & SVD | Read and save these instructions! Your energy. Optimized.
-
Page 3: Table Of Contents
Your energy. Optimized. Accessories | FR & SVD Content Product information Scope of supply Warranty Technical data Installation Installation - RS/RSHG model Installation - RSV/RSVG model Installation - RSHT model Installation - RHG model UK Conformity Assessed Declaration of Conformity... - Page 4 How to use this manual This manual has been prepared based on the specific product and contains relevant technical information and installations guides. Accessories and spare parts are not covered by this manual. Please refer to the individual manuals of these components. This installation manual does not contain any system design documentation.
- Page 5 Symbols The following symbols may be used in the manual to draw attention to danger or risk of personal injury or damage to the product. General prohibition Failure to observe instructions marked with the prohibited symbol may result in extreme danger or serious personal injury. General attention Marks a dangerous situation that, in the worst-case scenario, can cause serious personal injury or significant damage to the product.
- Page 6 Prior to servicing the product, disconnect the power and ensure that it cannot accidentally be reconnected. • Exodraft always recommends the use of a smoke alarm when a solid fuel fireplace is installed. • If the Exodraft fan system has been designed for solid fuel/multi fuel installations, please ensure that the design meets the requirements of BS EN15287-1.
-
Page 7: Product Information
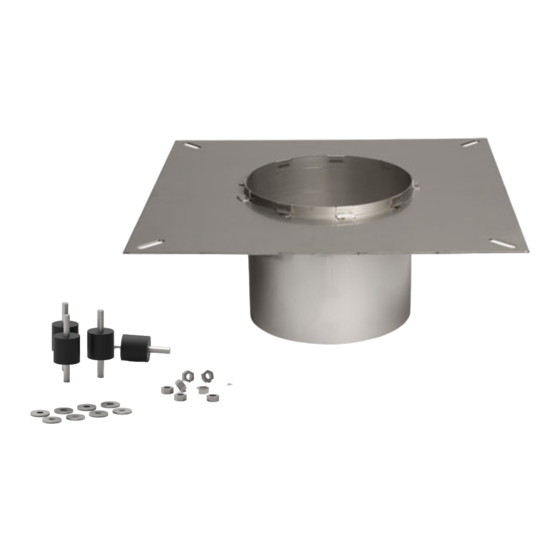
3112032_FR+SVD_UK Product information The exodraft flange system has been developed for steel chimneys to ensure that the chimney fan is placed on a flat surface. The flange creates a stable and safe transition between the chimney and chimney fan. It is made of stain- less steel and includes a set of four vibrations dampers that reduces vibrations between the chimney fan and the chimney. -
Page 8: Technical Data
Your energy. Optimized. Technical data M6 hex nut M6 washers flat Ø25x25 vibrations dampers M6 washers flat M6 hex nut FR flange Dimension [mm] Model* A [Ø] 97-247 113.80 97-247 113.80 122-347 113.80 147-447 113.80 97-147 113.80 [Ø] 300 [Ø] 300 *For more details and informations about size and models, see www.exodraftinfo.dk/datasheets/fange-system... -
Page 9: Installation
3112032_FR+SVD_UK Installation The installation is different for the different chimney fans. See the guides below for each type. Installation - RS/RSHG model Step Action Illustration The flange must be placed so that the spigot goes into the chimney! Measure the diameter of the hole in the flange. Then cut a hole in the mineral wool mat that matches. - Page 10 Your energy. Optimized. Fixate the flange to the chimney fan with the use of the vibration dampers supplied with the flange. RS og RSHG The fan assembly can now be fitted onto the steel chimney. RS og RSHG 10 | UK...
- Page 11 3112032_FR+SVD_UK Use the safety wire to secure the fan to the chimney. Apply the supplied self-cutting screw in steel chimney. Then mount the wire through the designated hole in the base plate and into the wire lock. Tighten the safety wire slightly and then tighten the wire lock, so that the chimney fan is secured when opened for service and cleaning purposes.
-
Page 12: Installation - Rsv/Rsvg Model
Your energy. Optimized. Installation - RSV/RSVG model Step Action Illustration The flange must be placed so that the spigot goes into the chimney! Measure the diameter of the hole in the flange. Then cut a hole in the mineral wool mat that matches. - Page 13 3112032_FR+SVD_UK Fixate the flange to the chimney fan with the use of the vibration dampers supplied with the flange. Be aware that the washers flat and hex nuts must be mounted inside the bottom part of the RSV/RSVG model. RSV og GSV og RSVG The fan assembly can now be fitted onto the steel chimney.
- Page 14 Your energy. Optimized. Use the safety wire to secure the fan to the chimney. Apply the supplied self-cutting screw in steel chimney. Then mount the wire through the designated hole in the base plate and into the wire lock. Tighten the safety wire slightly and then tighten the wire lock, so that the chimney fan is secured when opened for service and cleaning purposes.
-
Page 15: Installation - Rsht Model
3112032_FR+SVD_UK Installation - RSHT model Step Action Illustration The flange must be placed so that the spigot goes into the chimney! Measure the diameter of the hole in the flange. Then cut a hole in the mineral wool mat that matches. - Page 16 Your energy. Optimized. Fixate the flange to the chimney fan with the use of the vibration dampers supplied with the flange. RS og RSHG RS og RSHG RS og RSHG RS og RSHG RS og RSHG The fan assembly can now be fitted onto the steel chimney.
- Page 17 3112032_FR+SVD_UK Use the safety wire to secure the fan to the chimney. Apply the supplied self-cutting screw in steel chimney. Then mount the wire through the designated hole in the base plate and into the wire lock. Tighten the safety wire slightly and then tighten the wire lock, so that the chimney fan is secured when opened for service and cleaning purposes.
-
Page 18: Installation - Rhg Model
Your energy. Optimized. Installation - RHG model Step Action Illustration The flange must be placed so that the spigot goes into the chimney! Measure the diameter of the hole in the flange. Then cut a hole in the mineral wool mat that matches. - Page 19 3112032_FR+SVD_UK The fan assembly can now be fitted onto the steel chimney. Before taking the fan into operation, please make sure that: • the nuts in the flange have been tightened. • the connection on the armoured cable has been fastened. The armoured cable must hang straight down from the fan.
-
Page 20: Uk Conformity Assessed
UK Conformity Assessed UK Conformity Assessed Exodraft a/s Industrivej 10 DK-5550 Langeskov Hereby declares that the following products: FR1, FR2, FR3, FR4, FR5 Were manufactured in conformity with the provisions of the following regulations: The Supply of Machinery (Safety) Regulations 2008... -
Page 21: Declaration Of Conformity
EU-Vaatimustenmukaisuusvakuutus Déclaration de conformité de l’Union Européenne ESS-Samræmisstaðfesting EU-Samsvarserklæring Dichiarazione di Conformità Unione Europea EU Deklaracja zgodności Exodraft a/s Industrivej 10 DK-5550 Langeskov Erklærer på eget ansvar, at følgende produkter: Veklaart dat onderstaande producten: Hereby declares that the following products: Deklarerar på... - Page 24 DE: Exodraft a/s Niederlassung Deutschland Soonwaldstr. 6 DE-55569 Monzingen Tel: +49 (0)6751 855 599-0 Fax: +49 (0)6751 855 599-9 info@exodraft.de www.exodraft.de FR: Exodraft sas 78, rue Paul Jozon FR-77300 Fontainebleau Tel: +33 (0)6 3852 3860 info@exodraft.fr www.exodraft.fr Your energy. Optimized.
Need help?
Do you have a question about the FR and is the answer not in the manual?
Questions and answers