
Subscribe to Our Youtube Channel
Related Manuals for Exodraft Draftbooster


Summary of Contents for Exodraft Draftbooster
- Page 1 Chimney Fan Draftbooster | Read and save these instructions! Your energy. Optimized.
-
Page 3: Table Of Contents
Precautions and user instructions Mechanical installation Minimum distance Assembly parts Assembling the bottom flange Installing the bottom flange and wire on the Draftbooster Installation onto a brick chimney Installation onto a steel chimney Electrical wiring Startup and configuration System testing... - Page 4 How to use this manual This manual has been prepared based on the specific product and contains relevant technical information and installations guides. Accessories and spare parts are not covered by this manual. Please refer to the individual manuals of these components. This installation manual does not contain any system design documentation.
- Page 5 Symbols The following symbols may be used in the manual to draw attention to danger or risk of personal injury or damage to the product. General prohibition Failure to observe instructions marked with the prohibited symbol may result in extreme danger or serious personal injury. General attention Marks a dangerous situation that, in the worst-case scenario, can cause serious personal injury or significant damage to the product.
- Page 6 Prior to servicing the product, disconnect the power and ensure that it cannot accidentally be reconnected. • Exodraft always recommends the use of a smoke alarm when a solid fuel fireplace is installed. • If the Exodraft fan system has been designed for solid fuel/multi fuel installations, please ensure that the design meets the requirements of BS EN15287-1.
-
Page 7: Product Information
The fan is part of an Exodraft system and should be connected to an Exodraft controller for optimal effect. The Draftbooster comes with a Schuko plug. (Type F) If it is to be used in a country where the installations use a different connector system, a suitable adapter must be used for the product. -
Page 8: Technical Specifications
Draftbooster. If you need extra draw-out later, due to e.g. a change in weather, you simply turn on the Draftbooster again, leaving it active as long as necessary. - Page 9 3112038_Draftbooster_UK Technical data Data Motor specifications Data Motor specifications Discharge Vertical Weight 3.2 Kg Motor Shaded pole, class H A x B x C [mm] 266 x 230 x 140 Voltage 1V x 230 AC Impedance protected Max. temperature during Rev/m 2.000 250 °...
-
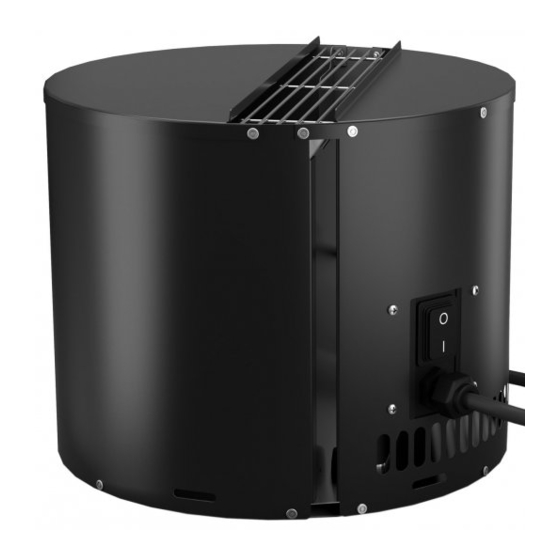
Page 10: Construction And Components
Your energy. Optimized. Construction and components Switch Cable screw joint Motor Net / outlet Vane Locking mechanism of lid Inlet air Drainholes wireless outlet with remote control and battery. Assemble kit. 10 | UK... -
Page 11: Precautions And User Instructions
Fireplaces and wood stoves used in private dwellings normally operate in a relatively stable environment, where no major pressure fluctuations occur. However, to secure an optimal use of the Exodraft system speed adjustments and adjustment of air intakes are required depending on the weather outside and on the stage of the firing process. -
Page 12: Mechanical Installation
Your energy. Optimized. Mechanical installation Positioning of the chimney fan The Draftbooster can be mounted horizontally or vertically. Be aware of national law and building regulations! Minimum distance The minimum distance to flammable materials must be at least 500 mm (national legislation must be observed)! Min. -
Page 13: Assembly Parts
3112038_Draftbooster_UK Assembly parts Assembling the bottom flange UK | 13... -
Page 14: Installing The Bottom Flange And Wire On The Draftbooster
Your energy. Optimized. Installing the bottom flange and wire on the Draftbooster 14 | UK... -
Page 15: Installation Onto A Brick Chimney
4 self-tapping screws. * This example shows the setting for an inside chimney diameter of ø150 mm. The Draftbooster can now be lowered into place with the flange legs into the chimney. Do not screw or bolt the brackets into... - Page 16 Your energy. Optimized. Use the safety wire to secure the Draftbooster to the chimney. Apply the supplied screw and rawl- plug into the brick chimney. Then mount the wire into the wire lock. Tighten the safety wire slightly and then tighten the wire lock, so that the chimney fan is secured.
-
Page 17: Installation Onto A Steel Chimney
4 self-tapping screws. * This example shows the setting for an inside chimney diameter of ø150 mm. The Draftbooster can now be lowered into place with the flange legs into the chimney. Do not screw or bolt the brackets into... - Page 18 Your energy. Optimized. The supplied steel wire must always be securely fastened both to the Draftbooster and to the chimney. Wrap the wire around the chimney and through the wire lock.Tighten the wire in a downward direction and tighten the wire lock.
-
Page 19: Electrical Wiring
The plug from the Draftbooster can now be connected and the Draftbooster can be controlled by the on / off on the remote control. (Check that the Draftbooster can be switched on and off. If not the distance between the wireless outlet and the remote control must be reduced. -
Page 20: Startup And Configuration
• Make sure that the Draftbooster is turned on, before you attempt lighting the fire. Strike a match inside the stove and keep it there, noting if the smoke from the match is being drawn towards the top of the stove and out of the chimney* •... -
Page 21: Maintenance And Troubleshooting
WARNING! Do not open the top section unless the power to the Draftbooster has been disconnected! UK | 21... -
Page 22: Troubleshooting
Check wiring and correct problem Check and remedy the problem with the Loose electrical connections connections There is power to the Draftbooster Change the battery but it is not working The voltage setting is too low Reduce the distance between the wireless... -
Page 23: Uk Conformity Assessed
UK Conformity Assessed UK Conformity Assessed Exodraft a/s Industrivej 10 DK-5550 Langeskov Hereby declares that the following products: DB7B01, DB7B02, DB7S01, DB7S02 Were manufactured in conformity with the provisions of the following regulations: The Supply of Machinery (Safety) Regulations 2008... -
Page 24: Declaration Of Conformity
EU-Vaatimustenmukaisuusvakuutus Déclaration de conformité de l’Union Européenne ESS-Samræmisstaðfesting EU-Samsvarserklæring Dichiarazione di Conformità Unione Europea EU Deklaracja zgodności Exodraft a/s Industrivej 10 DK-5550 Langeskov Erklærer på eget ansvar, at følgende produkter: Veklaart dat onderstaande producten: Hereby declares that the following products: Deklarerar på... - Page 28 DK: Exodraft a/s Industrivej 10 DK-5550 Langeskov Tel: +45 7010 2234 Fax: +45 7010 2235 info@exodraft.dk www.exodraft.dk SE: Exodraft a/s Kalendevägen 2 SE-302 39 Halmstad Tel: +46 (0)8-5000 1520 info@exodraft.se www.exodraft.se NO: Exodraft a/s Storgaten 88 NO-3060 Svelvik Tel: +47 3329 7062 info@exodraft.no...
Need help?
Do you have a question about the Draftbooster and is the answer not in the manual?
Questions and answers