Table of Contents
Advertisement
Quick Links
Motorized FlexStyle
Motor operated open roll shade with low-profile decorative brackets
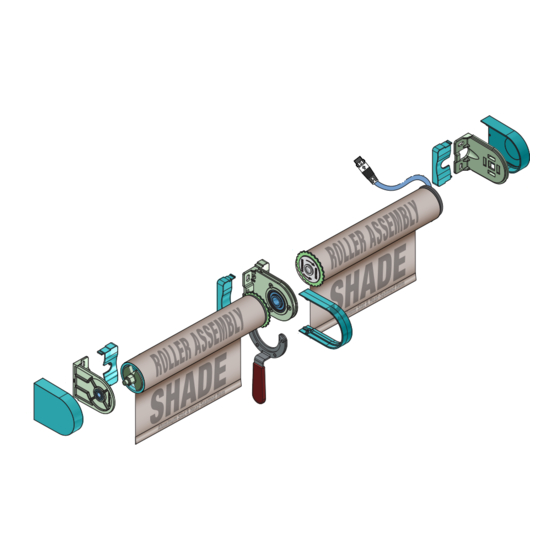
Overview - Components
FLEXSTYLE C*MO
These instructions apply to all Draper
window shades using the following motors:
120VAC MOTORS
Intelliflex I/O D45AE-6/28 AC120V 6Nm
Somfy Round Head 50mm or 500 Series
Sonesse Ultra RH RTS 6/24
#1002564
(Uq)
506s2 Sonesse RH 6/32
#1001812 0.58
(Qt50)
Sonesse Ultra RH 6/24
#1002560
(Uq)
24VDC MOTORS
Square Head 504A8 Sonesse Ultra DC 485 4/25 24VDC
Square Head 504A8 Sonesse Ultra DC RTS 4/25 24VDC 0.66
B R A
C K E
T
C A P
I D L
B R A
E R
C K E
B R A
T
C K E
C O V
T
E R
Contents
Overview - Components .......................................................................................1
PLEASE READ - Important Safety & Installation Information ........................2
PLEASE READ - Field Adjustments, Cleaning and Maintenance ...................2
Section 1 - Operating the Retractable Coupler Shaft .....................................3
Section 2 - Brackets and Couplers ....................................................................3
Section 3 - Mounting Roller Assemblies, Couplers, and Brackets ...............4
Section 4 - Fabric/Roller Assembly Alignment ................................................6
TM
(Coupled)
Motorized FlexStyle
®
TM
C O U
P L E
R
C O U
P L E
R
C A P
L O C
K I N
G
R I N
G
C O U
P L E
C O V
R
E R
S P A
N N E
W R
R
E N C
H
TOOLS REQUIRED
PENCIL
TAPE MEASURE
LASER LEVEL
Section 5 - Bracket & Coupler Covers ...............................................................7
Section 7 - Limit Switch Adjustments ...............................................................8
Section 8 - Electrical Connections .....................................................................8
Section 9 - Bracket & Coupler Dimensions ....................................................11
Section 10 - Coupled Shades Dimensions ......................................................12
© 2022 All Rights Reserved
INSTRUCTIONS
INSTALLATION & OPERATION
B R A
C A P
C K E
Read and understand
all warnings before
beginning installation.
(Page 2 of this document)
LEVEL
POWER DRILL
If you have any difficulties installing or servicing your
Motorized FlexStyle
(Coupled), call your dealer or Draper, Inc.
TM
Draper, Inc. | 411 S. Pearl St. Spiceland, IN 47385
draperinc.com | 765.987.7999 | 800.238.7999
|
FORM: Coupled_FlexStyle_MO_Inst22
B R A
C K E
C O V
T
E R
M O
T O R
B R A
C K E
T
T
CAUTION
HARDWARE
(by others)
....................7
Advertisement
Table of Contents

Related Manuals for Draper FlexStyle C MO Series


Summary of Contents for Draper FlexStyle C MO Series
-
Page 1: Table Of Contents
If you have any difficulties installing or servicing your Motorized FlexStyle (Coupled), call your dealer or Draper, Inc. Draper, Inc. | 411 S. Pearl St. Spiceland, IN 47385 draperinc.com | 765.987.7999 | 800.238.7999 FORM: Coupled_FlexStyle_MO_Inst22 © 2022 All Rights Reserved... -
Page 2: Please Read - Important Safety & Installation Information
Even with this testing, some field Most standard Draper fabrics may be cleaned at the window by vacuuming with a soft brush adjustments may be needed for telescoping. attachment. They also may be cleaned by using a sponge or soft cloth and mild solution of warm soapy If the shade is telescoping, place a piece of shimming water. -
Page 3: Section 1 - Operating The Retractable Coupler Shaft
Motorized FlexStyle (Coupled) page 3 of 12 RECOMMENDED PERSONNEL Please Note: Draper recommends that a team of at least two people install this product. ® Caution: Before beginning installation, practice extending and retracting the coupler shaft in a fabric/roller assembly, following instructions in the "Operating the Retractable Coupler Shaft" section below. -
Page 4: Section 3 - Mounting Roller Assemblies, Couplers, And Brackets
Motorized FlexStyle (Coupled) page 4 of 12 Section 3 - Mounting Roller Assemblies, Couplers, and Brackets Caution: Before mounting shades, verify measurements on the card provided with the shade, and ensure the brackets are installed at the correct width. Please Note: Use measurements instead of Attach motor end of roller to the roller to determine placement. - Page 5 Motorized FlexStyle (Coupled) page 5 of 12 Install the next coupler mounting surface. CAUTION: The end of the previously- installed coupler shaft should be flush with the outside edge of the bearing. If coupler shaft extends beyond the bearing, retract coupler shaft of the SHAFT HALF previously installed roller to...
-
Page 6: Section 4 - Fabric/Roller Assembly Alignment
Motorized FlexStyle (Coupled) page 6 of 12 Section 4 - Fabric/Roller Assembly Alignment Please note: If needed, the fabric panel heights can be adjusted so that the bottom edges of the fabric panels are aligned. On large units, this procedure should be done on only one panel at a time to minimize the amount of fabric weight that must be supported during the adjustment procedure. -
Page 7: Section 5 - Bracket & Coupler Covers
Motorized FlexStyle (Coupled) page 7 of 12 Section 5 - Bracket & Coupler Covers Slide Bracket Caps over Please Note: Ensure Brackets and Couplers. that Bracket and Coupler Covers SNAP into place. Slide Covers over Brackets and Couplers. Section 6 - Removing Bracket Covers (Must be ordered separately.) Please Note: The Cover Removal Tool is available if bracket covers need to be detached for any reason. -
Page 8: Section 7 - Limit Switch Adjustments
All operating switches should be “off” before power is connected. Please Note: For low-voltage wiring requirements, Draper recommends consulting with a professional low-voltage electrical contractor. It is very important that shielded and stranded CAT 5 cable be used to prevent any electrical interference. - Page 9 30.5 cm wires from the motor to the switch. Standard Do not wire motors in parallel without written permission from Draper. M12 Connector 1 - BLACK 2 - WHITE 2 - WHITE Telis 1 RF Remote Ø...
- Page 10 Motorized FlexStyle (Coupled) page 10 of 12 Controls & System Overview Controls & 120VAC Motors AV Gateway AV Gateway Contact Closure Handheld Interface Remote Wireless Network Network Network Device Connector Device Connector Device Connector Gateway Network Network Network Network Device Connector Device Connector Device Connector Device Connector...
-
Page 11: Section 9 - Bracket & Coupler Dimensions
Motorized FlexStyle (Coupled) page 11 of 12 Section 9 - Bracket & Coupler Dimensions C002.1822 (Idler End, Extended) C002.1820 (Motor End, Extended) 2 " 2 " (59mm) (59mm) " " (17mm) (17mm) " " (5mm) (5mm) " " " " "... -
Page 12: Section 10 - Coupled Shades Dimensions
Section 10 - Coupled Shades Dimensions COUPLER ASSEMBLIES IDLER MOTOR BRACKET BRACKET Idler Shade Panel Intermediate Panel Intermediate Panel Intermediate Panel Motor Shade Panel * This dimension may be larger, depending on motor selection. Contact Draper for motor verification. ®...
Need help?
Do you have a question about the FlexStyle C MO Series and is the answer not in the manual?
Questions and answers