Advertisement
Quick Links
Quick Start Guide
MX10004
IN THIS GUIDE
Step 1: Begin | 1
Step 2: Up and Running | 8
Step 3: Keep Going | 12
Step 1: Begin
SUMMARY
In this guide, we provide a simple, three-step path, to quickly
get you up and running with your new MX10004 router.
We've simplified and shortened the installation and
configuration steps. You'll learn how to install the MX10004
in a rack, power it up, and configure basic settings.
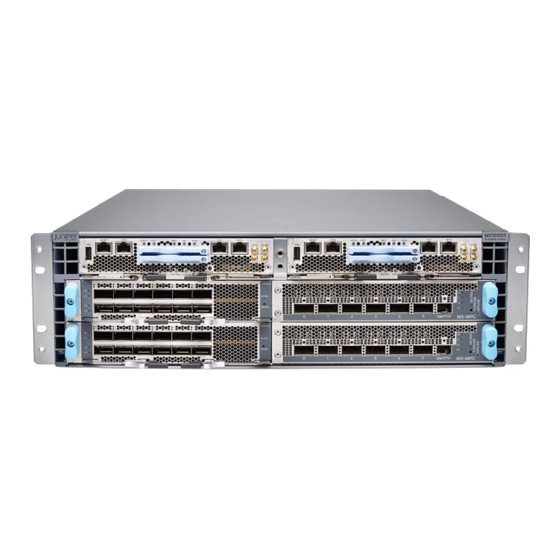
Meet the MX10004
®
The Juniper Networks
MX10000 line of modular packet-routing transport routers. At only 7 U in height, the MX10004 is designed for today's
space-constrained facilities. The MX10004 supports Juniper's 400 GbE architecture with inline Media Access Control
Security (MACsec) on all ports for point-to-point security on Ethernet links. MX10004 provides 1 GbE, 10 GbE, 25 GbE,
40 GbE, 50 GbE, 100 GbE, or 400 GbE modular solutions that support up to 38.4 Tbps of throughput.
MX10004 is the most compact, high-density, and power-efficient modular chassis in the
IN THIS SECTION
Meet the MX10004 | 1
Rack It | 2
Power On | 7
Advertisement

Subscribe to Our Youtube Channel
Related Manuals for Juniper MX10004


Summary of Contents for Juniper MX10004
- Page 1 MX10004 is the most compact, high-density, and power-efficient modular chassis in the MX10000 line of modular packet-routing transport routers. At only 7 U in height, the MX10004 is designed for today’s space-constrained facilities. The MX10004 supports Juniper’s 400 GbE architecture with inline Media Access Control Security (MACsec) on all ports for point-to-point security on Ethernet links.
- Page 2 What's in the Box? | 2 What Else Do I Need? | 3 Assemble the Rack Mount Kit | 3 Mount the MX10004 in the Rack and Ground the Chassis | 4 What's in the Box? Along with your MX10004 router, you’ll find: •...
-
Page 3: What Else Do I Need
What Else Do I Need? • A mechanical lift rated for 250 lb (113.4 kg). You can mount an MX10004 router manually or by using a mechanical lift. Because of the router's size and weight, we strongly recommend that you use a mechanical lift to mount the MX10004. - Page 4 7. Attach the mounting tray to the mounting blades in the rack with the 12 Phillips 8-32 x .375 in. flat-head screws. Mount the MX10004 in the Rack and Ground the Chassis Here’s how to install the MX10004 in a four-post rack: Wrap and fasten one end of the ESD grounding strap around your bare wrist, and connect the other end to a site ESD point.
- Page 5 Align the router in front of the rack, centering it in front of the mounting tray. Lift the chassis approximately 0.75 in. (1.9 cm) above the surface of the mounting tray. Align the chassis as close as possible to the mounting tray. Carefully slide the chassis onto the mounting tray until the chassis flanges touch the rack rails.
- Page 6 11. Install the line cards: a. Remove the line card cover by grasping the handles and pulling straight out to expose the slot for the line card. Save the cover. NOTE: If you are not installing a line card do not remove the line card cover. b.
- Page 7 Power On Now that you’ve installed your MX10004 in the rack and grounded the chassis, you’re ready to connect it to power. The MX10004 supports AC, DC, high-voltage alternating current (HVAC), and high-voltage direct current (HVDC). In this guide, we show you how to connect AC power. For DC, HVAC, and HVDC installations, see...
-
Page 8: Step 2: Up And Running
IN THIS SECTION SUMMARY Connect to the Router and Enter Configuration Now that the MX10004 is powered on, let’s do some initial Mode | 8 configuration to get the router up and running on the network. It’s simple to provision and manage the MX10004 on your network. - Page 9 RCB to 22.3R1 or later. Connect the console port on the MX10004 to a laptop or PC using the supplied RJ-45 cable and RJ-45 to DB-9 adapter. The console (CONSOLE) port is located on the Routing and Control Board (RCB).
- Page 10 You can configure the router name at the [edit system] hierarchy level. [edit] host-name root@# set system host-name If your MX10004 router has two RCBs, it is recommended you use a configuration group. You can use group-name as re0 or re1. [edit] group-name system host-name host-name...
- Page 11 [edit] root@# set system services telnet NOTE: When Telnet is enabled, you cannot log in to an MX10004 through Telnet using root credentials. Root login is allowed only for SSH access. 12. (Optional) If you used one or more configuration groups, apply the configuration groups, substituting the appropriate group name.
-
Page 12: What's Next
What's Next | 12 General Information | 13 Learn With Videos | 13 Congratulations! You’ve completed the initial steps to get your MX10004 up and running. Let’s keep going and learn more about what you can do with the MX10004 router. What's Next... -
Page 13: General Information
Download, activate, and manage your software licenses to Activate Junos OS Licenses in the Juniper Licensing Guide unlock additional features for your MX Series router See, automate, and protect your network with Juniper Security Visit the Security Design Center General Information If you want to... - Page 14 Juniper Learning Portal Juniper Juniper Networks, the Juniper Networks logo, Juniper, and Junos are registered trademarks of Juniper Networks, Inc. in the United States and other countries. All other trademarks, service marks, registered marks, or registered service marks are the property of their respective owners.
Need help?
Do you have a question about the MX10004 and is the answer not in the manual?
Questions and answers