
Subscribe to Our Youtube Channel
Related Manuals for PerkinElmer IVIS Lumina XRMS III Series


Summary of Contents for PerkinElmer IVIS Lumina XRMS III Series
- Page 1 H A R D W A R E M A N U A L IVIS Lumina XRMS Series III ® December 2013 PN CLS137706 RevB...
- Page 2 Reproduction of this publication or parts thereof in any form is expressly prohibited without the express written permission of PerkinElmer. Any errors or omission which may have occurred in this publication despite the utmost care taken in its production will be corrected as soon as possible, but not necessarily immediately upon detection. PerkinElmer provides this publication "As Is"...
-
Page 3: Table Of Contents
Contents Chapter 1 Welcome ..........1 Chapter 2 Important Safety Instructions . - Page 4 Contact Information ..........24 PerkinElmer Sales and Technical Support ......24 US State Radiation Authorities .
- Page 5 ® IVIS Lumina XRMS Series III Hardware Manual Contents Acquisition Computer ......... . 43 Computer Features .
- Page 6 ® IVIS Lumina XRMS Series III Hardware Manual Contents Conducting the X-Ray Radiation Survey ......68 Maintenance and Safety Checks .
-
Page 7: Chapter 1 Welcome
For instructions on using the Living Image software, please see ® the Living Image Software User Manual for IVIS Lumina XRMS Series III (PN CLS137702RevB). If you have questions regarding this manual or the IVIS Lumina XRMS Series III, please contact PerkinElmer Technical Support (see page 24). -
Page 8: Chapter 2 Important Safety Instructions
Important Safety Instructions Safety Information Safety Symbols on page 3 Instructions on page 3 X-Ray Safety and Hazards: Regulations on page 4 Environmental Considerations for the System Components on page 5 Cleaning or Moving the System Components on page 5 Power Considerations on page 6 Servicing on page 7 Other Equipment on page 7... -
Page 9: Safety Symbols
WARNING! The IVIS Lumina XRMS Series III should be operated only by personnel who have been trained in radiation safety and the operation and safety instructions contained in this manual. PerkinElmer also recommends that personnel who operate the equipment, or are close proximity to the equipment,... -
Page 10: X-Ray Safety And Hazards: Regulations
X-ray Safety and Radiation Hazards on page 14. DO NOT operate the IVIS Lumina XRMS Series III unless an X-ray safety survey has been performed within the last 12 months. Please contact PerkinElmer Technical Support for more information (see page 24). -
Page 11: Environmental Considerations For The System Components
® IVIS Lumina XRMS Series III Hardware Manual Chapter 2 | Important Safety Instructions 2.5 Environmental Considerations for the System Components Location for the IVIS Lumina XRMS Series III Before the IVIS Lumina XRMS Series III is installed, consider the proper environment for the components. -
Page 12: Moving The Ivis Lumina Xrms Series Iii
XWS-260 workstation. Due to the risk of potential damage, it is critical that only a trained PerkinElmer technician moves the IVIS Lumina XRMS Series III. If it is necessary to relocate the instrument, contact PerkinElmer Technical Support (see page 24). -
Page 13: Overloading
24). If the IVIS Lumina XRMS Series III is damaged and requires service, unplug the instrument from the outlet and contact PerkinElmer Technical Support. Servicing by anyone other than an authorized PerkinElmer representative voids the warranty covering the IVIS Lumina XRMS Series III. -
Page 14: Chapter 3 Warnings
There are no other user serviceable electrical parts in the light source module with the exception of the line fuse. See Fuse Replacement on page 65 instructions. Contact PerkinElmer Technical Support for other electrical service needs (see page 24). -
Page 15: Eye Safety And Burn Hazard
WARNING! Do not attempt to replace the tungsten halogen lamp or lamp assembly in the light source module. Lamp replacement requires PerkinElmer Technical Support (see page... -
Page 16: Chemical And Biological Safety
There are no user serviceable components in the lower electronics tray of the IVIS Lumina XRMS Series III. Do not remove the electronics tray from the IVIS Lumina XRMS Series III or the cover from the light source module unless you are instructed by and under the supervision of a PerkinElmer technical service representative. -
Page 17: Chapter 4 Legal Notices
Disclaimers on page 13 4.1 Introduction This manual is provided to you by PerkinElmer Health Sciences, Inc. ("PEHS") on behalf of itself and its affiliates, Caliper Life Sciences, Inc. ("Caliper") and Xenogen Corporation ("Xenogen"). PEHS, Caliper and Xenogen are referred to collectively throughout this manual as "PerkinElmer". -
Page 18: Patents
PerkinElmer warrants that such software will conform to PerkinElmer's program manuals current at the time of shipment to Customer when properly installed, provided, however, that PerkinElmer does not warrant that the operation of the software will be uninterrupted or error- free. -
Page 19: Trademarks
Chapter 4 | Legal Notices 4.4 Trademarks IVIS and Living Image are registered trademarks of PerkinElmer. The names of companies and products mentioned herein may be the trademarks of their respective owners. Microsoft and Windows are either registered trademarks or trademarks of Microsoft Corporation in the United States and/or other countries. -
Page 20: Chapter 5 X-Ray Safety And Radiation Hazards
X-ray exposure to the user and is safe to operate with the user in close proximity. This radiation is confined to the interior of the imaging chamber. PerkinElmer certifies the IVIS Lumina XRMS Series III to produce not more than 0.5 millirem per hour at a distance of 5 cm from the instrument surface. -
Page 21: X-Rays: An Ionizing Radiation
® IVIS Lumina XRMS Series III Hardware Manual Chapter 5 | X-ray Safety and Radiation Hazards overlap when discussing ultra-violent radiation. X-rays are a form of electromagnetic radiation similar to light, but having much shorter wavelengths. X-rays have wavelengths from 10 to 0.01 nanometers, whereas visible light ranges from 700 to 400 nanometers. -
Page 22: Lumina Xrms Series Iii X-Ray Source Tube
X-ray tube inoperable if the tray is opened. The tube and its integrated high voltage power supply are manufactured to PerkinElmer's specifications. The tube is rated at 40kV high voltage potential with a maximum beam current of 0.10milliAmps. Total power is 4.0 watts. -
Page 23: Stochastic Effects
A sample of PerkinElmer Model IVIS Lumina XRMS Series III has been tested at maximum operating conditions. PerkinElmer has determined the local x-ray dose rate at a distance of 5 cm from the surface of the equipment is less than 1.0 µSv/h. PerkinElmer declares that the Product IVIS Lumina XRMS Series III system conforms to: 1996/29/Euratom Directive (Dose rate of 1 µSv/h at 10 cm from any accessible surface under... -
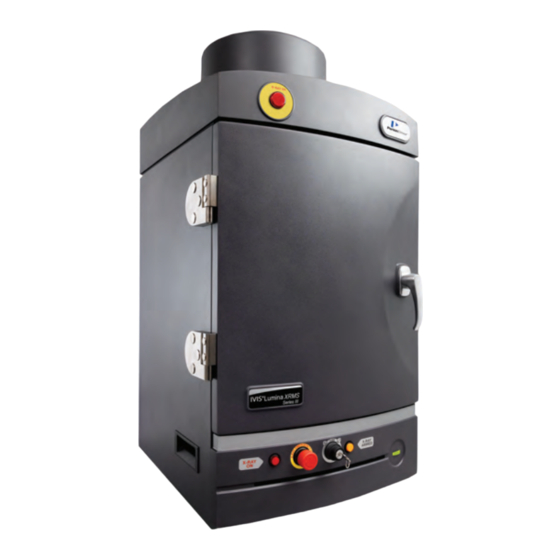
Page 24: Ivis Lumina Xrms Series Iii Control Panel
IVIS Lumina XRMS Series III Control Panel IVIS Lumina XRMS Series III is controlled primarily by software through a proprietary PerkinElmer ® program called Living Image software. - Page 25 ® IVIS Lumina XRMS Series III Hardware Manual Chapter 5 | X-ray Safety and Radiation Hazards imaging chamber. If for some reason the emergency OFF switch has been push in to the off position, it can be reset to ON by rotating the red knob in a counter-clockwise direction. Figure 5.1 Key Switch Figure 5.2 Arming Switch and Indicator Figure 5.3 Control Panel –...
-
Page 26: Turning Off X-Rays
® IVIS Lumina XRMS Series III Hardware Manual Chapter 5 | X-ray Safety and Radiation Hazards Turning Off X-rays The normal procedure for turning off the x-ray source is to either let Living Image software finish the imaging session and turn the source off as part of the normal termination of the imaging sequence, or by terminating the program by stopping the session by "pushing"... -
Page 27: X-Ray On Indicators
Operating the IVIS Lumina XRMS Series III without the safety interlocks can result in exposure to X-rays. Exposure to X-rays may cause serious bodily injury or death. Refer all servicing to PerkinElmer Technical Support (see page 24.) -
Page 28: Safety Testing
The safety test includes, but is not limited to, an X-ray radiation leakage test. 5.5 Your Laboratory X-ray Safety Procedures In addition to what PerkinElmer has done to make a safe system, there are some things required of the user to make the instrument operate safely and within legal authority. -
Page 29: Create A Training Plan
WARNING! A PerkinElmer representative will conduct a radiation leakage survey and safety tests after the IVIS Lumina XRMS Series III is serviced by PerkinElmer. PerkinElmer representatives are trained in radiation safety. However, check with your local radiation control authority to determine the specific radiation survey requirements at your facility. -
Page 30: Regulatory Compliance
Series III meets the Japanese standard JAIMAS0101- 2001 with respect to X-ray containment. PerkinElmer certifies that the IVIS Lumina XRMS Series III complies with FDA regulation CFR 1020.40 after installation at the customer's site. PerkinElmer also certifies that the instrument meets all of the international regulations of the country where it is installed. - Page 31 ® IVIS Lumina XRMS Series III Hardware Manual Chapter 5 | X-ray Safety and Radiation Hazards ALASKA Radiologic Health Program 4500 Boniface Parkway Anchorage, AK 99507-1270 907-334-2107 http://www.hss.state.ak.us/dph/labs/radiological/ ARIZONA Arizona Radiation Regulatory Agency 4814 South 40th St. Phoenix, AZ 85040-2940 602-255-4845 Ext.
- Page 32 ® IVIS Lumina XRMS Series III Hardware Manual Chapter 5 | X-ray Safety and Radiation Hazards DISTRICT OF COLUMBIA Department of Health HRLA/Radiation Protection Div. 717 14th Street NW, Room 639 Washington, DC 20005 202-724-8800 http://hrla.doh.dc.gov/hrla/site/default.asp FLORIDA Dept. of Health/Bureau of Radiation Control 4052 Bald Cypress Way, Bin C21 Tallahassee, FL 32399-1741 850-245-4266...
- Page 33 ® IVIS Lumina XRMS Series III Hardware Manual Chapter 5 | X-ray Safety and Radiation Hazards ILLINOIS IL Emergency Management Agency Division of Nuclear Safety 1035 Outer Park Dr. Springfield, IL 62704 217-785-9868 Registration and Certification Section 217-785-6982/Fax 217-785-9946 http://www.iema.illinois.gov/iema/dns.asp INDIANA State Department of Health Epidemiology Resource Center/...
- Page 34 ® IVIS Lumina XRMS Series III Hardware Manual Chapter 5 | X-ray Safety and Radiation Hazards MAINE Division of Environmental Health Radiation Control Program 286 Water Street, 4th Floor Augusta, ME 04333 Telephone: 207-287-5677 http://www.maine.gov/dhhs/eng/rad/ MARYLAND Radiologic Health Program Maryland Dept of the Environment 1800 Washington Blvd., Suite 750 Baltimore, MD 21230-1724 410-537-3300...
- Page 35 ® IVIS Lumina XRMS Series III Hardware Manual Chapter 5 | X-ray Safety and Radiation Hazards MISSOURI Medical Radiation Control Program Health Services Regulation Division of Regulation and Licensure PO Box 570 Jefferson City, MO 65102-0570 573-751-6083 http://www.dhss.mo.gov/RadProtection/ MONTANA Radiological Health Program MT Dept.
- Page 36 ® IVIS Lumina XRMS Series III Hardware Manual Chapter 5 | X-ray Safety and Radiation Hazards NEW MEXICO Radiologic Technologist Cert. Program New Mexico Environment Department 1190 St. Francis Drive Santa Fe, NM 87502-0110 505-476-3264 http://www.nmenv.state.nm.us/nmrcb/radserv.html NEW YORK Office of Radiologic Health 2 Lafayette Street, 11th Floor New York, NY 10007 212-676-1550...
- Page 37 ® IVIS Lumina XRMS Series III Hardware Manual Chapter 5 | X-ray Safety and Radiation Hazards PENNSYLVANIA Bureau of Radiation Protection Rachel Carson State Office Bldg. P.O. Box 8469 Harrisburg, PA 17105-8469 717-787-2480 http://www.dep.state.pa.us/brp/default.htm PUERTO RICO Radiological Health Division Department of Health P.
- Page 38 ® IVIS Lumina XRMS Series III Hardware Manual Chapter 5 | X-ray Safety and Radiation Hazards UTAH Division of Radiation Control 168 North 1950 West PO Box 144850 Salt Lake City, UT 84114-4850 801-536-4257 http://www.radiationcontrol.utah.gov/XRAY/reginspc.htm VERMONT Office of Radiologic Health Department of Health 108 Cherry Street PO Box 70...
-
Page 39: Canadian Radiation Authorities
® IVIS Lumina XRMS Series III Hardware Manual Chapter 5 | X-ray Safety and Radiation Hazards WYOMING Office of Healthcare Licensing 6101 Yellowstone Road, Suite #400 Cheyenne, WY 82002 (307) 777-7124 http://wdh.state.wy.us/main/divisionsprograms Canadian Radiation Authorities Canadian Provincial/Territorial/Federal Radiation Protection Contacts (Non-medical X-rays). Alberta Radiation Health and Safety Specialist Alberta Human Resources and Employment... - Page 40 ® IVIS Lumina XRMS Series III Hardware Manual Chapter 5 | X-ray Safety and Radiation Hazards Manitoba Head of Radiation Protection Medical Physics Division Cancer Care Manitoba 675 McDermot Ave Winnipeg, MB R3E 0V9 Tel: (204) 787-2213 Fax: (204) 775-1684 New Brunswick Health Protection Branch Department of Health...
- Page 41 ® IVIS Lumina XRMS Series III Hardware Manual Chapter 5 | X-ray Safety and Radiation Hazards Prince Edward Island Environmental Health Dept. of Health and Social Services 16 Garfield Street PO Box 2000 Charlottetown, PE C1A 2N8 Tel: (902) 368-4792 Fax: (902 368-6468 Quebec CSST Quebec...
-
Page 42: Components And Specifications
Components and Specifications CCD Camera on page 37 X-Ray System and Components on page 37 X-Ray Scintillation Module on page 39 X-Ray System Control Panel on page 40 Key Selector Switch on page 41 Imaging Chamber on page 41 Optics on page 42 Optical Filter Wheel on page 42 Acquisition Computer on page 43 Environmental Requirements on page 44... -
Page 43: Ccd Camera
24). IMPORTANT: If you modify the IVIS Lumina XRMS Series III in any way, without prior approval from PerkinElmer, all warranties that cover this product are void. In addition, the computer included with the IVIS Lumina XRMS Series III is specifically configured to run all system-related applications. - Page 44 ® IVIS Lumina XRMS Series III Hardware Manual Chapter 6 | Components and Specifications X-ray Any combination of bioluminescence, fluorescence, and/or X-ray mode Operating in X-ray mode requires activation with a key-operated selector switch on the imaging chamber front panel. See Key Selector Switch on page 41 for more details.
-
Page 45: X-Ray Scintillation Module
® IVIS Lumina XRMS Series III Hardware Manual Chapter 6 | Components and Specifications Table 6.1 X-ray Source Specifications Item Description High Voltage Potential 20 to 40 kV Maximum Current 100 mA Anode Type Tungsten Window Beryllium Spot Size ~300 mm Cone Angle 46 degrees Field of View... -
Page 46: X-Ray System Control Panel
® IVIS Lumina XRMS Series III Hardware Manual Chapter 6 | Components and Specifications CAUTION: DO NOT direct strong sprays of cleaning liquids at the scintillation module. While reasonably water tight, a directed spray could penetrate the seals of the module and damage the sensor. WARNING! The glass window covering the scintillation sensor is very thin and fragile. -
Page 47: Key Selector Switch
OFF position. When the authorized user is finished using the instrument, the key is removed from the switch. Two keys are provided with the instrument, and it is a good practice to archive the spare key. If the keys are lost, contact PerkinElmer Technical Support (see page 24). -
Page 48: Imaging Chamber Features
® IVIS Lumina XRMS Series III Hardware Manual Chapter 6 | Components and Specifications Imaging Chamber Features Custom zero-background imaging chamber Eight position optical filter emission wheel with seven filters (Table 6.2 on page 22-position excitation filter wheel with 19 narrow band pass filters (see Table 6.2 on page 43 ... -
Page 49: Acquisition Computer
® IVIS Lumina XRMS Series III Hardware Manual Chapter 6 | Components and Specifications Table 6.2 IVIS ® Lumina XRMS Series III Filters Excitation Filters Emission Filters Center (nm) Passband (nm) Center (nm) Passband (nm) 6.9 Acquisition Computer ® ® The computer contains an Intel family processor and Windows operating system. -
Page 50: Environmental Requirements
® IVIS Lumina XRMS Series III Hardware Manual Chapter 6 | Components and Specifications Computer Specifications Computer Description Power requirements 1.0 A at 120 V 0.5 A at 240 V 50-60 Hz Dimensions 17.0” D x 16.7” H x 6.9” W 43.4 cm D x 42.5 cm H x 17.5 cm W Weight 27.56 lbs... -
Page 51: Basic Operation
Basic Operation Starting the IVIS Lumina XRMS Series III Restarting the System After a Power Outage on page 46 Gas Plumbing on page 46 Door Operation on page 48 Changing the X-Ray Scintillation Plate Position on page 49 Imaging Basics on page 54 System Shut Down Procedure on page 55 7.1 Starting the IVIS Lumina XRMS Series III NOTE: All components of the IVIS Lumina XRMS Series III should be left on at all... -
Page 52: Restarting The System After A Power Outage
® IVIS Lumina XRMS Series III Hardware Manual Chapter 7 | Basic Operation When the temperature is locked at -90°C, as indicated by the green light in the control panel, the ® instrument is ready for operation. (For operating instructions, see the Living Image Software Manual for IVIS Lumina XRMS Series III, PN CLS137702RevB.) Figure 7.2 IVIS Acquisition Control Panel in the Living Image Software... - Page 53 7.4). The system supplies a controlled amount of isoflurane to the imaging chamber and continuously reduces the build-up of isoflurane in the chamber. If you want to use a gas other than the recommended isoflurane/oxygen gas mixture or pure air, contact PerkinElmer Technical Support (see page 24).
-
Page 54: Door Operation
When the door is open, this plug removes part of the electrical circuit powering the X-ray source. If the copper plug becomes damaged in anyway, do not operate the X-ray function of the system, and contact PerkinElmer Technical Support (see page 24). -
Page 55: Changing The X-Ray Scintillation Plate Position
® IVIS Lumina XRMS Series III Hardware Manual Chapter 7 | Basic Operation 7.5 Changing the X-Ray Scintillation Plate Position The X-ray scintillation module contains a scintillation plate which has two imaging positions (Figure 7.6). Figure 7.6 Scintillation Plate in Lower Position Protective cover Scintillation... - Page 56 ® IVIS Lumina XRMS Series III Hardware Manual Chapter 7 | Basic Operation Figure 7.7 Control Panel Software prompt Remove the locking screw using the hex wrench provided with the imaging system (Figure 7.8). Figure 7.8 Remove the Locking Screw Locking screw Scintillation plate...
- Page 57 ® IVIS Lumina XRMS Series III Hardware Manual Chapter 7 | Basic Operation Figure 7.9 Alignment Pins and Magnets Magnets – upper position Right alignment pin receptacle – upper position Scintillation assembly Right alignment pin receptacle – lower position Magnets - lower position Scintillation plate Alignment pins and magnets...
-
Page 58: Moving The Scintillation Plate To The Lower Position
® IVIS Lumina XRMS Series III Hardware Manual Chapter 7 | Basic Operation Figure 7.11 Moving the Scintillation Plate Cover to Upper Position Thumb screw Scintillation plate cover Scintillation plate Click OK in the software prompt (Figure 7.7 on page 50). - Page 59 ® IVIS Lumina XRMS Series III Hardware Manual Chapter 7 | Basic Operation Figure 7.13 Remove the Locking Screw Locking screw Scintillation plate Slide the scintillation plate out by pulling the plate toward you. After the plate is removed from the scintillation assembly, magnets and alignment pins on the scintillation plate are visible.
-
Page 60: Imaging Basics
PerkinElmer recommends not using the FOV mat (supplied as an accessory to the Lumina XRMS) during imaging in the X-ray mode where high resolution is desired. The FOV mat material permits more X-ray scatter. -
Page 61: Glowing Materials
Turn off the power to the other system components and power surge protection devices. If moving the system, unplug the devices from the wall. If you have any problems during the shut down or start up procedure, please contact PerkinElmer Technical Support for assistance (see page 24). -
Page 62: Fluorescence Module
Fluorescence Module About the Fluorescence Module Installation Requirements on page 57 Specifications on page 57 Description and Theory of Operation on page 58 Fluorescent Imaging on page 63 Troubleshooting on page 64 Care and Maintenance of the Fluorescence Equipment on page 67 8.1 About the Fluorescence Module The Fluorescence Module provides IVIS Lumina XRMS Series III with fluorescent imaging capability. -
Page 63: Installation Requirements
® IVIS Lumina XRMS Series III Hardware Manual Chapter 8 | Fluorescence Module 8.2 Installation Requirements The fluorescence equipment requires 90 - 260 VAC 50/60 Hz electrical power. The system automatically accepts the required voltage. IMPORTANT: The fluorescence equipment operates at the same voltage as the IVIS Lumina XRMS Series III chamber and must not be used at other than its labeled voltage. -
Page 64: Chemicals Required For Operation
® IVIS Lumina XRMS Series III Hardware Manual Chapter 8 | Fluorescence Module Chemicals Required for Operation No chemicals are required for the operation of the IVIS Lumina XRMS Series III or the fluorescence equipment. Other user supplied chemicals or materials may be required for your specific biological testing procedures. - Page 65 ® IVIS Lumina XRMS Series III Hardware Manual Chapter 8 | Fluorescence Module Figure 8.2 IVIS Lumina XRMS Series III and Fluorescence Equipment CCD camera Emission filter wheel assembly Excitation filter wheel assembly Reflectors Light source module The fluorescence light source module (Figure 8.3) provides the fluorescence excitation light.
- Page 66 ® IVIS Lumina XRMS Series III Hardware Manual Chapter 8 | Fluorescence Module Figure 8.4 Relative Spectral Radiance for the Quartz Halogen Lamp ® The lamp intensity level is computer-controlled by the Living Image software. The user can adjust the lamp output intensity by means of software to a low or high setting. The fluorescence light source module operates under software control;...
- Page 67 ® IVIS Lumina XRMS Series III Hardware Manual Chapter 8 | Fluorescence Module Figure 8.6 Excitation Filter Wheel – Cross Sectional Area Following the excitation filter, a second lens focuses light into a one quarter inch fused silica fiber optic bundle inside the IVIS Lumina XRMS Series III imaging chamber. Fused silica (core and clad) fibers are used in this bundle to avoid the generation of auto-fluorescence in the fiber, as is the case with ordinary glass fibers.
-
Page 68: Understanding Filter Spectra
® IVIS Lumina XRMS Series III Hardware Manual Chapter 8 | Fluorescence Module Understanding Filter Spectra The use of high quality filters is essential for obtaining good signal-to-background levels (contrast) in fluorescence measurements, particularly in a high sensitivity instrument such as the IVIS Lumina XRMS Series III. -
Page 69: Fluorescent Imaging
® IVIS Lumina XRMS Series III Hardware Manual Chapter 8 | Fluorescence Module The vertical axis in Figure 8.9 is optical density, defined as OD = -log(T) where T is the transmission. An optical density of 0 indicates 100% transmission, whereas OD7 indicates a reduction of the transmission to 1x10 . -
Page 70: Acquiring Fluorescent Images
® IVIS Lumina XRMS Series III Hardware Manual Chapter 8 | Fluorescence Module Acquiring Fluorescent Images ® If it is not already on, start the acquisition computer and Living Image software. The control panel appears (Figure 8.10). Click Initialize IVIS system. After initialization, the Temperature box in the center of the panel should be green, indicating that the CCD camera is adequately cooled. -
Page 71: Fuse Replacement
If no light is detected, try a different filter. If there is still no excitation light on the sample stage, contact PerkinElmer Technical Support (see page 24). -
Page 72: Lamp Replacement
ON position in order for Living Image software to control lamp functions. Resume normal operation. Lamp Replacement Contact PerkinElmer Technical Service (see page 24) for lamp replacement. Replacing the lamp requires re-calibration of the IVIS Lumina XRMS Series III. The procedure also requires removing the lamp module cover, which potentially exposes the user to hazardous voltages. -
Page 73: Care And Maintenance Of The Fluorescence Equipment
Cleaning the IVIS Lumina XRMS Series III on page 69 for instructions on cleaning the imaging chamber, Cleaning the Optical Components and Filter Replacement Contact PerkinElmer Technical Support for information about cleaning or sterilizing any of the optical components or the optical filter replacement (see page 24). -
Page 74: Care And Maintenance
Cleaning the Scintillation Plate Window and Holder on page 70 9.1 Surveying the IVIS Lumina XRMS Series III for Radiation Leakage PerkinElmer recommends, and some local government agencies may require, an X-ray leakage safety test be performed: Every 12 months. -
Page 75: Weekly Safety Checks
® IVIS Lumina XRMS Series III Hardware Manual Chapter 9 | Care and Maintenance Weekly Safety Checks The following safety checks should be performed on a weekly basis. All checks performed on a daily basis. Inspect all screws holding the door shield and make sure that none are loose. Inspect the metal knife edges on the door and the light box for damage such as bending. -
Page 76: Cleaning The Scintillation Plate Window And Holder
70% ethyl alcohol/30% deionized water solution 3 - 5% bleach (in deionized water) NOTE: PerkinElmer makes no claims as to the sterility of the IVIS Lumina XRMS Series III imaging chamber after using the solutions in Table 9.1. Please refer to the manufacturer’s literature for information as to the applicability of the compound for the organism of interest. - Page 77 Using the Living Image software service software commands, move the scintillation plate to the center of the stage (Figure 9.2). Figure 9.2 Scintillation Plate Moved to Center of the Stage Wet a small portion of the soft, lint-free wipe (PerkinElmer part no. 126291) with the optical cleaner (PerkinElmer part no. 123495) (Figure 9.3).
- Page 78 ® IVIS Lumina XRMS Series III Hardware Manual Chapter 9 | Care and Maintenance Figure 9.3 Apply Optical Cleaner to a Soft, Lint-free Wipe Starting at the middle of the plate, wipe the window surface using a gentle circular motion to remove dirt or smudges (Figure 9.4).
- Page 79 ® IVIS Lumina XRMS Series III Hardware Manual Chapter 9 | Care and Maintenance Figure 9.5 Support the Alcohol-soaked Lint-free Wipe with a Foam Paint Applicator NOTE: If this method does not completely clean the plate holder, it may be necessary to remove the plate holder from the drive mechanism for cleaning.
-
Page 80: Chapter 10 Troubleshooting
Check air vents in the camera head by removing temperature. blocked, or system needs service. A protective cover and inspecting. Contact PerkinElmer problem may exist with the camera. Technical Support for assistance (see page 24). -
Page 81: Photographic Image Is Unacceptable
Turn off the entire system and remove excess moisture in the center of the field of view. environment in the imaging imaging chamber. Allow the chamber to thoroughly dry. If chamber can result in the problem persists, contact PerkinElmer Technical Support condensation on the CCD for assistance (see page 24). -
Page 82: No Image Produced
Close the Living Image software and restart the computer. Restart the Living Image software and try to acquire an image. If after restarting the computer, you are still unable to produce an image, contact PerkinElmer Technical Support for assistance (see page... -
Page 83: Appendix A Xws-260 Workstation
(Figure A.1). CAUTION: PerkinElmer recommends that you do not move an IVIS Lumina XRMS Series III that is not located on the XWS-260 workstation. If you need to move an imaging system not on the workstation, contact PerkinElmer Technical Support... -
Page 84: Shutting Down The Imaging System
Turn off the power to the other system components and power surge protection devices. Unplug the devices from the wall. If you have any problems during the shut down procedure, please contact PerkinElmer Technical Support for assistance (see page 24). - Page 85 ® IVIS Lumina XRMS Series III Hardware Manual Appendix A | XWS-260 Workstation Figure A.2 IVIS Acquisition Control panel – Living Image software The temperature square is green when the operating temperature is reached. Click the temperature square to display the current temperature. Allow the system to initialize.
-
Page 86: Appendix B Options And Accessories
Appendix B Options and Accessories Table B.1 Optional Equipment and Accessories for IVIS Lumina XRMS Series III Item Part Number XBP-24 Black Paper (1 tablet of 24 sheets) 117837 XLS-4 Calibrated Light Source 118897 XGI-8 Anesthesia System, 120V 118918 XGI-8 Anesthesia System, 230V 118919 XGI-8 Anesthesia System, 100V 118957... -
Page 87: Appendix C Scintillation Plate Holder
Appendix C Scintillation Plate Holder Removing the Scintillation Plate Holder Replacing the Scintillation Plate Holder on page 83 There may be occasions when the scintillation plate holder has to be removed for replacement or for a more thorough cleaning than can be accomplished in situ. This appendix explains how to remove the holder. - Page 88 ® IVIS Lumina XRMS Series III Hardware Manual Appendix C | Scintillation Plate Holder Move the scintillation plate holder out from under the scintillator cover by horizontally rotating the plate holder 90 degrees counter-clockwise. To remove the scintillation plate holder: Remove the 9/16"...
-
Page 89: Replacing The Scintillation Plate Holder
® IVIS Lumina XRMS Series III Hardware Manual Appendix C | Scintillation Plate Holder C.2 Replacing the Scintillation Plate Holder Insert the two pins on the scintillation plate holder into the L-bracket (Figure C.3). Tighten the 9/16" Hex screw. Figure C.3 Insert Scintillation Plate Holder on L-Bracket Pins on scintillation plate holder Move the scintillation plate holder under the scintillator cover by horizontally rotating the plate holder 90 degrees clockwise... -
Page 90: Index
Index installation requirements 57 system components 58 accessories 80 fluorescent imaging 63 – 64 acquiring fluorescent images 63 – 64 fuse 57 anesthesia fuse replacement 65 – 66 gas plumbing 46 gas plumbing 46 bandpass filter 62 glowing materials 55 black paper 54 burn hazard 9 hardware problems 64... - Page 91 IVIS ® Lumina XRMS Series III Hardware Manual Index optical density 63 environmental 57 optical filter wheel 42 fuse 57 options 80 humidity 57 other equipment 7 imaging chamber 42 lamp 57 optics 42 panels 10 temperature 57 photographic image unacceptable 75 stage curtain 48 power cord 6 start up 78 –...
Need help?
Do you have a question about the IVIS Lumina XRMS III Series and is the answer not in the manual?
Questions and answers