Table of Contents
Advertisement
Quick Links
Advertisement
Table of Contents

Related Manuals for PerkinElmer SPECTRUM TWO N


Summary of Contents for PerkinElmer SPECTRUM TWO N
- Page 1 MOLECULAR SPECTROSCOPY ™ PECTRUM User’s Guide...
- Page 2 The information contained in this document is subject to change without notice. Except as specifically set forth in its terms and conditions of sale, PerkinElmer makes no warranty of any kind with regard to this document, including, but not limited to, the implied warranties of merchantability and fitness for a particular purpose.
-
Page 3: Table Of Contents
EMC Compliance ....................18 Europe ......................18 South Korea ....................18 United States (FCC) ...................18 An Overview of the Spectrum Two N ............19 A Guided Tour of the Spectrum Two N ..............20 Optical system ...................21 Sample compartment .................21 Power switch and communication ports ............23 Portability....................23... - Page 4 Appendix 1: Connector Details ................ 118 Appendix 2: Instrument Performance Validation Kits ........119 Appendix 3: Decontamination and Cleaning ............. 120 Appendix 4: WEEE Instructions for PerkinElmer Products ......... 121 Appendix 5: Calibration Procedure for Optical Attenuators ........ 122 Index ......................123...
-
Page 5: Introduction
Introduction... -
Page 6: About This Manual
6 . Spectrum Two N User's Guide About This Manual This manual provides instructions for the installation, use and maintenance of the Spectrum Two N spectrometer. It contains the following sections: Introduction • • Warnings and Safety Information • An Overview of the Spectrum Two N •... -
Page 7: Conventions Used In This Manual
ALT+F. All eight-digit numbers are PerkinElmer part numbers unless stated otherwise. The term “instrument” refers to either the Spectrum Two N FT-NIR spectrometer, and any sampling accessory fitted. - Page 8 8 . Spectrum Two N User's Guide We use the term WARNING to inform you about situations that could result in personal injury to yourself or other persons. Details about these circumstances are in a box like this one. WARNING Warning (Warnung) Bedeutet, daß...
- Page 9 Introduction . 9 We use the term CAUTION to inform you about situations that could result in serious dam age to the instrum ent or other equipment. CAUTION Details about these circumstances are in a box like this one. Caution (Achtung) Bedeutet, daß...
- Page 10 10 . Spectrum Two N User's Guide...
-
Page 11: Warnings And Safety Information
Warnings and Safety Information... -
Page 12: Overview
This advice is intended to supplement, not supersede, the normal safety codes in the user's country. It is also a supplement to the PerkinElmer standard Safety and Health Policy. The information provided does not cover every safety procedure that should be practiced. -
Page 13: Safety Summary
Warnings and Safety Information . 13 Safety Summary The Spectrum Two N FT-NIR spectrometers have been designed to comply with a wide variety of international standards governing the safety of laboratory equipment. In routine use, the instruments pose virtually no risk to you. If you take some simple, common-sense... -
Page 14: General Safety
14 . Spectrum Two N User's Guide General Safety The Spectrum Two N FT-NIR spectrometers have been designed and tested in accordance with PerkinElmer specifications and in accordance with the safety requirements of the International Electrotechnical Commission (IEC). CE (Conformity European) Marking – Safety and EMC The instruments conform to IEC publication 61010-1 (“Safety requirements for electrical... -
Page 15: Optical Radiation
Only connect equipment that meets the requirements of IEC 61010-1, IEC 60950 or equivalent standards. A Spectrum Two N has: • An IEC Installation Category (Overvoltage Category) II classification - suitable for connection to local level power supplies. -
Page 16: Location And Ventilation
16 . Spectrum Two N User's Guide Location and Ventilation To allow for adequate cooling Do not site the instrument near to room-heating equipment, for example, • central-heating radiators. • Do not block the ventilation cooling holes under the instrument. -
Page 17: Warning Signs On The Instrument
Warnings and Safety Information . 17 Warning Signs on the Instrument W arning. Refer to accompanying documents in all cases where this symbol is used to find out the nature of the potential hazard and any actions which have to be taken. Avertissem ent. -
Page 18: Emc Compliance
All information concerning EMC standards is in the Declaration of Conformity, and these standards may change as the European Union adds new requirements. PerkinElmer instruments have been designed and manufactured, having regard to the state of the art, to ensure that: •... -
Page 19: An Overview Of The Spectrum Two N
An Overview of the Spectrum Two N... -
Page 20: A Guided Tour Of The Spectrum Two N
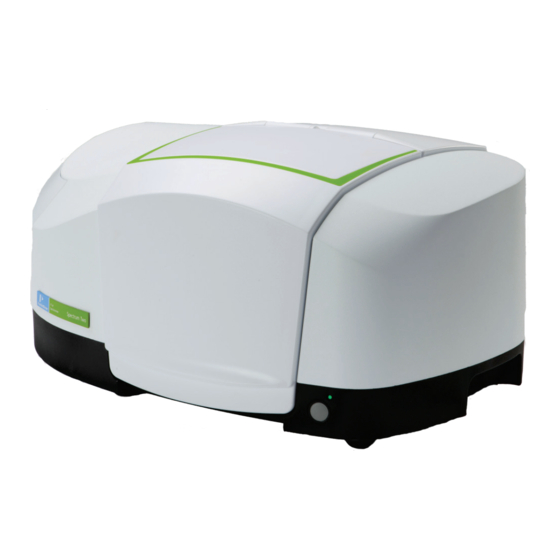
20 . Spectrum Two N User's Guide A Guided Tour of the Spectrum Two N PerkinElmer Spectrum Two N spectrometers are compact, robust instruments that can be used in non-laboratory environments. Figure 3 Spectrum Two N Spectrometer • Spectrum Two N FT-NIR spectrometers with standard detector: –... -
Page 21: Optical System
An Overview of the Spectrum Two N . 21 Optical system The optical system is under the main cover of the instrument. The instrument is sealed at the factory, and the main cover of the instrument should not be opened. - Page 22 Les fenêtres du compartiment d'échantillons CaF installées dans certains spectromètres Spectrum Two N FT NIR, bien que revêtues pour éviter d'être endommagées par de petites quantités de condensation, peuvent être endommagées par de grandes quantités d'accumulation de ATTENTION condensation dans la jante des fenêtres.
-
Page 23: Power Switch And Communication Ports
Portability The compact and robust design of the Spectrum Two N means that the instrument can be easily transferred between environments. The simple user-installation, and fast warm-up time, means that the instrument can be set up quickly. The range of accessories available help you to move your analysis out of the laboratory. -
Page 24: Accessories
24 . Spectrum Two N User's Guide Accessories There is a range of optional sampling accessories available for the Spectrum Two N FT-NIR spectrometer that fit in the sample compartment, including: Spectrum Two N NIRM – Near Infrared Reflectance Module – L1390205 •... -
Page 25: Unpacking And Installation
Unpacking and Installation... -
Page 26: Requirements
It contains important information. Electrical requirements The Spectrum Two N power supply adaptor can operate on electricity supplies of 50 or 60 Hz and in the 100 to 230 V range without any adjustment. The maximum power consumption of the system is 65 VA (approximately 40 W) when powering the wireless router. -
Page 27: Specifications
Unpacking and Installation . 27 Specifications Specification Value Dimensions 450 × 300 × 210 mm ( × × Weight Approximately 13 kg Power input 100–230 V, 50/60 Hz, Max 65 VA Laser Class 1 Detector LiTaO or InGaAs Operating temperature range 5 °C to 45 °C* Storage temperature range −20 °C to 60 °C... -
Page 28: Unpacking The Spectrometer
28 . Spectrum Two N User's Guide Unpacking the Spectrometer Take great care when installing your Spectrum Two N FT-NIR spectrometer, and follow the procedures described in this manual. If you require further assistance, please contact CAUTION IRTechSupport@PERKINELMER.COM. Faites attention lors de l'installation de votre spectromètre Spectrum Two ATTENTION N FT NIR et suivez les procédures décrites dans ce manuel. - Page 29 Unpacking and Installation . 29 2. Carefully remove the instrument from the shipping container, but not from the bag in which it was shipped. Retain the original packaging in case you need to ship the instrument to a new location. The spectrometer should be allowed to reach the temperature of its surroundings before it is removed from the protective bag to prevent CAUTION...
-
Page 30: Choosing Your Connection Method
NOTE: Do not connect your instrument to the PC using the USB cable provided until you have run the software installation wizard. The Spectrum Two N spectrometer is supplied with a USB 2.0 cable and a mains power supply adaptor with a DC connector (Figure 9). The mains power cord supplied will depend on your region. - Page 31 Unpacking and Installation . 31 The features on the rear of the spectrometer are shown in Figure 10. Figure 10 Communication ports on the Spectrum Two Table 1 Communication ports Port/LED A USB port This is the standard interface between the PC and the instrument.
-
Page 32: Installing Your Spectrum Two N
32 . Spectrum Two N User's Guide Installing your Spectrum Two N NOTE: Do not connect your instrument to the PC using the USB cable provided until you have run the software installation wizard. NOTE: If you wish to connect to your instrument using an Ethernet cable, you will need to configure the PC network adaptor. -
Page 33: Connecting The Spectrometer To The Electrical Supply
Connecting the spectrometer to the electrical supply The Spectrum Two N power supply adaptor can operate on electricity supplies of 50 or 60 Hz and in the 100 to 230 V range without any adjustment. The mains power cord supplied will depend on the requirements of your region. -
Page 34: Connecting The Spectrometer To The Pc Using The Usb Cable
Before connecting your spectrometer to the PC you must install Spectrum, Spectrum ES or AssureID software. NOTE: Once your instrument has been set up in one software application it will be available for use by all PerkinElmer FT-IR software installed on the PC. Connecting the spectrometer to the PC using the USB cable Before connecting your spectrometer to the PC via the USB cable you must run the Spectrum or Spectrum ES software installation. - Page 35 If the test fails, check that the instrument is connected to the mains power and is connected to the PC using the USB 2.0 cable provided, and then retry the test. If the test still fails, go to IRTechSupport@PERKINELMER.COM for assistance.
-
Page 36: Connecting The Spectrometer To The Pc Using The Wireless Router
The following procedure describes connection using the PerkinElmer-configured wireless router (not supplied with the instrument). The wireless router is powered by the EXT DETECTOR port on the rear of the Spectrum Two N instrument. The cable required is supplied with the wireless router. - Page 37 Figure 18 Power adaptor port on rear of spectrometer 5. Connect the Spectrum Two N power supply cable to the mains power. 6. Ensure that the Power ON LED on the front of the Spectrum Two N is lit green. Connecting the...
- Page 38 WIRELESS LED lit Figure 20 Wireless router LEDs indicate ready for use 9. Switch on your PC and then connect to the PerkinElmer FT-IR Wireless network. You will need to enter the network security key provided on the side of your router.
-
Page 39: Connecting The Spectrometer To The Pc Using An Ethernet Cable
You are now ready to start your software application. The first time you log on to Spectrum with a Spectrum Two N instrument connected to the PC via a wireless connection, the instrument is installed and configured automatically for you. -
Page 40: Connecting The Spectrometer Via A Network
3. Plug the other end of the cable into an Ethernet port on your PC. You are now ready to start Spectrum software. The first time you log on to Spectrum with a Spectrum Two N instrument connected to the PC using an Ethernet cable, the instrument is installed and configured automatically for you. - Page 41 Unpacking and Installation . 41 When using a network, the TCP/IP port of the PC will normally obtain an automatic address from a DHCP server. To communicate with the instrument over a network, the instrument must have a compatible network address. A subnet mask of 255 .
-
Page 42: Instrument Install Wizard
42 . Spectrum Two N User's Guide Instrument Install Wizard If you connected your spectrometer to a network using the Ethernet connection, or if you are using AssureID software to connect to the spectrometer, you will need to run the Instrument Install Wizard. -
Page 43: Changing The Sampling Accessory
Unpacking and Installation . 43 Changing the Sampling Accessory NOTE: For full installation and usage instructions for your accessory, refer to the appropriate Spectrum Two Manuals CD User’s Guide available as a pdf on the (part number L1050242). 1. If you are installing a NIRM, you will need to remove the sample compartment cover (Figure 24), if fitted. - Page 44 44 . Spectrum Two N User's Guide 3. If you are installing a NIRM, pivot the accessory on the ledge at the front of the sample area), and then tip it backwards). Push it firmly, ensuring that the top of the accessory connects properly with the lid of the instrument.
- Page 45 Figure 27 Setup Instrument Basic tab showing a NIRM For information on using your accessory, refer to the User’s Guide supplied with your accessory. For PerkinElmer Spectrum Two accessories, these can be found as pdf files on the Spectrum Two Manuals CD...
-
Page 46: Moving The Spectrometer
Cleaning on page 120 for more information. Although the Spectrum Two N spectrometer is usable within 15 minutes of being switched on after being switched off overnight, if your instrument has recently been transferred from a much colder environment it is advisable to run a background spectrum before every sample... -
Page 47: Getting Started With Spectrum Software
Getting Started with Spectrum Software... -
Page 48: Overview
48 . Spectrum Two N User's Guide Overview This section describes some of the basic functionality available in Spectrum software. It will guide you through the process, from when you start Spectrum software to when you export your data, directing you to additional information where applicable. -
Page 49: Starting Spectrum Software
LED is lit green. The instrument will initialize, which will take approximately 2 minutes. NOTE: The Spectrum Two N spectrometer is usable within 15 minutes of being switched on after being switched off overnight. However, if your instrument has recently been transferred from a much colder environment, it is advisable to run a background spectrum before every sample for the first couple of hours of use. - Page 50 50 . Spectrum Two N User's Guide 4. Select the Instrument you want to use and then click Connect. If you want to work with data that has been collected previously, without connecting to an instrument, select work offline. Spectrum starts.
-
Page 51: The Spectrum Workspace
Getting Started with Spectrum Software . 51 The Spectrum Workspace The Spectrum window, with the default layout for a Spectrum Two N installation, is shown in Figure 29. Figure 29 Spectrum window Global Toolbars Graph Bar Data Explorer Navigation Pane... - Page 52 52 . Spectrum Two N User's Guide Data Explorer Data Explorer (B), on the left, which you use to manage your spectra. The item(s) selected in the Data Explorer will be displayed in the Viewing Area. You can also use the Data Explorer to access the Sample Table, which enables you to set up multiple samples for data collection.
- Page 53 Getting Started with Spectrum Software . 53 Status Bar The Status Bar (I) located at the bottom of the workspace shows user information, messages, and the current status of the instrument. Figure 30 Status bar...
-
Page 54: Using The Spectrum On-Screen Help System
54 . Spectrum Two N User's Guide Using the Spectrum on-screen Help system Use the Spectrum Help system to find further information about using Spectrum software to control, set up and adjust your instrument. To open the Help file, select Contents from the Help menu. This menu also includes links to on-screen tutorials (Tutorials), and information about the software (About). -
Page 55: Scanning Samples
Getting Started with Spectrum Software . 55 Scanning Samples When you connect to your Spectrum Two N, the instrument settings will default to appropriate values for your instrument and accessory. These should be suitable for most −1 applications. The default scan range is 10,000 to 4,000 cm The Measurement bar (Figure 32) displayed by default at the top of the workspace includes the tools you need to collect a spectrum from a sample. - Page 56 56 . Spectrum Two N User's Guide Figure 33 Spectrum displayed in the Viewing Area If you want to change any of the default instrument settings, select Instrument from the Instrument Setup menu to display the Setup Instrument tabs. For more information see Settings on page 77.
-
Page 57: Optical Attenuators For Use With Optional Ingaas Detector
Getting Started with Spectrum Software . 57 Optical Attenuators for Use with Optional InGaAs Detector The high detectivity of InGaAs (indium gallium arsenide) detectors makes them prone to saturation, a condition that results in non-linear detector responses. Limiting the optical throughput to the detector is used to prevent detector saturation and can be accomplished through the use of optical attenuators. -
Page 58: Quality Checks
58 . Spectrum Two N User's Guide Quality Checks Quality Checks identify possible problems in the collected spectrum and suggest ways of improving the measurement. Quality Checks can be selected on the Setup Instrument Advanced tab (Figure 34). Simply select the Quality Checks that you want to perform from the list in the Setup Instrument Advanced tab and, if required, adjust the threshold Range using the slider bars to suit your application. - Page 59 Getting Started with Spectrum Software . 59 The result is displayed in the Results Table, and in the Information Pane for an individual spectrum. For example, the Quality Checks reported multiple warnings for the spectrum shown in Figure 35. Figure 37 Quality Checks result shown in the Information Pane To see which Quality Checks passed and which identified a problem, select the History tab of the spectrum in the Viewing Area and refer to the Quality Checks section of the tab (Figure 36).
-
Page 60: Processing Spectra
60 . Spectrum Two N User's Guide Processing Spectra To process your data in Spectrum software, ensure that the spectra you wish to process are selected in the Data Explorer and then select the appropriate option from the Process menu (Figure 37). -
Page 61: Identification
Getting Started with Spectrum Software . 61 You can also correct for baseline slope in your spectra. In Spectrum you can do this in two ways: using an automatic baseline correction, or using an interactive baseline correction (i-baseline) that enables you to define base points for the conversion (Figure 38). Figure 40 Spectrum with baseline corrected using i-baseline NOTE: The Processing Your Data tutorial includes a description of ordinate-unit conversion, automatic baseline correction, and peak detection and labeling. - Page 62 62 . Spectrum Two N User's Guide Compare The Compare process estimates similarity between spectra by comparison with a reference spectrum or spectra, and is used to confirm the identity of a sample. The results are displayed on the Compare tab in the Viewing Area (Figure 40).
- Page 63 Getting Started with Spectrum Software . 63 On the Setup Compare Parameters tab (Figure 42) you can define a limited wavelength range of your spectrum to be compared with the reference spectrum or spectra, and apply filters that try to eliminate differences in spectra that are not related to differences in the sample, such as differences between instruments or environmental condition.
- Page 64 64 . Spectrum Two N User's Guide The parameters used in the Search process are defined on the Setup Libraries and Search tabs. Select Search from the Setup menu to display the Setup Libraries and Search tabs. Select which folders or files are available as Spectral Libraries on the Setup Spectral Libraries tab (Figure 44), and specify which of the available spectral libraries should be included in the Search Process.
-
Page 65: Quantification
Getting Started with Spectrum Software . 65 NOTE: The Search tutorial provides an example of using the Search process to identify an unknown contaminant in a sample. Quantification Peak Area/Height Use the Peak Area/Height process to produce a table of the peak areas and/or peak heights for your spectrum or spectra. - Page 66 66 . Spectrum Two N User's Guide The results are displayed on the Quant tab in the Viewing Area (Figure 48), and in the Results table. In this example, the Prediction Property calculated by the Beer’s Law algorithm was FAME (fatty acid methyl ester) concentration in % v/v.
- Page 67 Getting Started with Spectrum Software . 67 More information about the method selected is shown in the Quant Method Setup dialog (Figure 50): Select Settings on the Setup Quant Methods tab. Here you can view a summary of the Quant method and, where the Quant calibration includes more than one prediction Property, select which ones will be included when the Quant method is run Figure 50).
- Page 68 68 . Spectrum Two N User's Guide Equations A list of the available Equations is displayed on the Setup Equations tab. The Equations are also added to the Equations sub-menu of the Process menu. To add a new Equation, select Equations from the Setup menu to display the Setup ...
-
Page 69: Macros
Getting Started with Spectrum Software . 69 The Results formatting tab enables you to define Pass / Fail criteria and select how the result will be displayed. For example, you can color the cell in the Results Table green if the result is a Pass. Figure 55 Results formatting example To view the details of, or modify, an equation: Select Equations in the Navigation Pane and then select the appropriate icon. -
Page 70: Scanalyze
70 . Spectrum Two N User's Guide Scanalyze As well as Macros, you can use the Scanalyze feature in Spectrum to scan a spectrum and then immediately process it using the Compare, Verify, Quant or Search options. During multiple accumulations, the results are displayed and then updated as the data collection progresses. -
Page 71: Saving Spectra, Exporting Spectra And Reporting
Getting Started with Spectrum Software . 71 Saving Spectra, Exporting Spectra and Reporting There are various features in the software to help you present your data outside Spectrum. Saving spectra All spectra in Spectrum software are saved to *.sp format by default. To find out if a spectrum has been saved, refer to the Results Table (if a Samples View is selected) or the Information Pane. -
Page 72: Exporting Spectra
72 . Spectrum Two N User's Guide Save, Save As, Save All Save will save the selected spectrum, or the spectra in the selected Samples View, to the current default save location. Save As displays a dialog for the spectra selected that enables you to change the file name and the destination directory (Figure 58). - Page 73 Getting Started with Spectrum Software . 73 Auto-Save Export If you select Export on the Setup Instrument Data Collection tab, your spectra will be exported to the location specified after each measurement (Figure 59). Figure 61 Auto-export on the Setup Instrument Data Collection tab The default Save Location, here C:\pel_data\spectra, was defined during the software installation.
-
Page 74: Send To
74 . Spectrum Two N User's Guide Send To The Send To option (Figure 61) sends the contents of the current window to the selected application. Figure 63 Send To To see the options on the Send To menu, you must have the appropriate software installed on your PC. -
Page 75: Reporting
Getting Started with Spectrum Software . 75 Reporting You can generate a report of your data in two ways: • Using the Report option from the File menu • Using an Output step in a Macro. NOTE: Reports are also generated using customized templates for Instrument Verification Ready Checks and Instrument Verification Checks and Ready Checks. -
Page 76: Printing
76 . Spectrum Two N User's Guide Reports are generated using a template. You can select the sections you want to include in your report on the Report Edit tab. The items listed depend on the template selected. In the example shown in Figure 64, we have included the spectrum and the Compare results. -
Page 77: Instrument Settings
Getting Started with Spectrum Software . 77 Instrument Settings If you want to change any of the default instrument settings, use the Setup Instrument tabs. Select Instrument from the Setup menu to display the Setup Instrument tabs. To amend any value, select the parameter and then enter your new value, or select a value from the drop-down list. -
Page 78: Changing The Resolution
The Spectrum Two N spectrometer has a slot in the double-sided slide holder that enables you to insert a J-stop card before the sample (Figure 66). - Page 79 Getting Started with Spectrum Software . 79 If you change the Resolution (cm−1) in Spectrum software with the slide holder installed in the sample compartment, a message will be displayed on the Setup Instrument BeamPath tab, and in the Status Bar, prompting you to insert one of the J-stop cards in the slide holder, or to remove any external J-stop card (Figure 67).
-
Page 80: Component Checks
80 . Spectrum Two N User's Guide Component Checks The Component Checks are run automatically the first time you connect to the instrument. You can select to run component checks each time you connect to the instrument, on demand, or after a scheduled number of days on the Setup Laboratory Actions tab in the Laboratory Scheduler. - Page 81 Figure 71 Component Checks dialog with source failure If the Component Checks identify a problem that may require investigation by a PerkinElmer Service Representative, refer to IRTechSupport@PERKINELMER.COM for assistance. If your PerkinElmer Service Engineer requires the log files created during the Component...
-
Page 82: Humidity Shield
82 . Spectrum Two N User's Guide Humidity Shield The humidity shield displays the current internal humidity of the spectrometer as measured by the humidity sensor inside the instrument. Select Humidity Shield from the Measurement menu. The Humidity Shield dialog is displayed. - Page 83 Getting Started with Spectrum Software . 83 The expiry date of the desiccant is based on the date the desiccant was last changed. It gives an indication of when the desiccant is expected to expire in normal conditions (up to five years).
-
Page 84: Power Save Mode
84 . Spectrum Two N User's Guide Power Save Mode There are two ways you can put the instrument into a low-power mode: by pressing the power button on the front of the instrument or using the Power Save option in Spectrum software. -
Page 85: Using Power Save Mode In Spectrum Software
Getting Started with Spectrum Software . 85 Using Power Save Mode in Spectrum software You can use the Power Save option in Spectrum software to control when the instrument is in standby or powered up. You can set up the Power Save options independently for each day of the week. -
Page 86: Ready Checks And Instrument Verification
86 . Spectrum Two N User's Guide Ready Checks and Instrument Verification There are three types of Instrument Checks in Spectrum software (Figure 74): Component Checks, which check that the components of your instrument are working. • Component Checks For more information refer to on page 80. - Page 87 Getting Started with Spectrum Software . 87 To run the tests, select Instrument Checks and then Ready Checks from the Measurement menu, and then select the Ready Check you want to run. You can run the ready checks individually or run all the Ready Checks selected on the Setup Ready Checks tab using the Run Selected option.
- Page 88 88 . Spectrum Two N User's Guide Instrument Verification You can run the basic Instrument Verification Checks without changing any settings. However, you can select further tests and modify the default values for each test. NOTE: Before performing any Instrument Verification tests you should remove any sampling accessory from the beam path.
-
Page 89: Atmospheric (Co O) Suppression
Getting Started with Spectrum Software . 89 Atmospheric (CO O) Suppression Atmospheric suppression, selected by default on the Setup Instrument Advanced tab (Figure 77), is an atmospheric correction routine. Figure 79 Setup Instrument Advanced tab in Spectrum This routine is more powerful than simple subtraction, overcoming the following issues: •... -
Page 90: Avi Correction
90 . Spectrum Two N User's Guide AVI Correction If available for your current instrument and sampling configuration, AVI correction can be selected on the Setup Instrument Advanced tab in Spectrum (Figure 79). Figure 81 Setup Instrument Advanced tab in Spectrum The objectives of Absolute Virtual Instrument (AVI) correction are: •... -
Page 91: Avi Calibration
Getting Started with Spectrum Software . 91 −1 Figure 82 Spectra of methane at 4 cm resolution as measured (top) and with AVI (bottom) AVI correction can only be performed if an AVI Calibration has been set up for the current configuration and resolution. -
Page 92: Exit Spectrum Software
92 . Spectrum Two N User's Guide Exit Spectrum Software When you exit Spectrum software you can choose a Save Option appropriate for what you want to do next time you use Spectrum. If you want to continue working with the same data, or to collect more samples listed in your Sample Table, you can resume your session next time with all your data loaded. - Page 93 Getting Started with Spectrum Software . 93...
-
Page 95: Maintenance
Maintenance... -
Page 96: Overview
96 . Spectrum Two N User's Guide Overview This section covers the maintenance that can be carried out by a user. It describes: • Cleaning the spectrometer • Replacing the desiccant • Purging the sample area Purging the instrument optics •... -
Page 97: Cleaning The Spectrometer
Maintenance . 97 Cleaning the Spectrometer Clean the outside of the instrument using a damp cloth. If necessary, a mild detergent may be used. Before you clean the entire instrument, always perform a patch test on an inconspicuous area. Avoid spilling liquid into the instrument. Clean all external spills immediately. -
Page 98: Changing The Desiccant
98 . Spectrum Two N User's Guide Changing the Desiccant Expect to change the desiccant in the spectrometer approximately every five years. Old, used desiccant releases moisture. In regions experiencing high humidity levels we recommend that you CAUTION change the desiccant more often, and that you monitor the internal humidity of your instrument using the Humidity Shield (refer to page 82) regularly. - Page 99 Maintenance . 99 Old, used desiccant releases moisture and can cause high humidity levels inside the instrument resulting in catastrophic failure of KBr optics. CAUTION Do not use damaged packs of desiccant. Make sure that the packs you use have not been left in contact with the air. Un dessiccateur usé...
- Page 100 100 . Spectrum Two N User's Guide 3. Click The Desiccant Replacement Wizard is displayed. 4. Follow the instructions on-screen. When you have the completed the procedure the Desiccant change due in (days) is reset automatically to 1800 days.
-
Page 101: Purging The Spectrometer
Maintenance . 101 Purging the Spectrometer Purge the sample compartment if you need to make sure that no residual water vapor or CO peaks are visible in the spectrum. The connectors are on the underside of the instrument (Figure 83). Instrument purge outlet port Sample area... -
Page 102: Purging The Sample Compartment
102 . Spectrum Two N User's Guide Do not use a flammable gas to purge the instrument. The spectrometer contains a hot source, and a fire or explosion will result. Only use clean, dry, oil-free nitrogen or air to purge the instrument. -
Page 103: Purging The Instrument
10. Disconnect the fitting from the instrument, if required, by easing the tubing off the purge connector. Purging the instrument The Spectrum Two N instrument was purged and then sealed after manufacture. The bolts in the instrument purge connection ports are marked with tamper-proof paint. If you break the seals on the CAUTION instrument you will invalidate your instrument warranty. - Page 104 104 . Spectrum Two N User's Guide Instrument purge inlet port Figure 87 Instrument inlet purge port securing bolt 7. Screw one of the straight connectors supplied into the instrument purge inlet port and tighten using the pliers supplied with the kit (Figure 86).
- Page 105 Maintenance . 105 Figure 90 Tubing connected to instrument purge inlet port 11. Connect the free end of the inlet tubing to the gas regulator. NOTE: Ensure the regulator is set to a pressure not greater than 6.9 kPa (1 lbf/in 12.
- Page 106 106 . Spectrum Two N User's Guide If you have finished purging your instrument, replace the bolts you removed in Step 6. NOTE: If you have mislaid the bolts fit the blanking bolts instead, then contact PerkinElmer Customer Care to obtain replacements.
-
Page 107: Replacing The Source
Maintenance . 107 Replacing the Source If there is a Recommended Action to replace the source in the Component Checks, you will require the source replacement kit (part number L1390110). The kit contains a replacement source and source-doubling mirror assembly, and a 2.5 mm hexagonal wrench. To replace the source, the instrument must be switched on and you must be connected to the instrument in Spectrum, Spectrum ES or AssureID software. - Page 108 108 . Spectrum Two N User's Guide 3. Click The Source Replacement Wizard is displayed. 4. Follow the instructions on-screen. 5. When you have completed the procedure, we recommend that you run the Component Checks to confirm that your instrument is working correctly.
-
Page 109: Installing/Replacing Windows
Maintenance . 109 Installing/Replacing Windows The Spectrum Two N spectrometer is available with CaF sample compartment windows. You should only need to replace them if they are broken. To replace the windows you will require the appropriate window replacement kit: part number L1390104. - Page 110 110 . Spectrum Two N User's Guide 4. Follow the instructions on-screen.
-
Page 111: Replacing The Main Board Air Filter
Maintenance . 111 Replacing the Main Board Air Filter If your instrument is used regularly in a dusty environment, the main board air filter may become blocked. If it does, you may notice that your instrument takes longer to stabilize. To replace the main board air filter you will need the replacement main board air filter (part number L1601717). - Page 112 112 . Spectrum Two N User's Guide 5. Using a Philips-type, PZ No 1 screwdriver, undo the screws securing the main board compartment cover to the instrument and remove the cover (Figure 91). Retain the screws and store in a safe place.
- Page 113 Maintenance . 113 7. Remove the used filter (Figure 93). Figure 95 Remove the used filter 8. Slot in the replacement filter, ensuring that it is flat. 9. Replace the compartment cover, and secure with the screws retained in Step 2. Ensure that the white main board cable shown in Figure 94 is not trapped when you replace the compartment cover, but passes through the cut-out in the instrument housing.
-
Page 114: Additional Parts
Optional parts Part Number Description L1600238 Spectrum Two N Portability Pack L1600233 Spectrum Two N Battery Pack (includes a 12 V car adaptor) L1600246 Spectrum Two N Wireless Router Kit L9004128 Spectrum Two N 12 V Car Adaptor L9004199 Spectrum Two N Carry Case... -
Page 115: Replacement Parts
Maintenance . 115 Replacement parts Part Number Description L1390110 Spectrum Two N Source Replacement Kit L1600244 SP2 Desiccant Replacement Kit L1390104 Spectrum Two N CaF Window Replacement Kit L1601717 SP2 Main Board Air Filter L9004169 USB Cable L1200466 Ethernet Crossover Cable... -
Page 117: Appendices
Appendices... -
Page 118: Appendix 1: Connector Details
118 . Spectrum Two N User's Guide Appendix 1: Connector Details Port Description Connector Voltages Maximum Type Currents This is the standard interface – – between the PC and the (Type B) instrument. ETHERNET 100 Base-T Ethernet Ethernet <5 V <100 mA... -
Page 119: Appendix 2: Instrument Performance Validation Kits
Appendices . 119 Appendix 2: Instrument Performance Validation Kits The NIR Polystyrene Re-Calibration TRM Kit (part number L1250475) contains a polystyrene reference sample for use when calibration validity of original TRM expires. Spectrum 10 STD and Spectrum ES Data Manipulation Validation and Suitability CD (part number L1050071) -
Page 120: Appendix 3: Decontamination And Cleaning
080089 60 46 cc.uk@perkinelmer.com If you are located outside these regions, please call your local PerkinElmer sales office for more information. Cleaning the Instrument Exterior surfaces may be cleaned with a soft cloth, dampened with a mild detergent and... -
Page 121: Appendix 4: Weee Instructions For Perkinelmer Products
Web address: www.perkinelmer.com/WEEE Products from other manufacturers may also form a part of your PerkinElmer system. These other manufacturers are directly responsible for the collection and processing of their own waste products under the terms of the WEEE Directive. Please contact these manufacturers directly before discarding any of their products. -
Page 122: Appendix 5: Calibration Procedure For Optical Attenuators
122 . Spectrum Two N User's Guide Appendix 5: Calibration Procedure for Optical Attenuators Calibration of optical attenuators involves collecting spectra with and without the attenuator in the optical path and computing the corresponding attenuator correction factor. In order to... -
Page 123: Index
Index . 123 Index About This Manual ......6 Identification ......... 61 Accessories ........24 Compare ........62 Changing ........43 Peak Table ........ 61 HATR ........24 Search........63 Atmospheric Suppression ....89 Installation Connecting to Electrical Supply ... 33 Calibration ......... - Page 124 124 . Spectrum Two N User's Guide Sampling Accessory Changing ........43 Parts ........... 114 Saving Spectra ......71 Optional ........114 Scanalyze ........70 Replacement ......115 Search .......... 63 Peak Area/Height ......65 SendTo ......... 74 Peak Table ........61 Shipping Container Power Switch ........
- Page 125 Index . 125...
Need help?
Do you have a question about the SPECTRUM TWO N and is the answer not in the manual?
Questions and answers
Forgot username and password in SPECTRUM software log-in, after several tries, the account is locked, how to unlock?