Table of Contents
Advertisement
Available languages
Available languages
Quick Links
MANUALE DI ISTRUZIONE PER SALDATRICE A FILO ........................
IT
INSTRUCTION MANUAL FOR WIRE WELDING MACHINE ..................
EN
BETRIEBSANLEITUNG FÜR DRAHTSCHWEISSMASCHINEN ...............
DE
MANUEL D'INSTRUCTIONS POUR POSTES A SOUDER A FIL..............
FR
MANUAL DE INSTRUCCIONES PARA SOLDADORAS DE HILO ............
ES
MANUAL DE INSTRUÇÕES PARA SOLDADORES A FIO .......................
PT
Parti di ricambio e schema elettrico
Spare parts and wiring diagram
Ersatzteile und elektrischer Schaltplan
Pièces de rechanges et schéma électrique
Partes de repuesto y esquema eléctrico
Peças e esquema eléctrico
Pag.
Page
Seite
13
Page
18
Pag.
23
Pag.
28
Pagg. Seiten
33
3
8
Advertisement
Table of Contents

Related Manuals for Elettro CF MIG COMBO 218


Summary of Contents for Elettro CF MIG COMBO 218
- Page 1 MANUALE DI ISTRUZIONE PER SALDATRICE A FILO ......Pag. INSTRUCTION MANUAL FOR WIRE WELDING MACHINE ....Page BETRIEBSANLEITUNG FÜR DRAHTSCHWEISSMASCHINEN ....Seite MANUEL D'INSTRUCTIONS POUR POSTES A SOUDER A FIL....Page MANUAL DE INSTRUCCIONES PARA SOLDADORAS DE HILO .... Pag. MANUAL DE INSTRUÇÕES PARA SOLDADORES A FIO .......
-
Page 3: Installazione
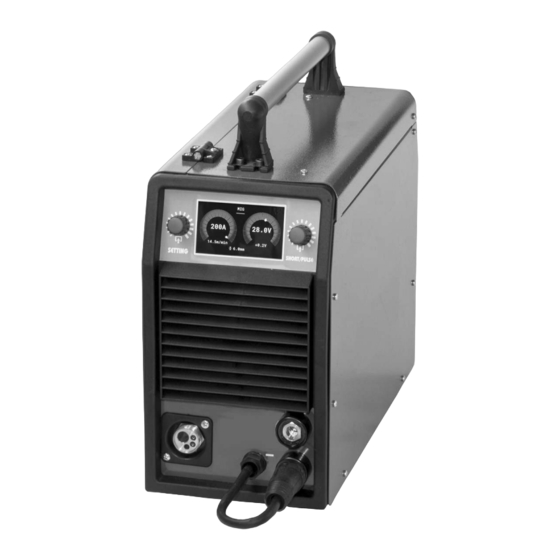
MANUALE D'ISTRUZIONE PER SALDATRICI A FILO surriscaldamenti. IMPORTANTE: PRIMA DELLA INSTALLAZIONE, DELL’USO O Corrente di saldatura QUALSIASI MANUTENZIONE ALLA SALDATRICE Tensione secondaria con corrente di sald. I LEGGERE IL CONTENUTO DI QUESTO MANUALE E DEL Tensione nominale di alimentazione. MANUALE “REGOLE DI SICUREZZA PER L’USO DELLE 1~ 50/60Hz Alimentazione monofase 50 oppure 60 Hz. -
Page 4: Messa In Opera
Per attivarla è necessario con la manopola B entrare nel G - Presa negativa. sottomenù selezionare Password, successivamente In saldatura MMA e MIG con gas, vi si connette il cavo di selezionare e premere con la stessa manopola la posizione ON. massa;... - Page 5 • T. I Avvio JOB (BLOCCATO) Funzione opzionale. E' il tempo, espresso in secondi, di durata della corrente In questa sezione si possono salvare, caricare, o cancellare di avvio, si imposta con la manopola C. Regolazione 0,1 - programmi di lavoro. Se si preme il tasto B il display A 10 sec.
-
Page 6: Saldatura Con Elettrodo Rivestito (Mma)
precedente premendo la manopola B. Se si desidera tornare Dopo aver confermato la scelta si torna alla schermata al menu principale ripremere la manopola B per almeno 1 precedente premendo la manopola B. Se si desidera tornare sec. al menu principale ripremere la manopola B per almeno 1 sec. -
Page 7: Manutenzione
Per scegliere questo processo partendo dal menù principale premere la manopola B per almeno 1sec. per entrare nel sottomenù. All’interno del sottomenù ruotando e premendo la manopola B selezionare Processi. All’interno dei Processi ruotando e premendo la manopola B selezionare TIG. Per tornare al sottomenù... -
Page 8: Installation
INSTRUCTION MANUAL FOR WIRE WELDING MACHINE Secondary voltage with current I IMPORTANT Rated supply voltage READ THIS MANUAL AND THE SAFETY RULES MANUAL 1~ 50/60Hz 50- or 60-Hz three-phase power supply. CAREFULLY BEFORE INSTALLING, USING, Max. absorbed current at the corresponding SERVICING THE WELDING MACHINE, PAYING SPECIAL current I and voltage U... -
Page 9: Motor-Driven Generators
From this moment, upon every start-up, a 3-digit code here; in TIG and MIG welding with flux-cored wire without gas, (password) will be requested to activate the device. insert the torch power cable coming out from fairlead E. NOTE: each device has its own password code, only in electronic format and located in the submenu next to the 4 CONTROLS ON THE REAR PANEL (Pict. - Page 10 • pressing knob C. Once the writing is finished, press CRA (Crater Curr.) the knob C again for at least 1 sec. Select SAVE and Display A shows the message OFF = Off. Pressing the confirm by pressing knob B. knob B, the display A shows the option ON-OFF.
-
Page 11: Tig Welding
the set time, the machine will stop the wire in any mode in which the button is pressed. • 5.2 MIG WELDING WITHOUT GAS Options: (entering the code to unlock the optional functions) The actions to prepare the welding machine for work are the The machine leaves the factory with the lock function same as those described previously, but for this type of active in the Double Lev. -
Page 12: Maintenance
- Slope Up - Slope Down - Pulse - Spot - Spot time - Pre Gas - Post Gas To return to the previous screen, press knob B again. To return to the main menu, press and hold down knob B for at least 1 sec. - Page 13 BETRIEBSANLEITUNG FÜR DRAHTSCHWEISSMASCHINE WICHTIG: VOR INSTALLATION UND GEBRAUCH DIESER bestimmten Stromstärke arbeiten kann, ohne sich SCHWEISSMASCHINE BZW. AUSFÜHRUNG zu überhitzen. BELIEBIGEN WARTUNGSARBEITEN, DIESES HANDBUCH Schweißstrom UND DAS HANDBUCH “SICHERHEITSVORSCHRIFTEN FÜR Sekundärspannung bei Schweißstrom I DEN GERÄTEGEBRAUCH” AUFMERKSAM LESEN. DABEI IST Nennspannung.
- Page 14 Von nun an fordert das Gerät Sie bei jedem Einschalten darauf, G – Steckdose Minuspol. den dreistelligen Code (Passwort) einzugeben, um sich zu Für das MMA- und MIG-Schweißen mit Gas wird hier das aktivieren. Massekabel angeschlossen. Für das WIG- und MIG-Schweißen HINWEIS: Jedes Gerät verfügt über einen persönlichen Fülldraht ohne...
- Page 15 gespeicherten Programme und der Programme, die noch durch Drücken des Drehknopfs B zum vorherigen Bildschirm geschrieben werden können, an. zurück. Wenn Sie zum Hauptmenü zurückkehren möchten, Speichern eines soeben ausgeführten drücken Sie den Drehknopf B erneut für mindestens 1 Arbeitsprogramms über den Drehknopf B ein Programm, Sekunde.
- Page 16 Schweißen eingestellten Geschwindigkeit, bevor der Draht einer "Masche" und der anderen mindestens 50% betragen das Werkstück berührt. muss. Diese Einstellung ist zur Gewährleistung eines optimalen Wird die Funktion aktiviert, erscheinen hintereinander Starts sehr wichtig. die Angaben: Die werkseitige Einstellung ist: 0% (Auto). Frequenz Zum Aufrufen der Funktion muss man sie mit dem Einstellung von 0,1 Hz bis 5,0 Hz.
-
Page 17: Wig-Schweissen
Zur Rückkehr zum Hauptmenü mindestens 1 Sek. lang erneut auf den Drehknopf B drücken. Während des Prozesses können mit dem Drehknopf B folgende Funktionen ausgewählt und eingestellt werden (mit dem Drehknopf C): - Hot-Start-Z. - Hot-Start-St - ArcForce Z. Zur Rückkehr zum vorherigen Bildschirminhalt erneut auf den Drehknopf B drücken. - Page 18 MANUEL D’INSTRUCTIONS POUR POSTE A SOUDER A FIL IMPORTANT: VEUILLEZ LIRE ATTENTIVEMENT Courant max absorbé au courant I et à la CONTENU DE CE LIVRET ET DU LIVRET" REGLES DE tension U correspondants. SECURITE POUR L'UTILISATION DES APPAREILS AVANT C’est la valeur maximale du courant effectif TOUTE INSTALLATION, UTILISATION OU TOUT ENTRETIEN absorbé...
-
Page 19: Mise En Oeuvre
REMARQUE : chaque appareil est doté d’un code-mot de passe 4 COMMANDES SUR LE PANNEAU ARRIERE. (fig. 2) personnel, qui ne peut se repérer que sous forme électronique entré dans le sous-menu à côté du texte Mot de passe. H - Passe-câble Au cas où... - Page 20 bouton rotatif C pendant au moins 1 seconde et écrire le Tps I nom à 8 caractères en tournant et en appuyant sur le C'est le temps, exprimé en secondes, de durée du bouton rotatif C. Une fois l'écriture terminée, appuyer de courant de départ.
- Page 21 • Il définit le pourcentage de présence du deuxième niveau Pre Gaz dans le temps total. Le réglage peut varier de 0 à 10 secondes. Corr. arc Pour accéder à la fonction, il suffit de la sélectionner en utilisant le bouton B modifier la valeur en tournant Réglage de -9,9V à...
-
Page 22: Soudure Tig
l’électrode de la pince porte-électrode. 5.4 SOUDURE TIG Avant de souder il est recommandé d’enlever la torche MIG et de monter la torche TIG. Brancher la borne de puissance de la torche sortant du passe- câble E sur la prise pôle moins G. Brancher le connecteur du câble de masse sur la prise plus F et sa borne sur la pièce aussi proche que possible de la soudure. -
Page 23: Explicación De Los Datos Técnicos
MANUAL DE INSTRUCCIONES PARA SOLDADORA DE HILO IMPORTANTE: ANTES DE LA INSTALACIÓN, DEL USO O DE Tensión secundaria con corriente de soldad. I CUALQUIER OPERACIÓN DE MANTENIMIENTO QUE SE Tensión nominal de alimentación. VAYA A REALIZAR EN LA MÁQUINA DE SOLDAR, HAY QUE 1~ 50/60Hz Alimentación monofásica 50 o 60 Hz. -
Page 24: Puesta En Marcha
Desde este momento, cada vez que se encienda, el equipo potencia de la antorcha saliente de la guía de cable E. solicitará la introducción del código de 3 cifras (contraseña) para poder activarse. 4 MANDOS EN EL PANEL POSTERIOR (fig. 2) NOTA: cada equipo tiene un código contraseña personal, presente solo en forma electrónica e introducido en el submenú... - Page 25 durante al menos 1 segundo y escribir el nombre de 8 Regulación 0,1 – 10 seg. caracteres girando y presionando el selector C. Una vez Tpo.empalme finalizada la escritura volver a presionar el selector C Regulación 0,1 – 10 seg. Define el tiempo de empalme durante al menos 1 segundo.
-
Page 26: Soldadura Tig
• aparecen las letras OFF y TODO, evidenciando las letras Postgas TODO y presionando el selector B se efectúa el reinicio. El ajuste puede variar desde 0 a 25 segundos. Después de confirmar la elección, se vuelve a la pantalla Para acceder a la función es suficiente evidenciarla anterior presionando el selector B. -
Page 27: Mantenimiento
Para seleccionar este proceso comenzando por el menú principal presionar el selector B durante al menos 1 segundo para entrar en el submenú. Dentro del submenú, girar y presionar el selector B para seleccionar Procesos. Dentro de los Procesos, girar y presionar el selector B para seleccionar TIG. - Page 28 MANUAL DE INSTRUÇÕES PARA MÁQUINA DE SOLDAR A FIO IMPORTANTE: ANTES DA INSTALAÇÃO, DO USO OU DE Tensão secundária com corrente de soldadura QUALQUER TIPO DE MANUTENÇÃO NA MÁQUINA DE SOLDADURA LEIA O CONTEÚDO DESTE MANUAL E DO Tensão nominal de alimentação. MANUAL “NORMAS DE SEGURANÇA PARA O USO DOS 1~ 50/60Hz Alimentação monofásica 50 ou então 60 Hz.
- Page 29 Para ativá-la, é necessário com o manípulo B aceder ao G – Tomada negativa. submenu e selecionar Password, de seguida selecionar e Usada para conectar, em soldadura MMA e MIG com gás, o premir com o mesmo botão a posição ON. cabo de massa;...
- Page 30 logo após selecionar e premir com o manípulo B um soldadura definida com o manípulo B nos programas de programa que ainda pode ser gravado, prima o manípulo C soldadura. Configura-se com o manípulo C. por no mínimo 1 seg. e escrever o nome de 8 caracteres ao •...
- Page 31 • • Language É a função de paragem automática do fio. É ativada nos Nesta seção é possível escolher o idioma no qual são processos MIG, regulável por 20 a 40 segundos e não escritas as mensagens do ecrã. desativável. Se a soldadura não inicia dentro do tempo configurado, com qualquer modo de pressão do botão, a 5.2 SOLDADURA EM MIG SEM GÁS máquina para a saída do fio.
- Page 32 -Slope Down -Pulse -Spot -Spot time -Pre Gas -Post Gas Para voltar ao ecrã anterior, premir o manípulo B. Para voltar ao menu principal, premir novamente o manípulo B por no mínimo 1 seg. Provocar, por contacto, o arco eléctrico com um movimento firme e rápido.
- Page 33 Art./Item 218 DESCRIZIONE DESCRIPTION BESCHREIBUNG DESCRIPTION DENOMINACIÓN DESCRIÇÃO SUPPORTO MANICO HANDLE SUPPORT GRIFFHALTERUNG SUPPORT POIGNEE SOPORTE EMPUÑADURA SUPORTE EMPUHNADURA MANICO HANDLE GRIFF POIGNEE EMPUÑADURA EMPUHNADURA MANOPOLA KNOB KNOPF BOUTON BOTÓN BOTÃO INNESTO TEXAS TEXAS CONNECTION TEXAS-KUPPLUNG CONNEXION TEXAS ACOPLAMIENTO TEXAS CONECTOR TEXAS INTERRUTTORE SWITCH...
- Page 34 Art./Item 218...
- Page 36 Codifica colori Wiring diagram Farben- Codification Codificación Codificação Kleurencodificering cablaggio colour code Codierung couleurs schéma colores cableado cores conjunto van schakelschema elettrico elektrische électrique eléctrico eléctrico de Schaltplan cabos Nero Black Schwarz Noir Negro Negro Zwart Rosso Rouge Rojo Vermelho Rood Grigio Grey...
Need help?
Do you have a question about the MIG COMBO 218 and is the answer not in the manual?
Questions and answers