
Related Manuals for SPRT SP-R301


Summary of Contents for SPRT SP-R301
- Page 1 SPRT ® POS Thermal Receipt Printer (SP-R301) User’s Manual (Ver 1.00) Beijing Spirit Technology Development Co.,Ltd. www.sprt-printer.com...
-
Page 2: Table Of Contents
Content Precautions ..............................1 Safety Precautions ..........................1 Precautions for storage ........................2 Brief introduction ........................... 2 Chapter 1 Feature and Performance ......................4 1.1 Printing performance ........................4 1.2 Printer paper ........................... 4 1.3 Print characters ..........................5 1.4 Interfaces ............................5 1.5 Print control command ........................5 1.6 Power requirements ........................6 1.7 Working environment ........................6 1.8 Dimensions ............................6... -
Page 3: Precautions
Precautions Before using the printer, please read this chapter carefully! Safety Precautions ◆Do not touch the print head and its connected parts to avoid burns or damage to the print head due to static electricity. ◆If the printer emits smoke, peculiar smell or abnormal noise, the machine must be turned off immediately. -
Page 4: Precautions For Storage
60°C and a relative humidity of 10% to 90%. Brief introduction The SP-R301 printer is a new type of thermal line printer with fast printing speed, low noise, good reliability, high printing quality, no need for ribbon, and eliminates the trouble of daily maintenance. - Page 5 Warning This is a class A product. In a domestic environment this product may cause radio interference in which case the user may be required to take adequate measures.
-
Page 6: Chapter 1 Feature And Performance
Chapter 1 Feature and Performance 1.1 Printing performance ● Printing method: line thermal printing ● Printing paper width: 79.5±0.5mm ● Printing density: 8dots/mm, 576dots/line ● Printing speed: maximum printing speed 200mm/s (25% printing density) ● Reliability: (1) Print head life: 150km Conditions of Use: * Print 12 ×... -
Page 7: Print Characters
Paper thickness ---------- 0.06mm~0.08mm 1.3 Print characters ● Western character set: 12×24 dots, 1.5 (width)×3.00 (height) mm ● Chinese characters: 24×24 dots, 3.00 (width) × 3.00 (height) mm 1.4 Interfaces ●Ethernet interface: Standard Ethernet interface. ●USB interface: Standard USB interface. ●Wireless interface: WiFi, Bluetooth interface ●Cash drawer control:... -
Page 8: Power Requirements
1.6 Power requirements ●DC24V±10%, 2A, A-1009-3P power socket 1.7 Working environment ●Operating temperature: 5℃~50℃ Operating relative humidity: 10%~80% ●Storage temperature: -20℃~60℃ Storage relative humidity: 10%~90% 1.8 Dimensions ●174(L)mm×150(W)mm×118(H)mm 1.9 Model classification model interface Speed (Max) SP-R301UE USB, 100M Ethernet SP-R301UEVT USB, 100MEthernet, voice 200mm/s SP-R301UEBT... -
Page 9: Paper Installation
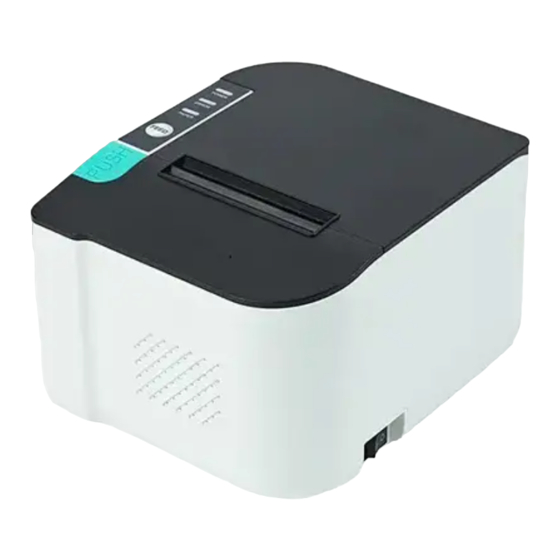
Figure 2-1 The name of each part of the printer 2.2 Paper Installation 2.2.1 Paper Loading The thermal paper installation steps are as follows: Press the left open button to open the paper compartment cover, put the thermal paper roll into the paper compartment of the paper machine, pull out a section from the paper roll, then put the paper end on the machine head, and close the paper compartment cover. -
Page 10: Interface
Fig2-3 Ethernet Interface 2.3.2 USB Interface The standard accessories of SP-R301 printer includes a Mini USB cable with D Type connector which connects printer and main device. The USB type belongs to the slave device type(DEVICE). Pins description of Mini-USB as Fig.2-3 below:... -
Page 11: Wireless Connection
Bluetooth connection Hand-held device, laptop and other information terminal devices with Bluetooth can drive SP-R301 to print by the Bluetooth interface. SP-R301 printer is compatible with Bluetooth2.0 standard. Power class is CLASS 2, effective communication distance is 10meters. The Bluetooth of the printer belongs to the slave device. The initial name... -
Page 12: Cash Drawer Interface
2.3.4 Cash Drawer Interface The cash drawer interface of SP-R301 adopts RJ-11 6-pin socket, as Fig.2-5 shows: Fig.2-4 Cash Drawer Interface The pin assignment is as below: Pin No. -
Page 13: Power Connection
Cash drawer driver signal 2 Signal ground —— 2.3.5 Power Connection The standard external power supply adopter is 24V±10%, 2A, the current is 2A. And the power socket is A-1009-3P model, as Fig. 2-6 shows: Pin No. Signal +24VDC Ground Fig.2-6 Definition of power socket and pin 2.4 Buzzer, Buttons and Indicators There is one button, one inner buzzer, one sounder (optional) and three indicators. - Page 14 The red ERROR indicator is error status indicator. The indicator light indicates the error happened, such as opening case cover. The details can be found in “Error Indicates Table”. ERROR indicator is red/blue double color indicator. It is used to indicate ERROR/receipts checking/wireless connection status.
- Page 15 ERROR Indicator ERROR Type ERROR Description Flickering Type LED flashes once:Internal memory reading and writing error LED flashes twice:over-voltage LED flashes three times:under-voltage LED flashes four times: CPU execution error (wrong address) Non-recovera ble error LED flashes five times: UIB error LED flashes six times: FLASH writing error LED flashes seven times:...
-
Page 16: Normal Boot State
LED flashes constantly: printing Auto-recovera head over-heat; upper case cover ble error opening error during printing 2.5 Normal Boot State In the power off state, with the paper cover closed, turn on the printer. The error indicator and the out of paper indicator flash alternately twice, and then go out, and the printer enters the normal working mode. -
Page 17: Hexadecimal Printing
Figure 2-7 self test 2.7 Hexadecimal Printing Turn on the printer according to the step below, it will enter the mode of Hexadecimal Printing 1.Open the cover; 2.Hold down 【FEED】 button,and connect with power; wait for the alarm and close the paper cover. -
Page 18: Parameter Setting
3.The printer will print out 3 lines as below: Hexadecimal Dump To terminate hexadecimal dump, Press FEED button three times. This means the printer has entered hexadecimal printing mode, and under this mode, all of the input will be printed out as hexadecimal number, feed one line with single-click of “FEED”... - Page 19 mode), and then close the [paper compartment cover]. The printer enters the program upgrade mode. At this time, the status indicator flashes at a rate of about 1 second. Quick access method: In the shutdown state, first open the [paper compartment cover], press and hold the 【FEED】...
- Page 20 Appendix A This appendix is the method to set the printer parameter according to button operation. Setting introduction: use the Paper cover to choose setting, when open and shut once, the set become the next one and it will print the present set value. Use 【FEED】 button to set the set value, when press it once, the set become the next one and it will print the present set value.
- Page 21 Error ON ALL ON FEED Paper-out reprint: FEED FEED Black mark mode:: FEED close open FEED The manufacturer has the right to modify the contents of the manual without making a prior statement! The final interpretation right belongs to SPRT.
Need help?
Do you have a question about the SP-R301 and is the answer not in the manual?
Questions and answers