
Related Manuals for BRAND Dispensette III


Summary of Contents for BRAND Dispensette III
- Page 1 Liquid Handling · Easy Handling! Dispensette ® F I R S T C L A S S · B R A N D Manual de operação Operating Manual...
-
Page 3: Table Of Contents
Índice Página Instruções de Segurança Funções e Limitações de uso Tabela de Seleção de Dispensadores Elementos de Operação Primeiros Passos Montagem Inicialização – Purga Dispensação Acessórios Limites de Erro (Volume Nominal, Volume Parcial) Verificação de Volume (Calibração) Ajuste Limpeza Limpeza/Substituição das Válvulas Autoclavação Informações para Pedido Acessórios ·... -
Page 4: Instruções De Segurança
Instruções de segurança Eventualmente, este instrumento pode ser utilizado com materiais, operações e equipamentos perigosos. Está além do escopo deste manual abordar todos os riscos de segurança potenciais associados com seu uso nestas aplicações. É responsabilidade do usuário do instrumento consultar e estabelecer práticas de segurança e saúde, além de determinar a aplicabilidade de limitações legais antes da utilização. -
Page 5: Funções E Limitações De Uso
Funções e Limitações de Uso Dispensette III (código de cor vermelho) ® código de cor vermelho) Digital · Easy Calibration Analógico – Volume Variável Volume Fixo Dispensette Organic (código de cor amarelo) ® ( código de cor amarelo) Digital · Easy Calibration Analógico –... - Page 6 Funções e Limitações de Uso Limitações de Uso Limitações de Operação O instrumento foi desenvolvido para dispensar lí- Líquidos que formam depósitos podem dificultar quidos, observando as seguintes limitações físicas: o movimento do pistão ou causar travamento (ex. soluções que cristalizam ou soluções alcalinas –...
- Page 7 Funções e Limitações de Uso Condições de armazenagem Armazene o instrumento e acessórios somente em locais com boas condições de limpeza, secos e frescos. Temperatura de armazenagem: de -20 °C a +50 °C. Faixa de aplicação recomendada Dispensette III (código de cor vermelho): sua ®...
-
Page 8: Tabela De Seleção De Dispensadores
(p.ex., soluções tampão biológicas), mola da válvula de platina-irídio. detergentes biológicos e meios para cultura de células. Caso necessite de informações referentes a outros reagentes químicos não presentes nesta lista, contate a BRAND. Esta edição: 0715/13... -
Page 9: Elementos De Operação
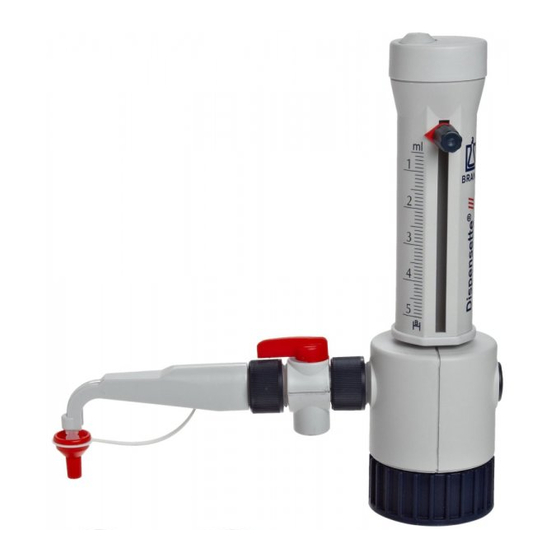
Elementos de Operação Base do pistão Ajuste de volume Tampa Ajuste de volume Carcaça Anel de Tensão Pistão Cilindro de dispensação Pistão Tubo de dosi- Tubo de do- Válvula de recirculação ficação sificação SafetyPrime ™ Bloco de válvulas (rosca de frasco GL 45) Tampa rosca Tubo de recirculação Tubo de enchimento... -
Page 10: Primeiros Passos
Primeiros Passos Todos os elementos estão na embalagem? Confirme que na embalagem estão incluídos: Dispensador para frascos Dispensette , tubo de dosificação, tubo de enchimento telescópico, válvula de ® recirculação SafetyPrime ™ e tubo de recirculação (opcionais), chave de montagem, diferentes adaptado- res para frascos, selo O-ring em KFM (para autoclavação), um certificado de performance e este manual de operações. - Page 11 Primeiros Passos Monte o tubo de Ajuste o comprimento do tubo de enchi- aspiração e o tubo mento telescópico à altura do frasco e de recirculação conecte-o. Se a válvula de recirculação SafetyPrime ™ (opcional) estiver sendo utilizada, o tubo de recirculação também deve ser montado.
-
Page 12: Inicialização - Purga
Inicialização - Purga Atenção! Nunca pressione o pistão para baixo quando a tampa estiver ros- queada! Evite respingos de reagente! O reagente pode gotejar do tubo de dosificação e da tampa rosca. Observação: Antes de utilizar o instrumento pela primeira vez, certifique-se de ter rinsado cuidadosamente e descarte as primeiras amostras dispensa- das. -
Page 13: Dispensação
Dispensação Ajuste do volume – Digital: Gire o botão de seleção Ajuste analógico: Gire por Volume fixo: O volume não de volume até que o volume meia volta a trava do seletor de é ajustável e não pode ser desejado seja indicado (contador volume para soltar (1), ajuste alterado. -
Page 14: Acessórios
Acessórios Os seguintes acessórios estão disponíveis para os dispensadores para frasco Dispensette ® Válvula de recirculação SafetyPrime ™ A válvula de recirculação SafetyPrime ™ (veja acessórios, pág. 27 ) permite a purga do instrumento sem perda de meio. Sempre utilize a válvula de recirculação adequada que corresponde ao modelo do ins- trumento. - Page 15 Acessórios Tubo de secagem A utilização de um de tubo secagem, cheio com um absorvente ade- quado (adquirido separadamente), é necessária para meios sensíveis à umidade e CO (Acessórios, pág. 28 ). Para montagem, desrosqueie a tampa de entrada de ar (Fig. a) e rosqueie o tubo de secagem cheio com absorvente (Fig.
- Page 16 Acessórios Tubo de dosificação com conector Luer-Lock para microfiltros O tubo de dosificação com conexão Luer-Lock permite a conexão de um microfiltro para filtração estéril. As partes em contato com os meios são feitas de: Vidro borossilicato, Al -cerâmica, ETFE, FEP, PFA, PTFE, platina- irídio e PP (conexão Luer-Lock).
-
Page 17: Limites De Erro (Volume Nominal, Volume Parcial)
Limites de Erro Limites de erro são relativos ao volume nominal (= volume máximo) indicados no instrumento, obtidos quando instrumento e água destilada estão em equilí- brio à temperatura ambiente (20 °C). O testes são realizados de acordo com 20 °C a DIN EN ISO 8655-6 com um instrumento completamente cheio e dispen- sação suave e uniforme. -
Page 18: Verificação De Volume (Calibração)
Este período deve ser ajustado para corresponder aos requerimentos individuais. O procedimento de teste completo (SOP) pode ser baixado em www.brand.de. Além disso, verificações de função podem ser realizadas em períodos mais curtos, por exemplo dispensando o volume nominal em balões teste (balões volumétricos com 3 marcas calibrados DAkkS). -
Page 19: Ajuste
Ajuste Após um longo período de utilização, um ajuste do instrumento pode ser necessário. I Calibrar, por exemplo, no volume nominal (veja pág. 18) I Calcular o volume médio (resultado da pesagem) (veja pág. 18). I Ajuste o instrumento (para o volume médio calculado). I Após o ajuste, outra calibração é... -
Page 20: Limpeza
Limpeza O instrumento deve ser limpo nas seguintes situações para assegurar a correta operação: I Antes da troca da válvula I Imediatamente, quando o pistão apresentar dificuldade de movimentação I Regularmente quando utilizar líquidos que formam depósitos (ex. Líquidos que I Antes da troca de reagente cristalizam) I Antes da armazenagem por longo tempo... - Page 21 Limpeza Solte o pistão a) Analógico, volume ajustável e volume fixo Segure a carcaça firmemente e desenrosque o pistão completamente girando para a esquerda. Puxe o pistão cuidadosamente. Não remova a carcaça! b) Tipo Digital Realize a montagem e desmontagem somente com o ajuste no volume máximo. Mova a trava para a esquerda e remova a capa do Posicione a ponta da ferramenta de montagem na cilindro.
-
Page 22: Limpeza/Substituição Das Válvulas
Limpeza Limpeza/Substituição das Válvulas Válvula de enchimento a) Puxe o tubo de recirculação e o tubo de enchimento telescópico (Fig. a) b) Use a ferramenta de montagem para desrosquear a válvula de enchimento (Fig. b). c) Se o anel de vedação estiver contaminado ou danificado, remova-o cuidadosamente com uma pinça (Fig. -
Page 23: Autoclavação
Autoclavação O instrumento pode ser autoclavado a 121 °C, 2 bar absoluto (30 psi) com um tempo de espera de pelo menos 15 minutos de acordo com a DIN EN 285. Antes da primeira autoclavação Remova o anel de vedação em PTFE não elástico (R) que já vem montado e substitua pelo anel de vedação de KFM elástico (S). -
Page 24: Informações Para Pedido
Informações para pedido Dispensette III, Digital · Easy Calibration ® Capacidade Subdivisão Sem válvula de recircula- Com válvula de recir- ção SafetyPrime culação SafetyPrime ™ ™ Ref. Ref. 0,2 - 0,01 4700 320 4700 321 0,5 - 0,02 4700 330 4700 331 0,05 4700 340... - Page 25 Informações para pedido Dispensette Organic, Digital · Easy Calibration ® Capacidade Subdivisão Sem válvula de recircula- Com válvula de recir- ção SafetyPrime culação SafetyPrime ™ ™ Ref. Ref. 0,5 - 0,02 4730 330 4730 331 0,05 4730 340 4730 341 2,5 - 4730 350 4730 351...
-
Page 26: Acessórios · Peças De Substituição
Acessórios · Peças de Reposição Adaptadores para frascos em PP ou ETFE/PTFE. Adaptadores de ETFE/ PTFE oferecem resistência química mais alta. Rosca externa Para rosca de frasco/ Material Ref. junta esmerilhada GL 32 GL 24-25 7043 25 GL 32 GL 28/ S* 28 7043 28 GL 32 GL 30... - Page 27 Acessórios · Peças de Reposição Tubo de dosificação Tubos de enchimento flexível PTFE, enrolado, telescópicos FEP. Se comprimento 800mm, adaptam a várias alturas com manípulo de segu- de frascos. Embalagem rança. Emb. Com 1 und. com 1 und. Volume Nominal Tubo de dosificação Ref.
- Page 28 Acessórios · Peças de Reposição Selos PTFE. Selos de reposi- ção para o tubo de dosi- Anel de vedação para ficação, SafetyPrime ™ bloco de válvulas e válvula de enchimento. PTFE, para reagentes Embalagem com 5 uni- muito voláteis. dades de cada Embalagem com 1 und.
-
Page 29: Resolução De Problemas
Resolução de Problemas Problema Possível causa Ação corretiva Pistão difícil de mover Formação de cristais, sujeira Pare de dosificar imediatamente. Solte o pistão com movimentos circulares, mas não desmonte. Siga as instruções de limpeza (veja pág. 20-22). Não é possível encher Seletor de volume ajustado no Ajuste para o volume desejável (veja pág. -
Page 30: Reparo E Informações De Garantia
A instrução detalhada do teste pode ser encontrada em www.brand. de para download. A BRAND também oferece a opção do seu instrumento ser calibrado pela BRAND pelo Serviço de Calibração BRAND ou pelo Serviço de Calibração DAkkS da BRAND. - Page 31 Table of Contents Page Safety Instructions Functions and Limitations of Use Dispenser Selection Chart Operating Elements First Steps Assembly Priming Dispensing Accessories Error Limits (Nominal Volume, Partial Volume) Checking the Volume (Calibration) Adjustment Cleaning Cleaning/Replacing Valves Autoclaving Ordering Information Accessories · Spare Parts Troubleshooting Repairs and Warranty Information Disposal...
-
Page 32: Safety Instructions
Safety Instructions This instrument may sometimes be used with hazardous materials, operations, and equipment. It is beyond the scope of this manual to address all of the potential safety risks associated with its use in such applica- tions. It is the responsibility of the user of this instrument to consult and establish appropriate safety and health practices and determine the applicability of regulatory limitations prior to use. -
Page 33: Functions And Limitations Of Use
Functions and Limitations of Use Dispensette III (red color code) ® color code) Digital · Easy Calibration Analog-adjustable Fixed-volume Dispensette Organic (yellow color code) ® ( yellow color code) Digital · Easy Calibration Analog-adjustable Fixed-volume When the instrument is correctly used, the dispensed liquid comes Note: into contact with only the following chemically resistant materials: For dispensing HF, we re-... - Page 34 Functions and Limitations of Use Limitations of Use Operating Limitations This instrument is designed for dispensing liquids, Liquids, which form deposits may make the piston observing the following physical limits: difficult to move or may cause jamming (e.g., crystallizing solutions or concentrated alka- –...
- Page 35 Functions and Limitations of Use Storage Conditions Store the instrument and accessories only in cleaned condition in a cool and dry place. Storage temperature: from -20 °C to +50 °C (from -4 °F to 122 °F). Recommended Application Range Dispensette III (color code red): Its broad range ®...
-
Page 36: Dispenser Selection Chart
(e.g., biological buffers), biological Dispensette TA bottle-top dispenser ® detergents and media for cell culture can be dispensed. Should you require information on chemicals with platinum-iridium valve spring. not listed, please feel free to contact BRAND. Status as of: 0715/13... -
Page 37: Operating Elements
Operating Elements Piston seat Volume adjustment Cover plate Volume adjustment Housing Tension ring Piston Dispensing cylinder Piston Discharge Discharge ™ SafetyPrime tube tube recirculation valve Valve block (GL 45 bottle thread) Screw cap Recirculation tube Telescoping filling tube Filling seal for autoclaving Filling and recirculation tube Mounting tool application... -
Page 38: First Steps
First Steps Is everything in the package? Confirm that your package includes: ™ Bottle-top dispenser Dispensette , discharge tube, telescoping filling tube, SafetyPrime recirculation ® valve and recirculation tube (optional), mounting tool, different bottle adapters, O-ring FKM (for autoclav- ing), a performance certificate and this operating manual. Nominal volume, ml Adapters Filling tube... - Page 39 First Steps Adjust the length of the telescoping fill- Mounting the ing tube to the bottle height and attach filling tube and ™ recirculation tube it. If a SafetyPrime recirculation valve (optional) is used, the recirculation tube must also be mounted. Insert the recir- culation tube with the opening pointing outward (Fig.
-
Page 40: Priming
Priming Warning: Never press down the piston when the screw cap is screwed on! Avoid splashing the reagent! The reagent can drip out from the dis- charge tube and screw cap. Note: Before using the instrument for the first time, ensure it is rinsed carefully and discard the first few samples dispensed. -
Page 41: Dispensing
Dispensing Setting the volume – Digital: Rotate the volume- Analog-adjustable: Loosen the Fixed-volume: The volume is setting wheel until the desired volume selector thumb screw non-adjustable and cannot be volume is indicated (mechanical one-half turn (1), set the pointer changed. counter). -
Page 42: Accessories
Accessories The following optional accessories are available for the bottle-top dispenser Dispensette ® SafetyPrime ™ recirculation valve The SafetyPrime ™ recirculation valve (see accessories, page 55) en- ables priming of the instrument without loss of medium. Always use the designated recirculation valve that corresponds to the instrument model. - Page 43 Accessories Drying tube Use of a drying tube, filled with a suitable absorbent (purchased separately), might be necessary for moisture- and CO -sensitive media ('Accessories', page 56). For mounting, unscrew the air vent cap (Fig. a) and screw the filled drying tube in (Fig.
- Page 44 Accessories Discharge tube with Luer-Lock attachment for micro filter The dispensing tube with a Luer Lock attachement enables the con- nection of a microfilter for sterile filtration. The parts which come in contact with the medium are: Borosilicate glass, AI -ceramic, ETFE, FEP, PFA, PTFE, platinum- iridium and PP (Luer-Lock attachment).
-
Page 45: Error Limits (Nominal Volume, Partial Volume)
Error Limits Error limits related to the nominal capacity (= maximum volume) indicated on the instrument, obtained when instrument and distilled water are equilibrated at ambient temperature (20 °C/68 °F). Testing takes place according DIN EN 20 °C ISO 8655-6 with a completely filled instrument and with uniform and smooth dispensing. -
Page 46: Checking The Volume (Calibration)
This time frame should be adjusted to correspond with individual requirements. The complete testing procedure (SOP) can be downloaded at www.brand.de. In addition, you can also carry out function checks at shorter intervals, e.g. dispensing the nominal volume into a volumetric test flask (volumetric flask with 3 marks, DAkkS calibrated). -
Page 47: Adjustment
Adjustment After a long period of usage an adjustment of the instrument might be necessary. I Calibrate for example at nominal volume (see page 46). I Calculate mean volume (result of weighing) (see page 46). I Adjust the instrument (to the calculated mean volume). I After the adjustment, further calibration is necessary to confirm appropiate adjustment. -
Page 48: Cleaning
Cleaning The instrument must be cleaned in the following situations to assure correct operation: I prior to changing the valve I immediately when the piston is difficult to move I regularly when using liquids which form deposits (e.g., crystallizing liquids) I before changing the reagent I regularly when liquids accumulate in the I prior to long term storage... - Page 49 Cleaning Loosen piston. a) Analog-adjusted and fixed-volume model Hold the housing securely and unscrew the piston completely by turning it to the left. Carefully pull out the piston. Do not remove the housing! b) Digital type Carry out assembly and dismantling at the maximum volume setting only. Move the latch to the left and remove the cylinder Place the tip of the mounting tool in the receiving sleeve.
-
Page 50: Cleaning/Replacing Valves
Cleaning Cleaning/replacing the valves Filling valve a) Pull out the recirculation tube and the telescoping filling tube (Fig. a). b) Use the mounting tool to unscrew the filling valve (Fig. b). c) If the sealing ring is contaminated or damaged, carefully remove it with a pair of curved forceps (Fig. -
Page 51: Autoclaving
Autoclaving This instrument is autoclavable at 121 °C (250 °F), 2 bar absolute (30 psi) with a holding time of at least 15 minutes according to DIN EN 285. Prior to the first autoclaving Remove built-in inelastic PTFE-sealing ring (R) and replace with the supplied elastic sealing ring made of FKM (S). -
Page 52: Ordering Information
Ordering Information Dispensette III, Digital · Easy Calibration ® Capacity Subdivision without SafetyPrime ™ with SafetyPrime ™ recirculation valve recirculation valve Cat. No. Cat. No. 0.2 - 0.01 4700 320 4700 321 0.5 - 0.02 4700 330 4700 331 0.05 4700 340 4700 341 2.5 -... - Page 53 Ordering Information Dispensette Organic, Digital · Easy Calibration ® Capacity Subdivision without SafetyPrime with SafetyPrime ™ ™ recirculation valve recirculation valve Cat. No. Cat. No. 0.5 - 0.02 4730 330 4730 331 0.05 4730 340 4730 341 2.5 - 4730 350 4730 351 4730 360 4730 361...
-
Page 54: Accessories · Spare Parts
Accessories · Spare Parts Bottle adapters PP or ETFE/PTFE. Adapters of ETFE/PTFE offer higher chemical resistance. Outer for bottle thread/ Material Cat. No. thread ground joint GL 32 GL 24-25 7043 25 GL 32 GL 28/ S* 28 7043 28 GL 32 GL 30 7043 30... - Page 55 Accessories · Spare Parts Flexible discharge tubing Telescoping filling PTFE, coiled, length tubes 800 mm, with safety FEP. Adjusts to various handle. Pack of 1. bottle heights. Pack of 1. Nominal Discharge tube Cat. No. Nominal Outer Ø Length Cat. No. volume Outer Ø...
- Page 56 Accessories · Spare Parts Seals PTFE. Spare seals for Sealing ring for valve discharge tube, block SafetyPrime ™ PTFE, for highly filling valve. volatile reagents. Pack of 5 each type. Pack of 1. Cat. No. 6696 Cat. No. 7044 86 Sealing ring for filling valve FKM (Fluororo elasto-...
-
Page 57: Troubleshooting
Troubleshooting Problem Possible cause Corrective action Piston difficult Formation of crystals, dirty Stop dispensing immediately. Loosen piston with to move circular motion, but do not disassemble. Follow all cleaning instructions (page 48-50). Filling Volume adjusted to Set to required volume not possible minimum setting (see page 41). -
Page 58: Repairs And Warranty Information
The detailed testing instruction can be downloaded on www.brand.de. BRAND also offers you the possibility to have your instruments calibrated by the BRAND Calibration Service or the BRAND-owned DAkkS Calibration Service. - Page 60 BRAND GMBH + CO KG · Postfach 11 55 · 97861 Wertheim · Germany Tel.: +49 9342 808-0 · Fax: +49 9342 808-236 · E-Mail: info@brand.de · Internet: www.brand.de 9975 19 · Printed in Germany · 13/0715/30...
Need help?
Do you have a question about the Dispensette III and is the answer not in the manual?
Questions and answers
Есть ли в дозаторе минлио аккумулятор и где он находится