Table of Contents
Advertisement
Revision history form
Delivery no.
Delivery no.
Delivery no.
Delivery no.
Delivery no.
Delivery no.
Delivery no.
Delivery no.
Delivery no.
Delivery no.
Delivery no.
Delivery no.
Delivery no.
Delivery no.
Delivery no.
Delivery no.
Delivery no.
Delivery no.
37091
CliniMACS® Plus System User Manual (Canadian edition)
Exchange of pages:
Date
Exchange of pages:
Date
Exchange of pages:
Date
Exchange of pages:
Date
Exchange of pages:
Date
Exchange of pages:
Date
Exchange of pages:
Date
Exchange of pages:
Date
Exchange of pages:
Date
Exchange of pages:
Date
Exchange of pages:
Date
Exchange of pages:
Date
Exchange of pages:
Date
Exchange of pages:
Date
Exchange of pages:
Date
Exchange of pages:
Date
Exchange of pages:
Date
Exchange of pages:
Date
Signature
Signature
Signature
Signature
Signature
Signature
Signature
Signature
Signature
Signature
Signature
Signature
Signature
Signature
Signature
Signature
Signature
Signature
Revision history form
Advertisement
Table of Contents

Related Manuals for Miltenyi Biotec CliniMACS Plus System


Summary of Contents for Miltenyi Biotec CliniMACS Plus System
- Page 1 CliniMACS® Plus System User Manual (Canadian edition) Revision history form Delivery no. Exchange of pages: Date Signature Delivery no. Exchange of pages: Date Signature Delivery no. Exchange of pages: Date Signature Delivery no. Exchange of pages: Date Signature Delivery no. Exchange of pages: Date Signature...
- Page 2 CliniMACS® Plus System CliniMACS® Plus System User Manual (Canadian edition) Software 2.4x Miltenyi Biotec B.V. & Co. KG Friedrich-Ebert-Straße 68 51429 Bergisch Gladbach Germany Miltenyi Biotec Technical Support: +49 2204 8306-8484 +49 2204 8306-80 (hotline) +49 2204 8306-89 macsde@miltenyi.com www.miltenyibiotec.com...
- Page 3 CliniMACS, MACS, and the MACS logo are registered trademarks or trademarks of Miltenyi Biotec B.V. & Co. KG and/or its affiliates in various countries worldwide.
-
Page 4: Table Of Contents
Table of contents Table of contents General ..............1 Introduction . - Page 5 CliniMACS® Plus System User Manual (Canadian edition) STEP 1: Cell preparation and magnetic labeling CliniMACS® CD34 Reagent ............1 General information .
- Page 6 Table of contents STEP 1: Cell preparation and magnetic labeling (continued) CliniMACS® TCRα/β-Biotin ............1 General information .
- Page 7 CliniMACS® Plus System User Manual (Canadian edition) STEP 2: Start of the CliniMACS® Plus Instrument and choice of separation program CD34 SELECTION 1/2 ............. . 1 Switch-on of the CliniMACS®...
- Page 8 Table of contents STEP 3: Installation of CliniMACS® Tubing Sets CliniMACS® Tubing Set and CliniMACS Tubing Set LS ....... . 1 Preparation for tubing set installation .
- Page 9 CliniMACS® Plus System User Manual (Canadian edition) STEP 4: CliniMACS® Plus Separation CD34 SELECTION 1/2 ............. . 1 Separation procedure .
-
Page 10: General
(MACS® Technology) will be null and void. developed by Miltenyi Biotec B.V. & Co. KG. Miltenyi Biotec has made these products available for clinical applications meeting the requirements of European Regulatory Standards. -
Page 11: Service Information
CliniMACS® Plus System User Manual (Canadian edition) Service information Miltenyi Biotec Technical Support (Clinical) For any information regarding the CliniMACS Plus System and its components, contact the Miltenyi Biotec Technical Support: Miltenyi Biotec B.V. & Co. KG Friedrich-Ebert-Straße 68 51429 Bergisch Gladbach... -
Page 12: The Clinimacs® Plus Instrument
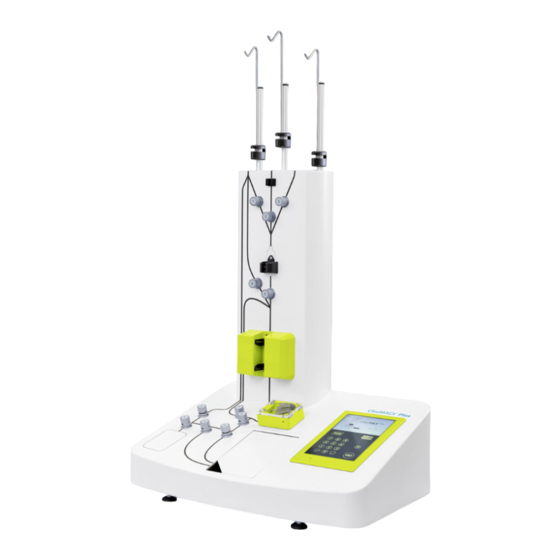
The CliniMACS Plus Instrument is UL Listed (see Figure 1.1). For regulatory status in countries outside Europe, contact the authorized local Miltenyi Biotec Service Provider. 1.3.2 Intended purpose Figure 1.1: UL listing mark, listed as laboratory... -
Page 13: Warnings And Precautions
Contact Miltenyi Biotec Technical Support. The instrument is a protection class I device and may only be plugged into an outlet with a grounded connection. - Page 14 General 11. Never leave the instrument unattended during a run. If an error occurs, the cell separation can be interrupted by the user at the current step and the operator will have 600 seconds to correct certain errors. If the instrument has not been restarted after this time period, the run will be aborted.
-
Page 15: Specifications
The technical data of the CliniMACS Plus Instrument are listed approved by the manufacturer of the in Table 1.1. WARNING ! The instrument shall not be used CliniMACS Plus System could invalidate outside its specifications. the user’s authority to operate this system. - Page 16 General Protection class: The instrument is a protection class I device (acc. to DIN 61140) and may only be plugged into an outlet with a grounded conductor. The protection category according to DIN EN 60529 is IPX 0. Interferences: This equipment has been tested and found to comply with the limits for a class A digital device, pursuant to part 15 of the FCC Rules.
-
Page 17: Guidance And Manufacturer's Declaration On Electromagnetic Compatibility
EMC compliance with IEC 60601-1-2:2014 has been attested for the provided power cable. The use of other power cables may result in increased electromagnetic emissions or decreased immunity of the CliniMACS Plus Instrument. If the provided power cable is missing, contact Miltenyi Biotec for information on a replacement part. Guidance and manufacturer’s declaration – Electromagnetic emissions The CliniMACS Plus Instrument is intended for the use in the professional facility healthcare environment. - Page 18 General Guidance and manufacturer’s declaration – Electromagnetic immunity The CliniMACS Plus Instrument is intended for the use in the professional facility healthcare environment. The instrument is not intended to be used near active HF surgical equipment. The customer or user of the instrument should assure that it is used in such an environment.
- Page 19 CliniMACS® Plus System User Manual (Canadian edition) Guidance and manufacturer’s declaration – Electromagnetic immunity to RF wireless communication equipment Test Band Service Modulation Maximum Distance Immunity Compliance Frequency (MHz) Power Test Level Level (V/m) (MHz) (V/m) TETRA 400 Pulse – modulation 18 Hz GMRS 460, FRS 460...
-
Page 20: Components Of The Clinimacs® Plus Instrument
Important The CliniMACS Plus Software offers the operator the choice between various separation programs. For further details see This CliniMACS Plus System User Manual chapter 4. The CliniMACS Plus Instrument and CliniMACS Tubing only contains the instructions for clinical applications... - Page 21 CliniMACS® Plus System User Manual (Canadian edition) Bag hanger for buffer bag Bag hanger for Bag hanger Priming Waste Bag/ for Cell Reapplication Bag/ Preparation Bag Non-Target Cell Bag Bag hanger clamp Liquid sensor Pinch valve Pre-column holder Magnetic Peristaltic separation unit pump Main ON/OFF...
-
Page 22: Unpacking And Installation
EMC information. Portable and mobile RF communications equipment can affect medical electrical equipment. Unpacking and installation of the CliniMACS Plus Instrument must only be performed by an authorized local Miltenyi Biotec Service Provider. Unpacking Note Unpacking the instrument should be performed by two people, Visually inspect and note any significant... - Page 23 CliniMACS® Plus System User Manual (Canadian edition) Open the carton and remove the parts (power cord, bag hangers) from the protective foam (see Figure 1.9). Remove the protective foam. Figure 1.9: Remove the parts and the protective foam. Lift the top carton vertically off the pallet (see Figure 1.10). Figure 1.10: Lift the top carton.
- Page 24 General Unwrap the large shipping bag (see Figure 1.12). Caution Two people should carefully lift the instrument onto a flat, stable surface which is capable of supporting 100 kg. The instrument should be lifted under each of the four corners at the base of the instrument. The instrument is heavier at the back and should be stabilized while lifting it.
- Page 25 Then switch on the instrument again. If the instrument does not start correctly or the window displays an error message, note the error message number, switch the instrument off and contact the Miltenyi Biotec Technical Support. Screen 1.1: Main screen Proper training is required to operate the instrument.
-
Page 26: General Set-Up Menus
General 1.3.8 General set-up menus Language selection The language selection menu allows the operator to change the language used in the display. It is possible to choose between English, German, French, Spanish, Italian, and Dutch. To change the language, wait until the window displays Screen 1.1 and DO NOT press ‘ENT’... - Page 27 ‘STOP’ . CHECK INSTRUMENT In case of a suspected malfunction of the instrument contact the Miltenyi Biotec Technical Support. If an instrument check is indicated the specialist will assist the operator in performing the instrument check sequence.
-
Page 28: Cleaning
The CliniMACS Plus Instrument must be separately collected according to the European directive of waste of electrical and electronic equipment (WEEE). For final disposal, the instrument must be returned to Miltenyi Biotec. Clean the instrument Figure 1.15: Separate collection for waste of electrical and electronic equipment according to the instructions given in section 1.3.9. -
Page 29: Glossary
Glossary Glossary Glossary of symbols 2.1.1 Safety symbols General warning sign Warning: Magnetic field 2.1.2 Symbols used for labeling of products Medical device European conformity approval with ID number 0123 (ID number of Notified Body: “TÜV SÜD Product Service GmbH, Munich”). UL listing mark, listed as laboratory equipment Consult instructions for use. - Page 30 CliniMACS® Plus System User Manual (Canadian edition) Non-ionizing radiation Separate collection for waste of electrical and electronic equipment Fuse Keep dry. Fragile, handle with care. This way up. “OFF” (power) “ON” (power) Do not re-use. Do not use if package is damaged. Packaging PVC free 2 –...
- Page 31 Glossary Use-by date Temperature limit Non-pyrogenic fluid path Batch code Part number Contents of the packaging Catalogue number (REF) Serial number Unique Device Identifier Sterilized using aseptic processing techniques Sterilized using ethylene oxide Sterilized using steam or dry heat 2 – 3 37091/04 –...
- Page 32 CliniMACS® Plus System User Manual (Canadian edition) Single sterile barrier system Single sterile barrier system with protective packaging outside Phone E-mail Website 2 – 4 37091/04 – ch20 (Issued: 2020-06)
-
Page 33: Glossary Of Terms
Glossary Glossary of terms Apheresis The method of collecting blood in which whole blood is withdrawn, a desired component selected and retained, and the remainder of the blood returned to the donor Anti-biotin antibody This antibody recognizes cells which have previously been labeled with an appropriate biotinylated antibody or ligand Bag compartment Compartment of the CliniMACS Plus Instrument in which the Negative Fraction... - Page 34 CliniMACS PBS/EDTA Buffer Buffer used for cell preparation and cell separation with the CliniMACS Plus System: PBS (phosphate buffered saline), supplemented with 1 mM EDTA, pH 7.2. Before use, CliniMACS PBS/EDTA Buffer must be supplemented with pharmaceutical grade HSA to a final concentration of 0.5% (weight/volume, i.e., 5 g HSA per liter...
- Page 35 Glossary Monoclonal antibodies A single type of antibody that is directed against a specific epitope (antigen, antigenic determinant) and is produced by a single clone of B cells or a single hybridoma cell line, which is formed by the fusion of a lymphocyte cell with a myeloma cell.
- Page 36 CliniMACS® Plus System User Manual (Canadian edition) Revolutions per minute Sampling site coupler Injection port, e.g., for removal of samples or addition of CliniMACS Reagents to the Cell Preparation Bag Selection buffer See CliniMACS PBS/EDTA Buffer. Selection column See separation column. Selection column holder See separation column holder.
-
Page 37: Customer Information
CliniMACS Plus System only. The different tubing sets have been developed for the special needs of the respective application for use in combination with the CliniMACS Plus System only. They consist of pre-assembled, tubing, pre-assembled bags, and other components as required. -
Page 38: Additional Materials Required
CliniMACS® Plus System User Manual (Canadian edition) Additional materials required Note For information on the amount of In addition to the CliniMACS Products, additional materials may materials required for an application or be required for a CliniMACS Plus Separation. further specific materials, refer to the instructions of the respective application –... -
Page 39: Equipment Required
Customer information Equipment required – Uninterruptable power source (reliable, noise free utility). Recommended UPS: APC Smart-UPS 1500VA USB & Serial 230 V, manufactured by APC (American Power Conversion) or equivalent – Laminar flow hood – Sterile tubing connector Terumo Sterile Connection Device, TSCD®, or equivalent –... -
Page 40: General Warnings And Precautions
CliniMACS® Plus System User Manual (Canadian edition) General warnings and precautions Limited warranty Separation procedure Should the CliniMACS Plus System – All separation procedures must be performed by trained be used in a manner not explicitly operators only. The operator training will be provided by described in this manual, all warranties Miltenyi Biotec Technical Support. - Page 41 Customer information Handling of biohazardous material – To avoid contamination of the cellular starting product, all preparation steps should be performed using aseptic techniques. – The operator performing the cell separation must be trained in the proper use of the equipment and in the handling of blood products and bone marrow aspirate.
- Page 42 CliniMACS® Plus System User Manual (Canadian edition) Important Cellular starting product Labeling and separation of cells should – The cellular starting product (e.g. leukapheresis product, begin as soon as possible after the cellular buffy coat, bone marrow aspirate) should be collected starting product has been collected.
-
Page 43: Labeling Of Cells With Clinimacs® Reagents
Customer information Labeling of cells with CliniMACS® Magnetic Reagents particle Antibody Using the CliniMACS® Plus System cells can be magnetically labeled in three different ways: Antigen Cell – Directly in a one-way labeling procedure by antigen-specific anti-bodies conjugated to super-paramagnetic iron-dextran beads (see Figure 3.1). -
Page 44: Clinimacs® Plus Separation Strategies
CliniMACS® Plus System User Manual (Canadian edition) CliniMACS® Plus Separation strategies The CliniMACS® Plus System provides the user with a variety of separation programs. The separation programs can generally be divided into enrichment strategies (CD34 SELECTION 1/2) and depletion strategies (DEPLETION 2.1 and DEPLETION 3.1). Enrichment of magnetically labeled cells When choosing an enrichment strategy, the magnetically labeled cells (primary labeled with a CliniMACS Reagent) are... -
Page 45: Enrichment Strategy
Customer information 3.8.1 Enrichment strategy Enrichment of cells using the CliniMACS Tubing Set or CliniMACS Tubing Set LS 3. Enrichment strategy 1. Separation 2. Elution Cell Preparation Bag Cell Preparation Magnet Separation column Separation column Cell Collection Bag Negative Cell Negative Fraction Bag Collection Bag... -
Page 46: Depletion Strategy
CliniMACS® Plus System User Manual (Canadian edition) 3.8.2 Depletion strategy Depletion of cells using the CliniMACS Tubing Set LS – DEPLETION 2.1 3. Depletion strategy 1. Separation 2. Elution Cell Preparation Bag Cell Preparation Magnet Separation column Separation column Cell Collection Bag Cell Negative... - Page 47 Customer information Depletion of cells using the CliniMACS Depletion Tubing Set – DEPLETION 3.1 (Part 1: BULK LOADING STAGE) 3. Depletion strategy (Part 1: BULK LOADING STAGE) Cell Preparation Bag 1. Separation 2. Elution Reapplication Bag Non-Target Cell Bag Cell Preparation Magnet Separation column...
- Page 48 CliniMACS® Plus System User Manual (Canadian edition) Depletion of cells using the CliniMACS Depletion Tubing Set - DEPLETION 3.1 (Part 2: SENSITIVE LOADING STAGE) 3. Depletion strategy (Part 2: SENSITIVE LOADING STAGE) Cell Preparation Bag 2. Elution 1. Separation Reapplication Bag Non-Target Cell Bag Reapplication Magnet...
-
Page 49: Four Steps To Your Target Cells
The overview table contains information on the applicable chapters of the CliniMACS Plus System User Manual on a basis of the kind and number of reagents, the number of cells, the type of tubing set and the relevant separation program needed for the separation. - Page 50 CliniMACS® Plus System User Manual (Canadian edition) Antigen/ CD19 CD34 CD34 TCRα/ß-Biotin Reagent REF 179-01 REF 171-01 REF 171-01 REF 701-48 Application Depletion Enrichment Enrichment Depletion (large scale) Application 5×10 CD19 positive 0.6×10 CD34 positive 1.2×10 CD34 positive 24×10 TCRα/β cells from 40×10 cells from 60×10 cells from 120×10...
-
Page 51: Step 1: Cell Preparation And Magnetic Labeling
Enrichment of CD34 positive cells STEP 1 Cell preparation and magnetic labeling I. General information Read the instructions for use provided for the respective component and material: CliniMACS Plus Instrument, CliniMACS CD34 Reagent, CliniMACS Tubing Sets, CliniMACS PBS/EDTA Buffer, handling of biohazardous material, and cellular starting product. II. - Page 52 Enrichment of CD34 positive cells STEP 2 Start the CliniMACS® Plus Instrument Switch-on of the CliniMACS® Plus Instrument Choice of separation program CD34 SELECTION 1/2 (using 1 vial: CD34 SELECTION 1, or using 2 vials: CD34 SELECTION 2) STEP 3 Installation of CliniMACS®...
- Page 53 Depletion of CD19 positive cells STEP 1 Cell preparation and magnetic labeling I. General information Read the instructions for use provided for the respective component and material: CliniMACS Plus Instrument, CliniMACS CD19 Reagent, CliniMACS Tubing Sets, CliniMACS PBS/EDTA Buffer, handling of biohazardous material, and cellular starting product. II.
- Page 54 Depletion of CD19 positive cells STEP 2 Start the CliniMACS® Plus Instrument Switch-on of the CliniMACS® Plus Instrument Choice of separation program DEPLETION 2.1 Sample parameter input STEP 3 Installation of CliniMACS® Tubing Sets Preparation for tubing set installation Attach Cell Collection Bag Attach Priming Waste Bag and insert pre-column Insert separation column and load valve no.
- Page 55 Depletion of TCRα/β positive cells STEP 1 Cell preparation and magnetic labeling I. General information, warnings, and precautions Read the instructions for use provided for the respective component and material: CliniMACS Plus Instrument, CliniMACS TCRα/β-Biotin, CliniMACS Tubing Sets, CliniMACS PBS/EDTA Buffer, handling of biohazardous material, and cellular starting product.
- Page 56 Depletion of TCRα/β positive cells STEP 2 Start the CliniMACS® Plus Instrument Switch-on of the CliniMACS® Plus Instrument Choice of separation program DEPLETION 3.1 Sample parameter input STEP 3 Installation of CliniMACS® Tubing Sets Preparation for tubing set installation Attach Non-Target Cell Bag, Reapplication Bag, and insert separation column Load valves nos.
-
Page 57: Clinimacs® Cd34 Reagent
STEP 1: CliniMACS® CD34 Reagent STEP 1: CliniMACS® CD34 Reagent General information Important The CliniMACS® Plus CD34 System including the CliniMACS Plus Instructions, warnings, precautions, Instrument, the CliniMACS CD34 Reagent, the CliniMACS Tubing and other important information Set or the CliniMACS Tubing Set LS, and the CliniMACS PBS/EDTA for the use of the CliniMACS Plus Buffer is intended for the in vitro enrichment of human CD34 Instrument as well as warnings and... -
Page 58: Materials Required
CliniMACS® Plus System User Manual (Canadian edition) II. Materials required Important CliniMACS® Plus CD34 System components The application capacity for the in CliniMACS® CD34 Reagent (REF 171-01) vitro enrichment of CD34 positive cells Using the CliniMACS Plus CD34 System, one vial is required using the CliniMACS Plus CD34 System for the normal scale application and two vials for the large amounts to 0.6×10... -
Page 59: Preparative Steps
STEP 1: CliniMACS® CD34 Reagent III. Preparative steps Preparation of the CliniMACS® PBS/EDTA Buffer Important Supplement three liters of CliniMACS® PBS/EDTA Buffer with Note that HSA is not a component HSA to a final concentration of 0.5% (w/v), i.e., add 5 g HSA per of the CliniMACS System. -
Page 60: Preparation Of Leukapheresis Product
CliniMACS® Plus System User Manual (Canadian edition) IV. Preparation of leukapheresis product Important All bag handling should be done in The following sections describe the recommended procedure a sterile environment (e.g. laminar for the preparation of the leukapheresis product using the flow hood) using aseptic techniques. -
Page 61: Transfer Into Cell Preparation Bag
STEP 1: CliniMACS® CD34 Reagent Transfer into Cell Preparation Bag Record the date and the start time before beginning to prepare the leukapheresis product. Determine the volume of the original leukapheresis product by estimating 1 mL of leukapheresis product as equivalent to 1 g (1 g 1 mL). -
Page 62: Dilution
CliniMACS® Plus System User Manual (Canadian edition) Dilution The leukapheresis product must be diluted with CliniMACS PBS/EDTA Buffer (supplemented with HSA to a final concentration of 0.5% (w/v)) before magnetic labeling. Calculate the weight of buffer to be added using the following equation and record it. Weight of buffer Weight of leukapheresis ×... -
Page 63: Centrifugation
STEP 1: CliniMACS® CD34 Reagent Centrifugation Using the TSCD, connect the empty Plasma Waste Bag to the Cell Preparation Bag. Fold any loose parts of the Cell Preparation Bag or tubing downwards. Place the two bags securely in the centrifuge bucket. - Page 64 CliniMACS® Plus System User Manual (Canadian edition) Using the heat sealer, seal off the tubing leaving at least 15 cm of tubing on the Cell Preparation Bag for further connections. Disconnect the Plasma Waste Bag. Resuspend the cells in the Cell Preparation Bag. Avoid intensive mixing of the cells.
-
Page 65: Magnetic Labeling Of Cells
STEP 1: CliniMACS® CD34 Reagent V. Magnetic labeling of cells The CliniMACS CD34 Reagent vials (7.5 mL each) are ready to use and sufficient for one application as described below. The reagents are not for parenteral administration. Store the reagents at +2 °C to +8 °C (+36 °F to +46 °F). DO NOT freeze. -
Page 66: Removal Of Excess Reagent
CliniMACS® Plus System User Manual (Canadian edition) Removal of excess reagent Wash no. 1 Insert the spike of a plasma transfer set to a port of a buffer bag containing at least one liter of buffer. Confirm the clamp on the plasma transfer set is in the closed position. Using the TSCD, connect the buffer bag to the Cell Preparation Bag. - Page 67 STEP 1: CliniMACS® CD34 Reagent 13. Place the Wash Waste Bag No. 1 on the balance and tare the balance. Important 14. Open the locking forceps next to the Cell Preparation For the normal scale application Bag. Using the plasma extractor, remove as much excess (one CliniMACS CD34 Reagent vial), supernatant as possible from the Cell Preparation Bag.
- Page 68 CliniMACS® Plus System User Manual (Canadian edition) 24. Fold any loose parts of the bags or tubing downwards. Transfer the Cell Preparation Bag and Wash Waste Bag No. 2 securely to the centrifuge bucket. 25. Centrifuge at 200×g (without brake) for 15 minutes at room temperature (+19 °C to +25 °C [+66 °F to +77 °F]).
- Page 69 STEP 1: CliniMACS® CD34 Reagent 34. Adjust sample loading volume: Calculate the weight of buffer necessary to adjust the weight of the cell suspension to approximately a) 150 g (normal scale application) or b) 275 g (large scale application). a) Weight of Weight of leuka- buffer to be 150 g...
- Page 70 CliniMACS® Plus System User Manual (Canadian edition) 43. Determine the weight of the leukapheresis product after addition of buffer (sample loading volume) by subtracting the weight of the empty Cell Preparation Bag from the weight of the filled Cell Preparation Bag. Record the calculated weight.
-
Page 71: Clinimacs® Cd19 Reagent
STEP 1: CliniMACS® CD19 Reagent STEP 1: CliniMACS® CD19 Reagent General information Important The CliniMACS® Plus CD19 System including the CliniMACS Plus Instructions, warnings, precautions, Instrument,the CliniMACS CD19 Reagent, the CliniMACS and other important information Tubing Set LS, and the CliniMACS PBS/EDTA Buffer is intended for the use of the CliniMACS Plus for the in vitro depletion of human CD19 positive cells from Instrument as well as warnings and... -
Page 72: Materials Required
CliniMACS® Plus System User Manual (Canadian edition) II. Materials required Important CliniMACS® Plus CD19 System components The application capacity for the in vitro CliniMACS® CD19 Reagent (REF 179-01) deple tion of CD19 positive cells using the One vial is required for the application using the CliniMACS Plus CD19 System amounts to CliniMACS Plus CD19 System. -
Page 73: Preparative Steps
STEP 1: CliniMACS® CD19 Reagent III. Preparative steps Preparation of the CliniMACS® PBS/EDTA Buffer Important Supplement each required liter of CliniMACS® PBS/EDTA Buffer Note that HSA is not a component with HSA to a final concentration of 0.5 % (w/v), i.e., add 5 g HSA of the CliniMACS System. -
Page 74: Preparation Of Leukapheresis Product
CliniMACS® Plus System User Manual (Canadian edition) IV. Preparation of leukapheresis product Important All bag handling should be done in The following sections describe the recommended procedure a sterile environment (e.g. laminar for the preparation of the leukapheresis product using the flow hood) using aseptic techniques. -
Page 75: Transfer Into Cell Preparation Bag
STEP 1: CliniMACS® CD19 Reagent Transfer into Cell Preparation Bag Record the date and the start time before beginning to prepare the leukapheresis product. Determine the volume of the original leukapheresis product by estimating 1 mL of leukapheresis product as equivalent to 1 g (1 g 1 mL). -
Page 76: Dilution
CliniMACS® Plus System User Manual (Canadian edition) Dilution The leukapheresis product must be diluted with CliniMACS PBS/EDTA Buffer (supplemented with HSA to a final concen- tration of 0.5% (w/v)) before magnetic labeling. Dilute the leukapheresis product with buffer to a total weight of 600 g. Calculate the weight of buffer to be added using the following equation and record it. -
Page 77: Centrifugation
STEP 1: CliniMACS® CD19 Reagent Centrifugation Using the TSCD, connect the empty Plasma Waste Bag to the Cell Preparation Bag. Fold any loose parts of the Cell Preparation Bag or tubing downwards. Place the two bags securely in the centrifuge bucket. - Page 78 CliniMACS® Plus System User Manual (Canadian edition) Open the locking forceps next to the Cell Preparation Bag. Slide the clamp on the plasma transfer set to the open position. Fill the Cell Preparation Bag with buffer until the calculated “Target weight of Cell Preparation Bag filled with diluted leukapheresis product”...
-
Page 79: Magnetic Labeling Of The Cells
STEP 1: CliniMACS® CD19 Reagent V. Magnetic labeling of the cells The CliniMACS CD19 Reagent vial (7.5 mL) is ready to use and sufficient for one application as described below. The reagent is not for parenteral administration. Store the reagent at +2 °C to +8 °C (+36 °F to +46 °F). DO NOT freeze. -
Page 80: Removal Of Excess Reagent
CliniMACS® Plus System User Manual (Canadian edition) Removal of excess reagent Insert the spike of a plasma transfer set to a port of a buffer bag containing at least one liter of buffer. Confirm the clamp on the plasma transfer set is in the closed position. Using the TSCD, connect the buffer bag to the Cell Preparation Bag. - Page 81 STEP 1: CliniMACS® CD19 Reagent 13. Place the Wash Waste Bag on the balance and tare the balance. Important 14. Open the locking forceps next to the Cell Preparation If the supernatant removed is less than Bag. Using the plasma extractor, remove as much excess 500 mL, a total of two washing steps supernatant as possible from the Cell Preparation Bag.
- Page 82 CliniMACS® Plus System User Manual (Canadian edition) 24. When the appropriate weight of buffer has been transferred, slide the clamp on the plasma transfer set to the closed position to stop the liquid flow. Close the locking forceps next to the Cell Preparation Bag. 25.
-
Page 83: Clinimacs® Tcrα/Β-Biotin
STEP 1: CliniMACS® TCRα/β-Biotin STEP 1: CliniMACS® TCRα/β-Biotin General information Important The CliniMACS® Plus TCRα/β-Biotin System including the Instructions, warnings, precautions, CliniMACS Plus Instrument, the CliniMACS TCRα/β-Biotin, and other important information the CliniMACS Anti-Biotin Reagent, the CliniMACS Depletion for the use of the CliniMACS Plus Tubing Set, and the CliniMACS PBS/EDTA Buffer is intended Instrument as well as warnings and for the in vitro depletion of human TCRα/β... -
Page 84: Materials Required
CliniMACS® Plus System User Manual (Canadian edition) II. Materials required Important CliniMACS® Plus TCRα/β-Biotin System components The application capacity for the in vitro CliniMACS® TCRα/β-Biotin (REF 701-48) depletion of TCRα/β positive cells using One vial is required for the application using the the CliniMACS Plus TCRα/β-Biotin System CliniMACS Plus TCRα/β-Biotin System. -
Page 85: Preparative Steps
STEP 1: CliniMACS® TCRα/β-Biotin III. Preparative steps Preparation of the CliniMACS® PBS/EDTA Buffer Important Supplement each required liter of CliniMACS® PBS/EDTA Buffer Note that HSA is not a component with HSA to a final concentration of 0.5% (w/v), i.e., add 5 g HSA of the CliniMACS System. -
Page 86: Preparation Of Leukapheresis Product
CliniMACS® Plus System User Manual (Canadian edition) IV. Preparation of leukapheresis product Important All bag handling should be done in The following sections describe the recommended procedure a sterile environment (e.g. laminar for preparing the leukapheresis product using the Terumo flow hood) using aseptic techniques. -
Page 87: Transfer Into Cell Preparation Bag
STEP 1: CliniMACS® TCRα/β-Biotin Transfer into Cell Preparation Bag Record the date and the start time before beginning to prepare the leukapheresis product. Determine the volume of the original leukapheresis product by estimating 1 mL of leukapheresis product as equivalent to 1 g (1 g 1 mL). Holding the leukapheresis product bag with both hands, mix the content thoroughly by using a gentle rotating Hermetic seals... -
Page 88: Dilution
CliniMACS® Plus System User Manual (Canadian edition) Dilution The leukapheresis product must be diluted with CliniMACS PBS/EDTA Buffer (supplemented with HSA to a final concen- tration of 0.5% (w/v)) before magnetic labeling. Dilute the leukapheresis product to a total weight of three times the weight of the leukapheresis product, but not exceeding a total weight of 600 g. -
Page 89: Centrifugation
STEP 1: CliniMACS® TCRα/β-Biotin Centrifugation Using the TSCD, connect the empty Plasma Waste Bag to the Cell Preparation Bag. Fold any loose parts of the Cell Preparation Bag or tubing downwards. Place the two bags securely in the centrifuge bucket. Balance the loaded bucket with a suitable weighted bucket. - Page 90 CliniMACS® Plus System User Manual (Canadian edition) Tare the balance. Place the Cell Preparation Bag on the balance. Open the locking forceps next to the Cell Preparation Bag. Slide the clamp on the plasma transfer set to the open position. Fill the Cell Preparation Bag with buffer until the calculated “Target weight of Cell Preparation Bag filled with diluted leukapheresis product”...
-
Page 91: Labeling Of The Cells With The Clinimacs® Tcrα/Β-Biotin
STEP 1: CliniMACS® TCRα/β-Biotin V. Labeling of the cells with the CliniMACS® TCRα/β-Biotin One CliniMACS® TCRα/β-Biotin vial (7.5 mL) is ready to use and sufficient for one application as described below. The conjugate is not for parenteral administration. Store the conjugate at +2 °C to +8 °C (+36 °F to +46 °F). DO NOT freeze. - Page 92 CliniMACS® Plus System User Manual (Canadian edition) Open the locking forceps next to the Cell Preparation Bag. Slide the clamp on the plasma transfer set to the open position. Completely fill the Cell Preparation Bag with buffer. Slide the clamp on the plasma transfer set to the closed position to stop the liquid flow.
- Page 93 STEP 1: CliniMACS® TCRα/β-Biotin 17. Resuspend the cell pellet in the Cell Preparation Bag. Avoid intensive mixing of the cells. Ensure that all cells are resuspended. 18. Repeat “washing procedure” (step 1 to 17) using the Wash Waste Bag No. 2 and continue with step 19. 19.
-
Page 94: Magnetic Labeling Of The Cells With The Clinimacs® Anti-Biotin Reagent
CliniMACS® Plus System User Manual (Canadian edition) VI. Magnetic labeling of the cells with the CliniMACS® Anti-Biotin Reagent The CliniMACS® Anti-Biotin Reagent vials (7.5 mL each) are ready to use and sufficient for one application as described below. The reagents are not for parenteral administration. Store the reagents at +2 °C to +8 °C (+36 °F to +46 °F). -
Page 95: Removal Of Excess Reagent
STEP 1: CliniMACS® TCRα/β-Biotin Removal of excess reagent Insert the spike of a plasma transfer set to a port of a buffer bag containing at least 500 mL of buffer. Confirm the clamp on the plasma transfer set is in the closed position. Using the TSCD, connect the buffer bag to the Cell Preparation Bag. - Page 96 CliniMACS® Plus System User Manual (Canadian edition) 14. Open the locking forceps next to the Cell Preparation Bag. Using the plasma extractor, remove as much supernatant as possible from the Cell Preparation Bag. Close the locking forceps next to the Cell Preparation Bag to stop the liquid flow.
- Page 97 STEP 1: CliniMACS® TCRα/β-Biotin 24. When the appropriate weight of buffer has been transferred, slide the clamp on the plasma transfer set to the closed position to stop the liquid flow. Close the locking forceps next to the Cell Preparation Bag. 25.
-
Page 98: Cd34 Selection 1/2
STEP 2: CD34 SELECTION 1/2 STEP 2: CD34 SELECTION 1/2 Switch-on of the CliniMACS® Plus Instrument Note Switch on the CliniMACS® Plus Instrument by using the ON/OFF Screen prompts and diagrams serving switch located on the back panel of the instrument. Record the as procedure guides will appear in the start time of the instrument run. - Page 99 CliniMACS® Plus System User Manual (Canadian edition) Material check The window will show Screen 4-2.3 as shown. CD34 SELECTION 1 and CD34 SELECTION 2 are optimized for the enrichment of CD34 positive cells. To confirm the suitable tubing set is available and the proper reagent has been used for cell labeling, enter respective catalogue number (REF) in the query box.
-
Page 100: Depletion 2.1
STEP 2: DEPLETION 2.1 STEP 2: DEPLETION 2.1 Switch-on of the CliniMACS® Plus Instrument Important Switch on the CliniMACS® Plus Instrument by using the ON/OFF The separation program DEPLE- switch located on the back panel of the instrument. Record the TION 2.1 must only be used with the start time of the instrument run. - Page 101 CliniMACS® Plus System User Manual (Canadian edition) Confirmation The window will display Screen 4-2.3 as shown. To confirm the combination of separation program and tubing set and to proceed, press Screen 4-2.3: Confirmation Material check The window will show Screen 4-2.4 as shown. The query of the catalogue number of the tubing set serves as a security check to ensure that the tubing set the operator selected can be used.
-
Page 102: Sample Parameter Input
STEP 2: DEPLETION 2.1 Sample parameter input If the material check has been successful, the program continues automatically with the query for different sample parameters that are necessary to adjust the separation to each individual sample and to provide the operator important information for required buffer and bag volumes. - Page 103 Screen 4-2.5 for correction. If the calculated number of labeled cells exceeds the separation capacity of the CliniMACS Plus System a screen similar to Screen 4-2.7 is shown. Ensure the correct sample parameters have been entered and the calculated number of cells is correct.
- Page 104 STEP 2: DEPLETION 2.1 Volume information From the total number of labeled cells (see previous page) the software calculates the number of separation stages, the amount of buffer needed for the entire separation and the liquid volumes that will be collected in the Cell Collection Bag, Negative Fraction Bag, Buffer Waste Bag, and Priming Waste Bag.
-
Page 105: Depletion 3.1
STEP 2: DEPLETION 3.1 STEP 2: DEPLETION 3.1 Switch-on of the CliniMACS® Plus Instrument Important Switch on the CliniMACS® Plus Instrument by using the ON/OFF The separation program DEPLE- switch located on the back panel of the instrument. Record the TION 3.1 must only be used with start time of the instrument run. - Page 106 CliniMACS® Plus System User Manual (Canadian edition) Confirmation The window will display Screen 4-2.3 as shown. To confirm the combination of separation program and tubing set and to proceed, press Screen 4-2.3: Confirmation Material check The window will show Screen 4-2.4 as shown. The query of the catalogue number of the tubing set serves as a security check to ensure that the tubing set the operator selected can be used.
-
Page 107: Sample Parameter Input
STEP 2: DEPLETION 3.1 Sample parameter input If the material check has been successful, the program continues automatically with the query for different sample parameters that are necessary to adjust the separation to each individual sample and to provide the operator important information for required buffer and bag volumes. - Page 108 Screen 4-2.5 for correction. If the calculated number of labeled cells exceeds the separation capacity of the CliniMACS Plus System a screen similar to Screen 4-2.7 is shown. Ensure the correct sample parameters have been entered and the calculated number of cells is correct.
- Page 109 STEP 2: DEPLETION 3.1 Volume information Important From the total number of labeled cells (see previous page) Negative Fraction Bag corresponds to the software calculates the number of separation stages, the Non-Target Cell Bag. amount of buffer needed for the entire depletion and the liquid volumes that will be collected in the Cell Collection Bag, Non- Priming Waste Bag corresponds to Target Cell Bag, Buffer Waste Bag, and Reapplication Bag.
-
Page 110: Clinimacs® Tubing Set And Clinimacs Tubing Set Ls
STEP 3: CliniMACS® Tubing Set and CliniMACS Tubing Set LS STEP 3: CliniMACS® Tubing Set and CliniMACS Tubing Set LS Preparation for tubing set installation The window will display Screen 4-3.1 as shown. The instruction is on the right, and a diagram corresponding to the instruction is displayed on the left. -
Page 111: Attach Priming Waste Bag And Insert Pre-Column
CliniMACS® Plus System User Manual (Canadian edition) Attach Priming Waste Bag and insert pre-column The window will display Screen 4-3.1 as shown. Priming Attach the Priming Waste Bag to the right hand bag hanger Waste Bag on the instrument as shown (see Figure 4-3.1). Place the pre-column into the holder as shown (see Figure 4-3.5). - Page 112 STEP 3: CliniMACS® Tubing Set and CliniMACS Tubing Set LS Priming Waste Bag Buffer spike Bubble trap spike Bubble trap 4-way fitting Pre-column Separation column Upper retaining ring T-fitting Pump tubing Lower retaining ring Negative Fraction Bag Luer connector Buffer Waste Bag Figure 4-3.2: General construction of a CliniMACS Tubing Set (e.g.
-
Page 113: Insert Separation Column And Load Valve No. 5
CliniMACS® Plus System User Manual (Canadian edition) Insert separation column and load valve no. 5 The window will display Screen 4-3.2 as shown. The valves shown on the screen will be opened automatically. Insert the separation column into the separation column holder as shown (see Figure 4-3.3). -
Page 114: Load Valves Nos. 1, 2, 3, And 4
STEP 3: CliniMACS® Tubing Set and CliniMACS Tubing Set LS Load valves nos. 1, 2, 3, and 4 The window will display Screen 4-3.3 as shown. Load the tubing into valve no. 4. Confirm that the tubing is placed securely in the valve opening (see Figure 4-3.4). Pay particular attention to the area between valves nos. -
Page 115: Load Pump Tubing
CliniMACS® Plus System User Manual (Canadian edition) Load pump tubing The window will display Screen 4-3.4 as shown. Open the pump door by lifting up at the left hand edge. Insert the upper retaining ring on the pump tubing into the retaining ring groove on the pump housing (see Figure 4-3.6). -
Page 116: Load Valves Nos. 7 And 8
STEP 3: CliniMACS® Tubing Set and CliniMACS Tubing Set LS Load valves nos. 7 and 8 The window will display Screen 4-3.5 as shown. Load the tubing into valve no. 7. Load the tubing into valve no. 8. To proceed, press Screen 4-3.5: Load valves nos. -
Page 117: Recheck All Tubing And Attachments
CliniMACS® Plus System User Manual (Canadian edition) Recheck all tubing and attachments The window will display Screen 4-3.7 as shown. Before beginning the run, recheck all tubing and attachments. Note Check all valves for proper tubing insertion. Make sure that the tubing is spaced uniformly, and that there are no kinks or stretched areas in the tubing. -
Page 118: Attach Clinimacs® Pbs/Edta Buffer
STEP 3: CliniMACS® Tubing Set and CliniMACS Tubing Set LS Attach CliniMACS® PBS/EDTA Buffer The window will display Screen 4-3.9 as shown. The prescribed buffer for CliniMACS® Plus Separations is CliniMACS PBS/EDTA Buffer supplemented with HSA to a final concentration of 0.5% (w/v). Using aseptic techniques, remove the cap from the buffer spike on the tubing set (see Figure 4-3.2) and connect it to the buffer bag. -
Page 119: Start Priming
CliniMACS® Plus System User Manual (Canadian edition) Start priming The window will display Screen 4-3.10 as shown. To start priming, press The window will display Screen 4-3.11 as shown. During the priming phase the tubing set is filled with buffer. The buffer will be circulated through the tubing set including both the pre-column and the separation column. -
Page 120: Integrity Test
Contact Miltenyi Biotec Technical Support for instructions Screen 4-3.14: Integrity test for upper part in regarding the return of the defective tubing set. - Page 121 Contact Miltenyi Biotec Technical Support for instructions regarding the return of the defective tubing set. If no leaks are observed the operator can now continue with the next step by pressing 12 –...
-
Page 122: Connect Cell Preparation Bag
STEP 3: CliniMACS® Tubing Set and CliniMACS Tubing Set LS Connect Cell Preparation Bag The window will display Screen 4-3.17 as shown. After the priming phase has been completed and no leaks or malfunctions are observed, the Cell Preparation Bag can be attached (see Figure 4-3.9). - Page 123 CliniMACS® Plus System User Manual (Canadian edition) CliniMACS PBS/EDTA Buffer Bag hanger for Cell Preparation Bag Cell Preparation Bag Priming Waste Bag Pre-system filter spike Pre-system filter Cell Collection Bag Figure 4-3.9: CliniMACS Plus Instrument with CliniMACS Tubing Set, CliniMACS PBS/EDTA Buffer, Cell Preparation Bag, and Cell Collection Bag 14 –...
-
Page 124: Alternative Installation Of Clinimacs® Tubing Sets
CliniMACS® Plus Instrument describe the installation of the CliniMACS Tubing Sets under sterile conditions (clean room). The CliniMACS Plus System itself is a closed system which does not necessarily need to be operated in a clean room. However, if operated outside a clean room, the installation procedure of the tubing set needs to be adapted in order to ensure that the sterility of the cell separation process is guaranteed. -
Page 125: Preparation For Tubing Set Installation
CliniMACS® Plus System User Manual (Canadian edition) Preparation for tubing set installation The window will display Screen 4-3.1 as shown. As described, the Cell Collection Bag, the CliniMACS PBS/EDTA Buffer, the pre-system filter, and the Cell Preparation Bag must be attached to the tubing set before installing the tubing set onto the instrument under sterile conditions. - Page 126 Alternative installation of CliniMACS® Tubing Sets Follow the instructions: Attach Priming Waste Bag and insert pre-column Insert separation column and load valve no. 5 Load valves nos. 1, 2, 3, and 4 Load pump tubing Load valves nos. 7 and 8 Load valves nos.
- Page 127 CliniMACS® Plus System User Manual (Canadian edition) Connect Cell Preparation Bag (& pre-system filter) The window will display Screen 4-3.17 as shown. The Cell Preparation Bag and the pre-system filter were attached during „Preparation for tubing set installation“. Remove the locking forceps below the bubble trap. To proceed, press Screen 4-3.17: Connect Cell Preparation Bag Follow the instructions:...
- Page 128 Alternative installation of CliniMACS® Tubing Sets Priming Waste Bag Buffer spike Bubble trap spike Clamp (1) here Bubble trap Clamp (2) here 4-way fitting Pre-column Separation column Upper retaining ring T-fitting Pump tubing Lower retaining ring Negative Fraction Bag Luer connector Buffer Waste Bag Figure 4.3-10: General construction of a CliniMACS Tubing Set (e.g.
- Page 129 STEP 3 Installation of the CliniMACS® Depletion Tubing Set Follow the installation instructions given on the screens of the CliniMACS® Plus Instrument. (1) Install upper part. (2) Install lower part. Proceed to the priming procedure. (3) Perform integrity test. WARNING: To perform the integrity test, clamp the tubing below the Non-Target Cell Bag, before starting the integrity test.
- Page 130 CliniMACS® Depletion Tubing Set Installed on the CliniMACS® Plus Instrument CliniMACS PBS/EDTA Buffer Reapplication Bag Non-Target Cell Bag Cell Preparation Bag Spike connector Pre-system filter Crossing of Cell Preparation Bag tubing and Reapplication Bag tubing Bag compartement (Buffer Waste Bag) Cell Collection 37091/04 ch20...
- Page 131 STEP 3: CliniMACS® Depletion Tubing Set STEP 3: CliniMACS® Depletion Tubing Set Preparation for tubing set installation The window will display Screen 4-3.1 as shown. The instruction is on the right and a diagram corresponding to the instruction is displayed on the left. The blinking features on the screen indicate the areas of attention.
-
Page 132: Attach Non-Target Cell Bag, Reapplication Bag, And Insert Separation Column
CliniMACS® Plus System User Manual (Canadian edition) Attach Non-Target Cell Bag, Reapplication Bag, and insert separation column Attach the Non-Target Cell Bag and the Reapplication Bag to the right hand bag hanger on the instrument as shown Non-Target Cell Bag (see Figure 4-3.1). - Page 133 STEP 3: CliniMACS® Depletion Tubing Set Cell Preparation Bag Spike connector Pre-system filter Non-Target Cell Bag Buffer spike Reapplication Bag Check valve Twist-off cap Y-fitting Separation column Upper retaining ring T-fitting Pump tubing Lower retaining ring Cell Collection Bag Luer connector Buffer Waste Bag Figure 4-3.3: General construction of a CliniMACS Depletion Tubing Set (REF 261-01) STEP 3: CliniMACS®...
-
Page 134: Load Valves Nos. 1, 2, 3, 4, And 5
CliniMACS® Plus System User Manual (Canadian edition) Load valves nos. 1, 2, 3, 4, and 5 The window will display Screen 4-3.2 as shown. The valves shown on the screen will be opened automatically. Load the tubing into valves nos. 1, 2, 3, 4, and 5. Mount the tubing between valve no. -
Page 135: Load Pump Tubing
STEP 3: CliniMACS® Depletion Tubing Set Load pump tubing The window will display Screen 4-3.3 as shown. Open the pump door by lifting up at the left hand edge. Insert the upper retaining ring on the pump tubing into the retaining ring groove on the pump housing (see Figure 4-3.6). -
Page 136: Load Valves Nos. 6, 7, 8, 9, And 10
CliniMACS® Plus System User Manual (Canadian edition) Load valves nos. 6, 7, 8, 9, and 10 The window will display Screen 4-3.4 as shown. Load the tubing into valve nos. 6, 7, 8, 9, and 10. Ascertain that the tubing is placed securely in the valve opening. Place the Buffer Waste Bag in the bag compartment. -
Page 137: Attach Clinimacs® Pbs/Edta Buffer
STEP 3: CliniMACS® Depletion Tubing Set Attach CliniMACS® PBS/EDTA Buffer The window will display Screen 4-3.7 as shown. The prescribed buffer for CliniMACS® Plus Separations is CliniMACS PBS/EDTA Buffer supplemented with HSA to a final concentration of 0.5% (w/v). Using aseptic techniques, remove the cap from the buffer spike (see Figure 4-3.3) on the tubing set and connect it to the buffer bag. -
Page 138: Start Priming
CliniMACS® Plus System User Manual (Canadian edition) Start priming The window will display Screen 4-3.8 as shown. To start priming, press The window will display Screen 4-3.9 as shown. During the priming phase the tubing set is filled with CliniMACS PBS/EDTA Buffer. -
Page 139: Integrity Test
STEP 3: CliniMACS® Depletion Tubing Set Integrity test For additional safety, an integrity test must be performed to test the tubing set for leaks. The test sequence consists of two automated sequences, which allow both the upper and the lower parts of the tubing set to be over pressurized and tested separately. - Page 140 Contact Miltenyi Biotec Technical Support for instructions regarding the return of the defective tubing set. If no leakages are observed, continue with the integrity test of the lower part of the tubing set.
-
Page 141: Connect Cell Preparation Bag
STEP 3: CliniMACS® Depletion Tubing Set Connect Cell Preparation Bag The window will display Screen 4-3.15 as shown. After the priming phase has been completed and no leaks or malfunctions are observed, the Cell Preparation Bag can be attached (see Figure 4-3.9). Use aseptic techniques for all steps. Connect the Cell Preparation Bag containing the magnetically labeled and washed cells with the tubing set: Remove the twist-off... -
Page 142: Final Check Of The Liquid Sensor
CliniMACS® Plus System User Manual (Canadian edition) Final check of the liquid sensor The window will display Screen 4-3.16 as shown. Check the liquid sensor tubing. Ensure the tubing has been properly inserted, that it is free of any external liquid and has not been dislodged during the loading procedure. - Page 143 STEP 3: CliniMACS® Depletion Tubing Set Bag hanger for Cell Preparation Bag Reapplication Bag Cell Preparation Bag Non-Target Cell Bag CliniMACS PBS/EDTA Buffer Spike connector Pre-system filter Cell Collection Bag Figure 4-3.9: CliniMACS Plus Instrument with CliniMACS Depletion Tubing Set, CliniMACS PBS/EDTA Buffer, Cell Preparation Bag, and Cell Collection Bag STEP 3: CliniMACS®...
-
Page 144: Cd34 Selection 1/2
STEP 4: CD34 SELECTION 1/2 STEP 4: CD34 SELECTION 1/2 Once the final check has been completed, the CliniMACS Plus Instrument is ready to begin the separation. The window will display Screen 4-4.1 as shown. Make a final check of all tubing and attachments. To proceed, press Once ‘RUN’... - Page 145 CliniMACS® Plus System User Manual (Canadian edition) Column wash I The pre-column and separation column are washed extensively to remove all unlabeled cells. Wash buffer is collected in the Buffer Waste Bag. When ‘Column Wash I’ starts, the total re maining time until the end of the separation procedure is shown.
-
Page 146: Disconnect Bags And Record Process Code
STEP 4: CD34 SELECTION 1/2 Disconnect bags and record process code When the run has been completed, the window will display Screen 4-4.3 as shown. Record the process code. Clamp or seal the tubing above the luer lock connecting the Cell Collection Bag to the tubing set (see Figure 4-4.1). Make three hermetic seals in the tubing directly below valve no. -
Page 147: Unload Tubing Set And Shutdown
CliniMACS® Plus System User Manual (Canadian edition) Unload tubing set and shutdown The window will display Screen 4-4.4 as shown. Remove the tubing set: Beginning with valve nos. 6, 9, 10, and 11, and working upwards, release the tubing from the liquid sensor and from the valves, by pressing on the valves. -
Page 148: Depletion 2.1
STEP 4: DEPLETION 2.1 STEP 4: DEPLETION 2.1 Once the final check has been completed, the CliniMACS Plus Instrument is ready to begin the separation. The window will display Screen 4-4.1 as shown. Make a final check of all tubing and attachments. To proceed, press Once ‘RUN’... - Page 149 CliniMACS® Plus System User Manual (Canadian edition) Note Column wash If the number of magnetically labeled The pre-column and separation column are washed extensively cells (calculated by the CliniMACS Plus to remove all unlabeled cells. Wash buffer is collected in the Software) exceeds the binding capacity Buffer Waste Bag.
-
Page 150: Disconnect Bags And Record Process Code
STEP 4: DEPLETION 2.1 Disconnect bags and record process code When the run has been completed, the window will display Screen 4-4.3 as shown. Record the process code. Clamp or seal the tubing above the luer lock connecting the Cell Collection Bag to the tubing set (see Figure 4-4.1). Make three hermetic seals in the tubing directly below valve no. -
Page 151: Unload Tubing Set And Shutdown
CliniMACS® Plus System User Manual (Canadian edition) Unload tubing set and shutdown The window will display Screen 4-4.4 as shown. Remove the tubing set: Beginning with valve nos. 6, 9, 10, and 11, and working upwards, release the tubing from the liquid sensor and from the valves by pressing on the valves. -
Page 152: Depletion 3.1
STEP 4: DEPLETION 3.1 STEP 4: DEPLETION 3.1 Once the final check has been completed, the CliniMACS Plus Instrument is ready to begin the separation. The window will display Screen 4-4.1 as shown. Make a final check of all tubing and attachments. To proceed, press Once ‘RUN’... - Page 153 CliniMACS® Plus System User Manual (Canadian edition) Important Sensitive loading stage If the number of magnetically For further depletion the cells hold in the Reapplication Bag are labeled cells (calculated by the loaded onto the separation column again. The unlabeled cells CliniMACS Plus Software) exceeds the (target cells) flow through the magnetic field and are collected binding capacity of the separation...
-
Page 154: Disconnect Bags And Record Process Code
STEP 4: DEPLETION 3.1 Disconnect bags and record process code When the run has been completed, the window will display Screen 4-4.3 as shown. Record the process code. Clamp or seal the tubing above the luer lock connecting the Cell Collection Bag to the tubing set (see Figure 4-4.1). Make three hermetic seals in the tubing directly below valve no. -
Page 155: Unload Tubing Set And Shutdown
CliniMACS® Plus System User Manual (Canadian edition) Unload tubing set and shutdown The window will display Screen 4-4.4 as shown. Remove the tubing set: Beginning with valve nos. 6, 9, and 10 and working upwards, release the tubing from the liquid sensor and from the valves by pressing on the valves. -
Page 156: Troubleshooting
These are marked as such and will be displayed on the screen. They refer to internal errors that cannot be corrected by the operator. Record the displayed error number and contact Miltenyi Biotec Technical Support. One possible error message is shown in the illustration opposite (Error message no. - Page 157 Any valve that has been contaminated by fluid has to be exchanged. Contact Miltenyi Biotec Technical Support. Buffer is leaking from tubing set Tubing set is defective. Turn off the CliniMACS® Plus Instrument and during priming.
-
Page 158: Automated Cell Separation
‘5’ . If warning message no. 1 appears again after each of the possible causes listed above have been ruled out, the liquid sensor may be defect. Contact Miltenyi Biotec Technical Support. 5 – 3 37091/04 – ch20 (Issued: 2020-06) - Page 159 Contact Miltenyi Biotec Technical Support. A magnet drive failure has occurred. An error message will be displayed (see section 5.2 “Error messages”). Record the number of the error message and contact Miltenyi Biotec Technical Support. 5 – 4 37091/04 – ch20 (Issued: 2020-06)
- Page 160 Warning message no. 2 above and below the separation column to save the cells retained on the column and contact Miltenyi Biotec Technical Support. If the pump tubing has not been damaged, it can be reinserted into the pump housing.
- Page 161 CliniMACS® Plus System User Manual (Canadian edition) Pump tubing collapsed and/or Pre-column is clogged due to large amount of cell debris in the Cell excessive air appeared in tubing Preparation Bag. It is necessary to skip the loading of the remaining set below pre-column during cell sample manually and to continue the separation with the cells that have loading.
- Page 162 Troubleshooting EMERGENCY PROGRAM If, for any reason, a run has irreversibly terminated prior to the target cells’ being eluted from the separation column, the EMERGENCY PROGRAM (to be used with CD34 can be run to elute the cells from the separation column. This program SELETCTION 1/2 only) has been designed only for use with all enrichment programs together with either a CliniMACS Tubing Set (REF 161-01) or a CliniMACS Tubing...
- Page 163 CliniMACS® Plus System User Manual (Canadian edition) Unexpected events – DEPLETION 2.1 Target cells do not reach the Cell Pump is unable to load the product from the Cell Preparation Bag Collection Bag. because the locking forceps next to the Cell Collection Bag is not open during the cell loading sequence.
- Page 164 Troubleshooting Loading stopped during The Reapplication Bag is hanging lower than the Cell Preparation Bag. sensitive loading stage. During sensitive loading step, Cell Preparation Bag runs empty before Reapplication Bag volume is completely loaded. It is therefore possible that an air bubble activates the liquid sensor before the sample is completely loaded from the Reapplication Bag after the depletion procedure is finished.
-
Page 165: Cell Separation Performance
CliniMACS® Plus System User Manual (Canadian edition) Cells flow into buffer bag during Buffer bag is hanging too low (lower than Cell Preparation Bag). Press gravimetric rinsing steps. ‘STOP’ and adjust buffer bag hanger to correct position. Confirm that three large bag hangers are installed for the program DEPLETION 3.1 and refer to installation instructions for appropriate bag heights (see “CliniMACS®... - Page 166 Troubleshooting The yield of target cells is low. Target cell content was over-estimated in the leukapheresis product. During analysis, target cells were incorrectly counted or an error occurred during counting of leukocytes. Repeat the analysis of leukapheresis product for starting target cell content. Target cells were poorly labeled with the reagent.
- Page 167 (see chapter 4, STEP 1). For troubleshooting purposes determine the leukocyte subsets (B cells, T cells, monocytes, granulocytes as well as platelets) contaminating the target cell fraction and contact Miltenyi Biotec Technical Support for advice. High numbers of granulocytes contaminated the start product (suboptimal apheresis setting).
- Page 168 Troubleshooting The purity of target cells is low. Non-target cells were retained. • Mobilization of target cells was poor. Very low number of target cells has occurred. Therefore, a low number of contaminating non-target cells (e.g. granulocytes, monocytes, platelets) may lead to decreased purity.
Need help?
Do you have a question about the CliniMACS Plus System and is the answer not in the manual?
Questions and answers