
Related Manuals for Kraus KAG-1


Summary of Contents for Kraus KAG-1
- Page 1 INSTALLATION GUIDE Air Gap KAG-1 KAG-2 www.kraususa.com I Toll Free: 1.800.775.0703 I © 2022 Kraus USA Plumbing LLC I REV. NOV 22, 2022...
- Page 2 Congratulations on the purchase of your new Please keep the box and packaging materials until your product is completely installed. If you have any questions, require technical assistance, or have any problems with your product: DO NOT RETURN TO STORE Please contact our Customer Service Team 1-800-775-0703 / customerservice@kraususa.com Have the model number available, and retain a copy of your receipt...
-
Page 3: Prior To Installation
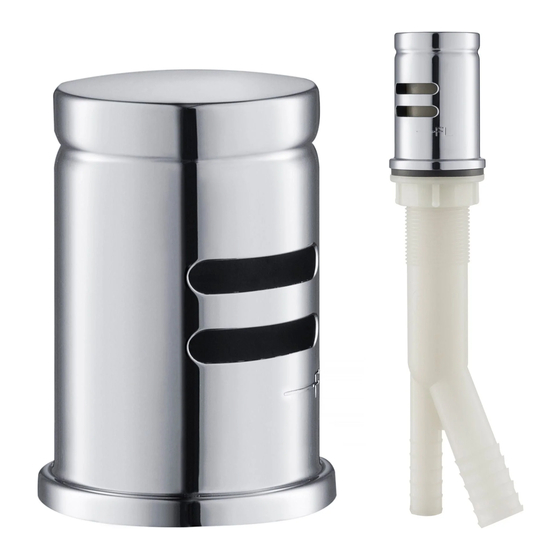
Toll-Free: 800.775.0703 or customerservice@kraususa.com The step-by-step guidelines in the installation instructions are a general reference for installing Kraus Accessory. Should there be any discrepancies, Kraus cannot be held liable. It is recommended to install all Kraus products by hiring a licensed professional. - Page 4 Diagram and Parts List: A. Cap B. Nut & Washer C. Washer D. Nut D. Air Gap Body...
- Page 5 Dimension 1 7/8” 1 7/8“ [46.3mm] [46.3mm]...
- Page 6 Step 1 Remove the cap (A) and nut & washer (B). A & B Step 2 Insert the air gap body (E) through the sink deck hole, leaving 2-1/4" (57 mm) approximately 2-1/4" (57 mm) of the body showing above sink deck. (Twist the nut (D) down counterclockwise if necessary).
- Page 7 Step 3 Thread the cap (A) and the nut & washer (B) fully onto body, with the slotted vents (1) facing the A & B wall. Tighten the nut (D) firmly from the (F/L) underside of the sink. Note: The air gap is to be installed so that the flood level mark (F/L) shall be at or above the flood level of the sink or other receptacle which may be connected to the sanitary drain into...
-
Page 8: Replacement Parts
Replacement Parts Replacement Parts List Finish / Color Part # KP27179 CH, SFS, MB, (For KAG-1) 1. Cap ORB, BG, SB, BB, KP27180 SFBG,SFSB* (For KAG-2) 2. Nut & Washer KP27192 3. Washer KP27182 4. Nut KP27181 *Denotes faucet component color options:... - Page 9 (1) year from the date of purchase. Any product reported to the authorized dealer or to Kraus as being defective within the warranty period will be repaired or replaced with a product of equal value at the option of Kraus.
- Page 10 TO THE MAXIMUM EXTENT PERMITTED BY APPLICABLE LAW, THIS WARRANTY DOES NOT COVER, AND KRAUS USA PLUMBING, LLC SHALL NOT BE LIABLE FOR, ANY SPECIAL, INCIDENTAL OR CONSEQUENTIAL DAMAGES (INCLUDING LABOR CHARGES TO REPAIR, REPLACE, INSTALL OR REMOVE THIS PRODUCT), WHETHER ARISING OUT OF BREACH OF ANY EXPRESS OR IMPLIED WARRANTY, BREACH OF CONTRACT, TORT, OR OTHERWISE.
- Page 11 IMPORTANT Register Your Kraus Product Activate Your Warranty Access Premium Customer Support Get Product Information REGISTER TODAY http://www.kraususa.com/registration...
Need help?
Do you have a question about the KAG-1 and is the answer not in the manual?
Questions and answers