
Related Manuals for Extron electronics DTP2 R 212 Series


Summary of Contents for Extron electronics DTP2 R 212 Series
- Page 1 User Guide DTP Systems DTP2 R 212 Series HDMI DTP2 Receiver and Switcher with Audio De-Embedding 68-2986-01 Rev. G 11 22...
- Page 2 Safety Instructions...
- Page 3 Copyright © 2020-2022 Extron. All rights reserved. www.extron.com Trademarks All trademarks mentioned in this guide are the properties of their respective owners. The following registered trademarks( ® , registered service marks( ), and trademarks( ) are the property of RGB Systems, Inc. or Extron (see the current list of trademarks on the page at Terms of Use...
- Page 4 FCC Class A Notice This equipment has been tested and found to comply with the limits for a Class A digital device, pursuant to part 15 of the FCC rules. The Class A limits provide reasonable protection against harmful interference when the equipment is operated in a commercial environment. This equipment generates, uses, and can radiate radio frequency energy and, if not installed and used in accordance with the instruction manual, may cause harmful interference to radio communications.
- Page 5 Conventions Used in this Guide Notifications The following notifications are used in this guide: CAUTION: Risk of minor personal injury. ATTENTION : Risque de blessure mineure. ATTENTION: • Risk of property damage. Risque de dommages matériels. • NOTE: A note draws attention to important information. A tip provides a suggestion to make working with the application easier.
-
Page 7: Table Of Contents
Device Info Panel ........... 54 HDCP ............21 Device Status Panel ........55 Audio Configuration ........21 Network Settings Panel ......... 55 CEC Control ..........22 Firmware Panel ..........56 Roles and Permissions Panel ......57 DTP2 R 212 Series • Contents... - Page 8 Mounting ..........58 Mounting the DTP2 R 212 ......... 58 Tabletop Use ..........58 Mounting Kits ..........58 Furniture Mounting......... 59 DTP2 R 212 Series • Contents viii...
-
Page 9: Introduction
(100 meters) with a maximum resolution of up to 4K @ 60 Hz, 4:4:4, with HDCP 2.3, supporting data rates up to 18 Gbps. The switcher is housed in a one‑inch high, three‑quarter rack wide, rack‑mountable metal enclosure, and is powered by an external power supply. DTP2 R 212 Series • Introduction... -
Page 10: Features
AV devices to be controlled without the need for additional cabling. RS-232 insertion from the Ethernet control port — Saves system resources and • simplifies installation by enabling a control processor to access remote RS‑232 devices over Ethernet. DTP2 R 212 Series • Introduction... - Page 11 Built-in Web pages — Enables the use of a standard browser for device monitoring and troubleshooting over an intuitive Web interface. Front panel security lockout — This feature locks out all front panel functions; all • functions however, are available through USB or RS‑232 control. DTP2 R 212 Series • Introduction...
- Page 12 Includes LockIt HDMI cable lacing brackets External Extron Everlast power supply included — Provides worldwide power • compatibility with high‑demonstrated reliability and low power consumption. Extron Everlast Power Supply is covered by a 7-year parts and labor warranty • DTP2 R 212 Series • Introduction...
-
Page 13: Application Diagrams
HDMI Rx G DTP2 IN MODE NORM/ AUTO HDMI Rx G DTP2 R 212 SERIES (70 m) HDMI Audio Ethernet Extron SM 3 Surface Mount Speakers Extron Extron Figure 2. Typical Switching Receiver Application DTP2 R 212 Series • Introduction... -
Page 14: Installation
Set the receiver SEND POWER switch of the receiver (see figure 3, ) to the “DOWN” (OFF) position (see figure 4 on page 9). • Set the transmitter SEND POWER switch (see figure 3, ) to the “UP” (SEND POWER) position. DTP2 R 212 Series • Installation... -
Page 15: Rear Panel Features
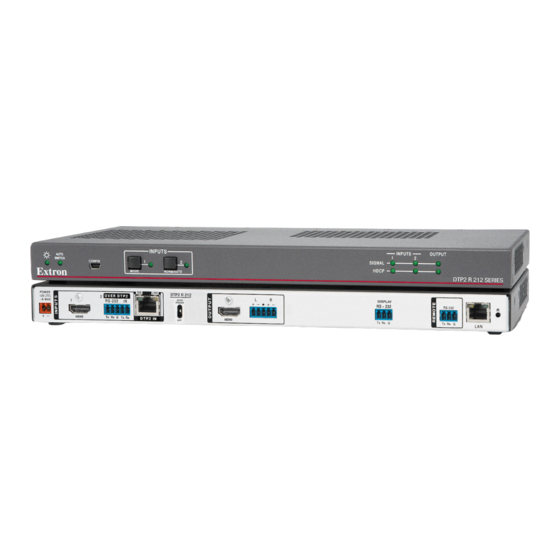
Remote amplified volume control (SA models) DTP2 IN RJ-45 port Switch for volume control (SA models) Send Power toggle switch Remote RS-232 port HDMI output LAN (Ethernet) port Audio output Reset button Figure 3. Rear Panel Features DTP2 R 212 Series • Installation... - Page 16 If you are using the DTP2 R 212 receiver (not the SA model), the power output of the DTP2 transmitter is enough to power the receiver. You can send power either way, if desired (see figure 4 on page 9). DTP2 R 212 Series • Installation...
- Page 17 RS-232 RS-232 CONFIG OUTPUT HDMI Rx G DTP2 IN HDMI Rx G DTP2 T 211 Extron DTP2 R 212 Receiver Local Power Supply Figure 4. DTP2 R 212 (non-SA) Send Power Toggle Switch Configuration DTP2 R 212 Series • Installation...
- Page 18 DTP2 R 212 (see Display and Remote RS-232 Control on page 15 to wire the connector). LAN (Ethernet) port — Use an RJ‑45 cable to connect this jack to a LAN (Ethernet) for control of the device. DTP2 R 212 Series • Installation...
-
Page 19: Wiring Connections
To verify the power cord polarity before connecting the plug, connect the power supply with no load and check the output with a voltmeter. Use the supplied tie wrap to strap the power cord to the extended tail of the connector. DTP2 R 212 Series • Installation... - Page 20 The power supply shall not be permanently fixed to building structure or similar structure. • La source d’alimentation ne devra pas être fixée de façon permanente à la structure de bâtiment ou à d’autres structures similaires. DTP2 R 212 Series • Installation...
-
Page 21: Lan Connector Wiring
DTP2 R 212 ne fonctionne pas correctement avec ces câbles. Supported cables The DTP2 R 212 switcher is compatible with shielded twisted pair (STP) and unshielded twisted pair (U/UTP) cable. However, Extron strongly recommends that you use STP cable to achieve best performance. DTP2 R 212 Series • Installation... -
Page 22: Analog Audio Output Connector
Pour l’audio asymétrique, connectez les manchons au contact au sol. NE PAS connecter les manchons aux contacts négatifs (–). NOTES: • The length of exposed wires is important. The ideal length is 3/16 inch (5 millimeter). Do not tin the wires! • DTP2 R 212 Series • Installation... -
Page 23: Display And Remote Rs-232 Control
50mA V C G 10 V (Pin 1) 2k ohms Vol/Mute Volume Pot (Pin 2) 10k ohms Mute Switch Ground (Pin 3) Figure 11. Remote Control Wiring (SA models only) DTP2 R 212 Series • Installation... -
Page 24: Over Dtp2 Rs-232 And Ir Control
The length of exposed wires is important. The ideal length is 3/16 inch (5 mm). • Longer than 3/16 inch, the exposed wires may touch, causing a short circuit. Shorter than 3/16 inch, wires can be easily pulled out. • DTP2 R 212 Series • Installation... -
Page 25: Lockit Lacing Brackets
Loosely place the included tie wrap around the HDMI connector and the LockIt lacing bracket as shown. While holding the connector securely against the lacing bracket, use pliers or similar tools to tighten the tie wrap, then remove any excess length. DTP2 R 212 Series • Installation... -
Page 26: Operation
TMDS clock activity is detected on it. NOTE: If the source device connected to the selected input is HDCP encrypted (requires HDCP authentication), the corresponding signal LED may not light unless HDCP has been authenticated. DTP2 R 212 Series • Operation... -
Page 27: Operations
Only one input can be switched to the output at a time. • NOTE: Buttons are disabled in auto‑switch mode, but LEDs still indicate the selected input. For more information about auto‑input switching, see Enabling Auto-Input Switching on page 20 DTP2 R 212 Series • Operation... -
Page 28: Front Panel Lockout (Executive Mode)
To enable and operate auto-input switching via the front panel: Press and hold the Input 1 button for 3 seconds. Press and release the Input 2 button to toggle between Normal mode and Auto Switch mode. DTP2 R 212 Series • Operation... -
Page 29: Edid Minder
PCS (see the DTP2 R 212 PCS Help File). Output Audio Configuration Embedded audio can be enabled or disabled on the HDMI output via SIS commands (see Output Audio Configuration on page 45) or PCS (see the DTP2 R 212 PCS Help File). DTP2 R 212 Series • Operation... -
Page 30: Cec Control
CEC for the DTP2 R 212 can be configured via SIS commands (see Command and on page 51) or PCS in the Control Response Table for CEC SIS Commands Config tab (see DTP2 R 212 PCS Help File). DTP2 R 212 Series • Operation... -
Page 31: Configuration Software
) or, if the software is listed, click that link directly (see the PCS Product Configuration Software link, NOTE: If there is no direct link to your software, click the Software link ( For firmware, click the Firmware link ( DTP2 R 212 Series • Configuration Software... - Page 32 Double‑click the executable file and follow the on‑screen directions to install the software. For firmware: To install via PCS, see Updating Firmware on page 23 Firmware Panel To install via the internal web page, see on page 56. DTP2 R 212 Series • Configuration Software...
-
Page 33: Connecting To Pcs
Click in the field to edit the address (see figure 20) . Click Apply to complete and close. Alternatively, click Apply and Connect to complete and connect to the device. Click Cancel to close the box without changes. Figure 20. Communication Settings DTP2 R 212 Series • Configuration Software... -
Page 34: Tcp/Ip Panel
), the port number or leave the field blank. PCS scans for the port if blank. NOTE: Select the Show Characters checkbox ( ) to display the password characters. Click the Connect button ( ). A new device tab opens. DTP2 R 212 Series • Configuration Software... -
Page 35: Offline Device Preview
NOTE: The device tab (see the right DTP2 R 212 image) has a grayed out indicator (circle) to indicate that there is no device connected and the software is running in offline configuration mode. DTP2 R 212 Series • Configuration Software... -
Page 36: Software Overview
PCS Software Menu Show Expanded Device Tabs Selecting Show Expanded Device Tabs from the software menu displays the device IP address or connection method in the Device tab (see image at the right). DTP2 R 212 Series • Configuration Software... - Page 37 Click the I Get It! button to close the dialog box. Extron PCS Help Open the PCS help file for general PCS operations. From the Software menu, select Extron PCS Help. Figure 27. PCS Help File DTP2 R 212 Series • Configuration Software...
- Page 38 Click the Close Session(s) and Exit button ( ) to disconnect the software from connected devices, close all offline device tabs, and close the software. Alternatively, click the Cancel button ( ) to leave the software open. DTP2 R 212 Series • Configuration Software...
-
Page 39: Device Menu
DTP2 R 212 Help — Opens the DTP2 R 212 PCS Help File in a separate window. About This Module — Opens the About This Module dialog box, with the PCS • module part number and version. DTP2 R 212 Series • Configuration Software... -
Page 40: Updating Firmware
Open PCS via the desktop Start menu, desktop icon, or toolbar icon. Unless changed in the installation of PCS, make the following selection from the Start menu: Start > All Programs > Extron Electronics > Extron Product Configuration Software > Extron Product Configuration Software The Product Configuration Software window opens to the Device Discovery screen (see figure 31). - Page 41 Les fichiers firmware valides doivent contenir l’extension fichier .eff. Un fichier avec n’importe quelle autre extension n’est pas une mise à jour de firmware pour cet appareil et l’appareil pourrait arrêter de fonctionner. DTP2 R 212 Series • Configuration Software...
- Page 42 Click Connect, or double‑click on the device. The device reconnects to the software. NOTE: The original factory‑installed firmware is permanently available on the DTP2 R 212. If the attempted firmware upload fails for any reason, the receiver reverts to the factory version. DTP2 R 212 Series • Configuration Software...
-
Page 43: Sis Commands
No response is required from the host. The switcher sends the following message when it is first powered on: (C) Copyright 2020, Extron Electronics DTP2 R 212, Vn.nn, 60-1588-52 Vn.nn is the firmware version number. •... -
Page 44: Password Messages
E01 – Invalid input number E06 – Invalid channel change E10 – Invalid command E13 – Invalid parameter E14 – Invalid for this configuration E17 – Invalid command for signal type E24 – Privilege violation DTP2 R 212 Series • SIS Commands... -
Page 45: Timeout
0 = Off, disabled, or not detected 1 = On, enabled, or detected = Auto switch mode 0 = Disabled (default) 1 = Enabled, highest active input has priority 2 = Enabled, lowest active input has priority DTP2 R 212 Series • SIS Commands... - Page 46 = Video and sync mute 0 = Mute off (default) 1 = Mute on (clock/sync present but not video/TMDS) 2 = Mute on (no clock/sync or TMDS present on output) = Video outputs 1 to 2 DTP2 R 212 Series • SIS Commands...
- Page 47 = Object Identification number (OID) Object Identification Number (OID) Channel Processor Type OID – L OID – R 60000 60001 Line Out Output Attenuation and Mutes Amp Out Output Attenuation and 60002 60003 Mutes DTP2 R 212 Series • SIS Commands...
- Page 48 Default subnet mask = 255.255.0.0 = Prefix (subnet mask bits). Subnet 255.255.0.0 is represented as a Prefix value by /16. Default subnet mask bits response for esc CISG command = /16. DTP2 R 212 Series • SIS Commands...
- Page 49 = CEC address byte: In the form of percent sign followed by 2 hex digits (Example: = Extron output ( ) to TV ( = CEC device presence: 0-F = Device address X = Missing — = CEC port is off DTP2 R 212 Series • SIS Commands...
-
Page 50: Command And Response Table For Sis Commands
= Automatic, based on sink EDID./ (default) = Force 8‑bit Signal Status (unsolicited) Request status of all signals • input 1 • input 2 output KEY: = On/Off: = Off, disabled, or undetected = On, enabled, or detected DTP2 R 212 Series • SIS Commands... - Page 51 = Enabled (default) Read Volume Control Switch Status Read rear panel Vol. Cont. switch 41STAT X5%] setting Stat41* X5%] Verbose mode 2/3 KEY: = Rear panel volume control switch status: = 10K po = RS‑232/SIS DTP2 R 212 Series • SIS Commands...
- Page 52 MHPLG X2$] status Verbose mode 2/3 HplgM X2$] KEY: = 5 V output mode: = Auto (5 V enabled when source present with 5 V, otherwise off) = 5 V always enabled (default) DTP2 R 212 Series • SIS Commands...
- Page 53 OA FMT X4) ] Afmt O X4) ] Verbose mode 2/3 KEY: Audio output: = Disable embedded audio on HDMI output = Pass digital embedded audio on HDMI (default) Pass analog audio path DTP2 R 212 Series • SIS Commands...
- Page 54 Set Audio Output Mode Set audio output mode AFMT Afmt & View audio output mode SAFMT & Verbose mode 2/3 AfmtS & KEY: = Audio output mode: = Stereo (default) = Dual mono DTP2 R 212 Series • SIS Commands...
- Page 55 = Connected to local DTP RS‑232 (input; default) = Connected to Ethernet port = Host Mode (RS‑232 control from TX) 2002 = Output insertion port: = Disabled (default) = Connected to Ethernet port DTP2 R 212 Series • SIS Commands...
- Page 56 = Hardware ( MAC) address = Subnet mask (xxx.xxx.xxx.xxx): Leading zeros in each of the 4 fields are optional in setting values and are expressed in 255.255.0.0 returned values. Default subnet mask = DTP2 R 212 Series • SIS Commands...
- Page 57 Leading zeros in each of the 4 fields are optional in setting values and are expressed in 192.168.254.254; returned values. Factory Default IP address: ss: 0.0.0.0, 0.0.0.0 Default Gateway IP addre Default DNS Server UP address: DTP2 R 212 Series • SIS Commands...
- Page 58 Reset all settings except IP Same as Absolute System Reset settings except that IP address, subnet mask, gateway address, DHCP, and port mapping are not reset. DTP2 R 212 Series • SIS Commands...
-
Page 59: Command And Response Table For Cec Sis Commands
) in the form of percent sign followed by 2 hex digits (Example: X3& = CEC address byte: In the form of percent sign followed by 2 hex digits (Example: = Extron output ( ) to TV ( DTP2 R 212 Series • SIS Commands... - Page 60 = Success (ACK) of entire message = Unable to send %32%00 = CEC physical address: 4 hexadecimal digits (Example: — = CEC device presence: ‑ = Device address = Missing = CEC port is off DTP2 R 212 Series • SIS Commands...
-
Page 61: Internal Web Page
In the event of a complete system reset, the passwords convert to the default, which is extron. Figure 36. Network Password Prompt Click the Sign in button. DTP2 R 212 Series • Internal Web Page... -
Page 62: Web Page Panels
To change the name of the device: Click EDIT (see figure 38 [left], ) in the Device Info panel. The Device Info Settings panel opens to allow edits (right). Figure 38. Device Info Panel DTP2 R 212 Series • Internal Web Page... -
Page 63: Device Status Panel
DHCP On and Off. To set the IP addresses: Click EDIT (see figure 40, ) in the Network [left], Settings panel. The Network Settings panel opens to allow edits (right). Figure 40. Network Settings Panel DTP2 R 212 Series • Internal Web Page... -
Page 64: Firmware Panel
When the update is completed, the message window closes and the message Firmware Upload Complete appears near the top of the screen. The new firmware filename appears beside Version in the Firmware panel. DTP2 R 212 Series • Internal Web Page... -
Page 65: Roles And Permissions Panel
To remove an assigned password: In the Change Admin Password or Change User Password field, enter a single space. Enter a single space in the appropriate Confirm Password Figure 44. Passwords Dialog Box field. Click SAVE. DTP2 R 212 Series • Internal Web Page... - Page 66 Consider equipment nameplate ratings when addressing this concern. • Reliable earthing (grounding) — Maintain reliable grounding of rack‑mounted equipment. Pay particular attention to supply connections other than direct connections to the branch circuit (such as the use of power strips). DTP2 R 212 Series • Mounting...
- Page 67 (ex. : les multiprises). Furniture Mounting The DTP2 R 212 can be mounted under a desk, table, or podium using an under‑desk mounting kit (see the mounting instructions provided with the kit). DTP2 R 212 Series • Mounting...
- Page 68 Extron Electronics makes no further warranties either expressed or implied with respect to the product and its quality, performance, merchantability, or fitness for any particular use. In no event will Extron Electronics be liable for direct, indirect, or consequential damages resulting from any defect in this product even if Extron Electronics has been advised of such damage.
Need help?
Do you have a question about the DTP2 R 212 Series and is the answer not in the manual?
Questions and answers