Table of Contents
Advertisement
Quick Links
2.5" SSD/HDD Mounting Bracket for 3.5" Bay | Tool-less | 5 Pack
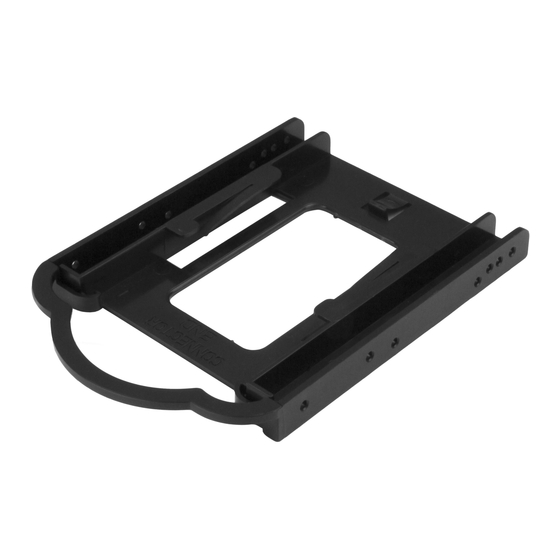
Product Diagram (BRACKET125PTP)
1
Component
• Used to secure a 2.5" Solid State Drive or
1
Hard Drive Slot
Hard Drive in the Mounting Bracket.
• Used to secure the Mounting Bracket to the
2
Plastic Pegs
Computer Chassis.
• Used to insert/remove the Mounting Bracket
3
Handle
into/out of the Computer Chassis.
Requirements
For the latest requirements, please visit
Packaging Contents
• 2.5" SSD/HDD Mounting Brackets x 5
• Plactic Pegs x 30
• Quick-Start Guide x 1
To view manuals, FAQs, videos, drivers, downloads, technical drawings, and more, visit www.startech.com/support.
2
3
Function
www.startech.com/BRACKET125PTP
Installing a Hard Drive
1. Remove the Plastic Pegs (x 6) from the center of the Mounting Bracket by gently
twisting the Plastic Peg until it snaps off of the plastic molding.
2. Slide the Hard Drive into the Hard Drive Slot on the Mounting Bracket towards
the Handle, label side down, with the Hard Drive Connector facing out.
Inserting a Hard Drive into the Mounting Bracket
Installing the Mounting Bracket
1. Turn off the Computer and any connected Peripheral Devices (e.g., printers,
external hard drives, etc.).
2. Unplug the Power Cable from the back of the Computer and disconnect any
Peripheral Devices.
3. Remove the Cover from the Computer Case.
Note: Please refer to the manufacturer's manual for instruction on how to remove the
Computer Case Cover.
4. Slide the Mounting Bracket (label side up) into a 3.5" Hard Drive Slot, aligning
the Mounting Holes on the Mounting Bracket with the Mounting Holes on the
Computer Chassis.
Sliding the Mounting Bracket into the 3.5" Hard Drive Slot
Quick-Start Guide
Manual Revision: September 9, 2019 10:18 AM
Advertisement
Table of Contents

Subscribe to Our Youtube Channel
Related Manuals for StarTech.com BRACKET125PTP


Summary of Contents for StarTech.com BRACKET125PTP
- Page 1 • Plactic Pegs x 30 • Quick-Start Guide x 1 Sliding the Mounting Bracket into the 3.5” Hard Drive Slot To view manuals, FAQs, videos, drivers, downloads, technical drawings, and more, visit www.startech.com/support. Manual Revision: September 9, 2019 10:18 AM...
- Page 2 StarTech.com. Where they occur these references are for illustrative purposes only and do not represent an endorsement of a product or service by StarTech.com, or an endorsement of the product(s) to which this manual applies by the third-party company in question.
Need help?
Do you have a question about the BRACKET125PTP and is the answer not in the manual?
Questions and answers