Advertisement
Quick Links
Advertisement

Subscribe to Our Youtube Channel
Related Manuals for D-CUT LX-200


Summary of Contents for D-CUT LX-200
- Page 1 OPERATION MANUAL D-CUT Flooring Cutter LX-200 www.dcutproducts.com...
- Page 2 7. Make sure tool is secure. Operate only on a firm substrate or solid stand. 8. Use the right tool. Do not force the D-Cut Multi-flooring Cutter or use it for a job for which it was not designed; use only on approved materials.
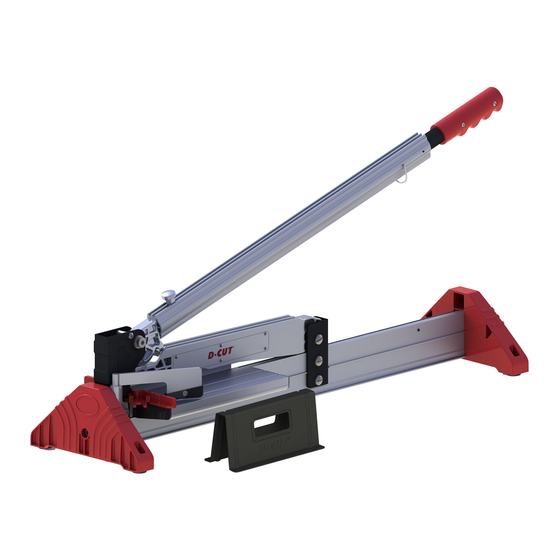
- Page 3 SET UP CUTTING AND C Installation of the Cutter (1) Install the cross bar to the cutter base with provided bolt as shown. Warning: Do not put your fingers against the sharp edge of the blade at any time. Installation of the Cutter (2) Insert the handle to the base install the rear base to the front base...
- Page 4 CUTTING Cutting Preparation Place the angle attachment into the cutter head and push it as much as you can to the bottom. Change the cutting angle 0°or 45°as needed. Warning: Do not put your fingers against the sharp edge of the blade at any time. Cutting (1) Insert material between the cutting blade and the base as...
-
Page 5: Maintenance
MAINTENANCE MAINTENANCE Changing the Blade Use the provided Allan wrench to remove the six screws, then hold the blade by each end and carefully move the blade out of blade holder. Note: the flat side of the blade facing the table. Warning: Do not put your fingers against the sharp edge of the blade at any time. -
Page 6: Parts List
PARTS LIST... - Page 7 PARTS LIST Parts Q’ty Parts Q’ty Foot Pad Screw M4×30 Bolt M8×40 Spring Pin φ6×30 Front-Rear Base Hook Front braket Chain Spring Pin φ6×22 Nut M8 Stop Pin Supporting Stand Inner Hexagonal Screw M5×10 45°-90° Attachment Nylon Washer Screw M6 Spring Base Allan Wrench Thin Nut M8...
- Page 8 D-Cut LX Series Cutting Capacity Chart LX-230 LX-080 Limit on Limit on Limit on Janka Rate WOOD FLOORING Solid Wood Engineered Engineered Flooring Wood Flooring Wood Flooring Eastern White Pine Basswood White Pine Hemlock Chestnut Larch Douglas Fir Southern Yellow Pine (Loblolly and Shortleaf)
- Page 9 Curupixa 1490 Sapele / Sapelli 1510 Kambala 1540 Peroba 1557 True Pine / Timborana 1570 Zebrawood 1575 Tualang 1624 Wenge / Red Pine 1630 Highland Beech 1686 Locust 1700 Kempas 1710 Merbau 1712 Blackwood 1720 African Padauk 1725 Rosewood 1780 Bangkirai 1798 Afzelia / Doussie...
Need help?
Do you have a question about the LX-200 and is the answer not in the manual?
Questions and answers