
Related Manuals for Projecta INTELLI-CHARGE IC7


Summary of Contents for Projecta INTELLI-CHARGE IC7
- Page 1 INTELLI-CHARGE BATTERY CHARGER 12 VOLT, 7 STAGE SWITCHMODE P/No.s IC7, IC7W, IC10, IC15...
-
Page 2: Important Safety Information
IMPORTANT SAFETY INFORMATION Please read this manual thoroughly before use and store in a safe place for future reference. WARNING • Explosive gases may escape from the battery during charging. Prevent flames and sparks. Provide adequate ventilation. • Before charging, read the instructions. •... - Page 3 FEATURES 7-STAGE AUTOMATIC CHARGING (GEL, AGM, WET & CALCIUM) Intelli-Charge incorporates the latest technology to deliver a 7-stage charge suitable for automotive, calcium, marine and all types of deep cycle batteries (Gel and AGM). These stages of charging ensure maximum battery life and performance are delivered with a faster charging time and ensure a complete charge is achieved.
- Page 4 Recondition If after charging, the battery is unable to hold the charge the battery reconditioning function is initiated automatically. This is most likely to take place on batteries that have been deeply discharged, prior to charging. The Recondition mode will then run for 4 hours and at the end will retest the battery.
-
Page 5: Multi Chemistry
ADJUSTABLE CHARGE RATE The charger’s output can be adjusted to suit the size of the battery for optimum charging. MULTI CHEMISTRY The Multi-Chem function allows you to set the charging profile to suit each battery’s chemistry type (Lithium, GEL, AGM, WET and Calcium). This ensures correct and thorough charging and maximises battery performance and battery life. -
Page 6: Cooling Fan
POLARITY PROTECTION Prevents the output leads from sparking due to accidental reverse connection or short circuit making the charger safer to use around batteries. OVER TEMPERATURE PROTECTION If the temperature within the charger rises too high, the charger will begin to cool down by turning on the fan, and if the temperature continues to rise it will begin reducing the power output. - Page 7 P/No. IC7 & IC7W IC10 IC15 CHARGE CONTROL – 7 STAGE Desulphation High Frequency Pulse charge up to 11V Soft Start Half the rated set current up to 12V Bulk Set current up to: Set current up to: Set current up to: 14.1V (GEL) 14.1V (GEL) 14.1V (GEL)
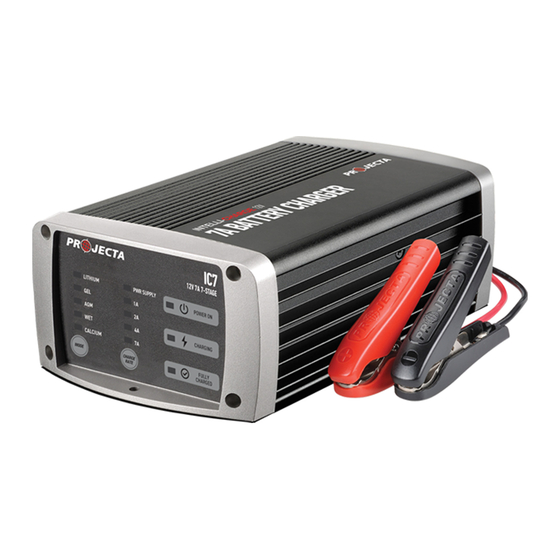
- Page 8 Battery Chemistry LED Battery DC Leads Thermostatically LED Charge Chemistry Display Controlled Status Display Selection (Mode) Indicates selected Cooling Fan Indicates Power, Button battery chemistry Charging and type Fully Charged Power Cord Adjustable Mounting Charge Rate Flange IC7W IC10 IC15 FOR LEAD ACID CELL BATTERIES FOR LEAD ACID CELL BATTERIES FOR LEAD ACID CELL BATTERIES...
-
Page 9: Charging Instructions
CHARGING INSTRUCTIONS STEP 1 – CHECK THE ELECTROLYTE LEVEL Prior to charging the battery, remove the vent caps and check the electrolyte level (not required on sealed & maintenance free batteries). The electrolyte should be 6mm (1/4”) above the battery’s plates. If low, top up with distilled water to the correct level and refit the vent caps. - Page 10 STEP 2B – CONNECTION IN VEHICLE Determine if the vehicle is Positively (+) or Negatively (-) earthed. Negatively earthed vehicles have a cable (usually black) from the Negative battery terminal to the vehicle’s chassis. Negatively earthed (most vehicles) Connect the RED lead (battery clip) from the charger to the Positive (+) battery terminal. Connect the BLACK lead (battery clip) from the charger to the vehicle’s chassis away from the fuel line or moving parts.
-
Page 11: Step 3 - Connect To 240V Mains Power
STEP 2C – CONNECTION IN VEHICLE WITH HARNESS (IC7 ONLY) Connect the RED ring terminal of the harness to the Positive (+) battery terminal. Connect the BLACK ring terminal of the harness to the Negative (-) battery terminal. Connect the plug on the harness to the charger’s output lead socket. Vehicle harness STEP 3 –... - Page 12 STEP 5 – SET BATTERY CHEMISTRY TYPE Battery Chemistry should be selected by the type of battery being charged (refer to the battery manufacturer’s specifications for battery type). Refer to page 15 for a detailed explanation. For example if you are charging an AGM battery, then AGM mode will need to be selected.
-
Page 13: Mounting Instructions
MOUNTING INSTRUCTIONS INTELLI-CHARGE Chargers are designed for indoor, out of weather use only. Ensure that both charger and battery are in a well-ventilated space during charging. The battery charger end plates include a mounting flange for easy mounting. If permanently fixed the charger should be mounted to a suitable horizontal or vertical panel, with at least 10cm clearance from the end plates to provide adequate ventilation for the cooling fan. - Page 14 Connection: 1. Cut off the supplied battery clips; ensure you leave sufficient cable to reach the battery terminals. (DO NOT extend the battery charger DC cables, as the added voltage drop will cause incorrect charging). 2. Fit a ring terminal to the BLACK Negative (-) wire. 3.
-
Page 15: Battery Chemistry Selection
BATTERY CHEMISTRY SELECTION The Multi-Chem function allows you to set the charging profile to suit each battery’s chemistry type (Lithium, GEL, AGM, WET and CALCIUM). This ensures correct and thorough charging and maximizes battery performance and battery life. 1. Press the Mode button; all the lights will come on. Wait for the lights to turn off. 2. -
Page 16: Fault Codes
LOCKING THE BATTERY CHARGER SETTINGS Locking the battery charger settings will disable the CHARGE RATE & MODE keys from use. This function is ideal for hire vehicles etc as it prevents the chargers settings from being altered if the keys are touched. To lock;... -
Page 17: Frequently Asked Questions
This can occur if a small amount of power is used for a long time, for example a map reading light is left on for a week or more. Projecta 7 Stage chargers are designed to charge from as little as 2.5 Volts. - Page 18 Q. What happens if my battery charger is in Desulphation mode or Soft Start mode, but I want to start bulk charging? A. Desulphation mode is time limited to 6 hours and Soft Start is limited to 1 hour. If you can not wait for the battery charger to move through these stages you can select Power Supply mode to charge the battery.
- Page 19 NOTES:...
-
Page 20: Warranty Statement
WARRANTY STATEMENT Applicable only to product sold in Australia Brown & Watson International Pty Ltd of 1500 Ferntree Gully Road, Knoxfield, Vic., telephone (03) 9730 6000, fax (03) 9730 6050, warrants that all products described in its current catalogue (save and except for all bulbs and lenses whether made of glass or some other substance) will under normal use and service be free of failures in material and workmanship for a period of one (1) year (unless this period has been extended as indicated elsewhere) from the date of the original purchase by the consumer as marked on the...
Need help?
Do you have a question about the INTELLI-CHARGE IC7 and is the answer not in the manual?
Questions and answers