
Related Manuals for Projecta IC3500


Summarization of Contents
Important Safety Information
Warning
Crucial safety precautions and warnings for operating the battery charger.
7-Stage Automatic Charging
Desulphation
Stage to break down sulphation in batteries using high-frequency pulses.
Soft Start
Initial charging stage to gently introduce power and protect the battery.
Bulk Charge
Charges the battery at maximum rate to reach a set voltage, approximately 80% charged.
Absorption
Charges the battery to 100% by adjusting charge rate for full power absorption.
Equalisation
Specific stage for calcium batteries to restore electrolyte by removing stratification.
Analysis
Tests the battery to ensure it has accepted the charge properly.
Recondition
Restores deeply discharged batteries by equalising cells for 4 hours.
Float
Maintains the battery at 100% charge indefinitely without overcharging.
Battery Chemistry Selection
Power Supply Mode
Sets the charger to provide a constant 13.8V DC for appliances drawing power.
Gel Battery Charging
Charging profile for GEL batteries with a max voltage of 14.1V.
AGM Battery Charging
Charging profile for AGM batteries with a max voltage of 14.4V.
Wet Battery Charging
Charging profile for WET batteries with max voltage of 14.7V and 16.0V.
Calcium Battery Charging
Charging profile for Calcium batteries, includes equalisation up to 16V or 32V.
Features
Adjustable Charge Rate
Allows adjustment of charger output to suit battery size for optimal charging.
Temperature Compensation
Sensor monitors battery temp and adjusts output to prevent overcharging in varied climates.
Mounting Instructions
Mounting Battery Charger
Guidance on how to mount the battery charger securely, ensuring ventilation.
Mounting Remote Control
Flush Mount Installation
Instructions for flush mounting the remote control unit into a surface.
Surface Mount Installation
Instructions for surface mounting the remote control unit onto a surface.
Removing Remote Control
Flush Mount Removal
Steps to detach the remote control from a flush mounted bracket.
Surface Mount Removal
Steps to detach the remote control from a surface mounted bracket.
Controls
Button Functions
Explanation of the functions of the VOLT/AMP, CHARGE RATE, BATTERY TYPE, and RECONDITION buttons.
LED Charge Indicators
LED Signal Interpretation
Details the meaning of different coloured LEDs indicating charging stages and status.
Charging Instructions
Step 1 - Check Electrolyte Level
Prepare battery by checking and topping up electrolyte level if necessary.
Step 2A - Connect Battery Out of Vehicle
Connect charger leads to battery terminals when battery is not installed in a vehicle.
Step 2B - Connect Battery In Vehicle
Connect charger leads to battery terminals when battery is installed in a vehicle.
Step 2C - Permanent Hard Wiring
Hardwire charger DC leads to battery for permanent installations, with circuit breaker.
Step 3 - Install Optional Accessories
Install remote control and temperature sensor if required before connecting to mains power.
Step 4 - Connect to Mains Power
Connect the charger to a 240V mains socket and turn on the power.
Step 5 - Set Charge Rate
Adjust the charger's output current based on the battery size.
Step 6 - Set Battery Chemistry Type
Select the correct charging profile for the battery's chemistry type.
Step 7 - Start Charging
Monitor charging process via LCD screen and LEDs.
Step 8 - Disconnection
Safely disconnect the charger from mains power and battery after charging is complete.
Step 9 - Check Electrolyte Level (Calcium)
Re-check electrolyte level and top up if required for Calcium batteries.
Initiating Recondition Mode
Recondition Process Steps
Follow charging steps, run recondition for 4 hours, then follow further charging steps.
Locking the Remote Control
Lock/Unlock Functionality
How to lock and unlock the remote control buttons to prevent unauthorized changes.
Faults & Errors
Error Code Interpretation
Explains LCD error codes, power LED status, faults, and remedies for troubleshooting.
Specifications
Product Specifications Table
Detailed technical specifications for different models, including charge control and battery range.
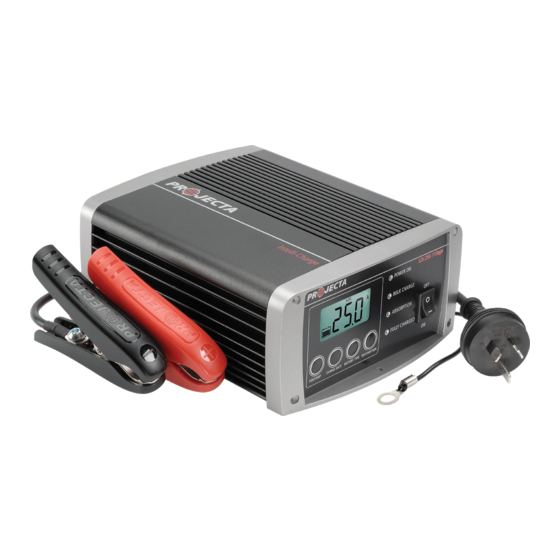
Product Overview
Component Identification
Diagram identifying key components of the battery charger and dimensions of different models.
Frequently Asked Questions
Battery Charge Status
How to determine if the battery is fully charged using LEDs or a hydrometer.
Charging Troubleshooting
Addresses issues like zero volts display, low voltage, and manual start of bulk charging.
Appliance Connected During Charging
Impact of connecting appliances while charging and recommended Power Supply mode use.
Battery Chemistry Selection
Discusses selecting different chemistry types and the special needs of Calcium batteries.
Warranty Statement
Product Warranty Terms
Details the warranty period, exclusions, and claim procedures for the product.
Need help?
Do you have a question about the IC3500 and is the answer not in the manual?
Questions and answers