
Related Manuals for Danfoss MES 1003


Summary of Contents for Danfoss MES 1003
- Page 1 User Guide MES 1003 WMS Doc no. 100837-MAN – Rev. E1 – Rev. date 2022-10 © Danfoss IXA A/S | Page 1...
-
Page 2: Table Of Contents
Salt bridge replacement – pH sensor ............................33 5.2.5. SU inlet filters ......................................35 5.2.6. Spare parts ....................................... 35 5.3. Calibration ........................................35 Doc no. 100837-MAN – Rev. E1 – Rev. date 2022-10 © Danfoss IXA A/S | Page 2... - Page 3 5.5.1. Reset alarms ......................................56 5.5.2. WAU Flow Switch Adjustment ................................. 57 Appendices ................................59 6.1. Appendix 1 – Parameter Overview ..............................59 Doc no. 100837-MAN – Rev. E1 – Rev. date 2022-10 © Danfoss IXA A/S | Page 3...
-
Page 4: Introduction
MES 1003 - Data Sheet (100602-DSH) MES 1003 - Installation Guide (100838-MAN) MES 1003 - Spare Parts Catalogue (101155-CAT) These documents are available for download at the Danfoss IXA website, or from the supplier of the marine emission sensor. 1.2. Abbreviations and Definitions... -
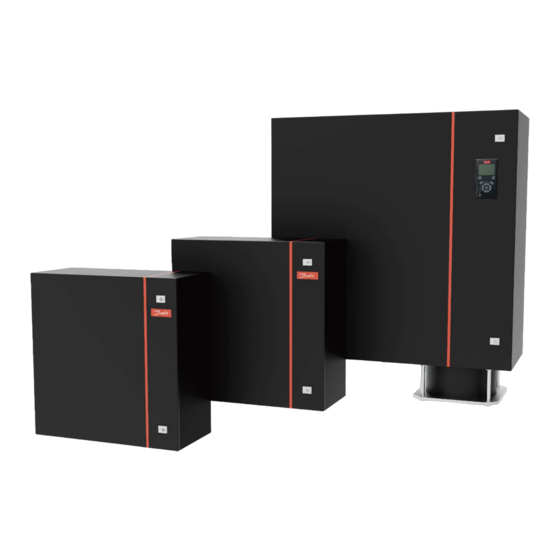
Page 5: Product Description
WSU offering a sample pump WSR offering pressure reduction Measurement chamber serviceable from the outside Internal and external interfaces Illustration 1: Washwater Monitoring System Doc no. 100837-MAN – Rev. E1 – Rev. date 2022-10 © Danfoss IXA A/S | Page 5... -
Page 6: Functional Features
When the animation is finished, the LEDs turn off, except On LED and Status LED. Warning LED will turn on if a warning is active. Alarm LED will flash if an alarm is active. Doc no. 100837-MAN – Rev. E1 – Rev. date 2022-10 © Danfoss IXA A/S | Page 6... -
Page 7: First Time Setup
C. Navigation keys for programming functions and moving the display cursor. Also included are the status indicator lights. D. Start/Stop Key. Illustration 3: LCP Layout Doc no. 100837-MAN – Rev. E1 – Rev. date 2022-10 © Danfoss IXA A/S | Page 7... -
Page 8: Display Area (A)
Gives access to menus (LED) Press to go to the Main Menu from any other display view. Table 4: Legend to Illustration 5: Display Menu Keys Doc no. 100837-MAN – Rev. E1 – Rev. date 2022-10 © Danfoss IXA A/S | Page 8... -
Page 9: Navigation Keys (C)
On when a warning is active. Alarm - red LED Blinking when an alarm is active. Table 6: Legend to Illustration 7: Indicator Lights (LEDs) Doc no. 100837-MAN – Rev. E1 – Rev. date 2022-10 © Danfoss IXA A/S | Page 9... -
Page 10: Start/Stop Key (D)
When Stop is pressed again, the LED turns off and the WMS enters Standby mode. If the WMS operation is controlled via Modbus, the Start/Stop key is ignored. Doc no. 100837-MAN – Rev. E1 – Rev. date 2022-10 © Danfoss IXA A/S | Page 10... -
Page 11: Status
Illustration 12: Non corrected PAH value Status 09:25 Status 09:25 WSR 1 18 °C Raw PAH 5 µg/L Sensing Sample point 1 Sensing Sample point 1 Doc no. 100837-MAN – Rev. E1 – Rev. date 2022-10 © Danfoss IXA A/S | Page 11... -
Page 12: Menu
Press Cancel to abort or press OK to confirm the new setting. The colors are now inverted. Illustration 16: Step 1 Illustration 17: Step 2 1-2* 1-2* Event log status Event log status 1-21 Status 1-21 Status Enabled Enabled Doc no. 100837-MAN – Rev. E1 – Rev. date 2022-10 © Danfoss IXA A/S | Page 12... -
Page 13: Menu Structure
1-** Event 2-** Settings 3-** Interfaces 4-** Sensor info 5-** Maintenance 6-** Calibration 7-** Measurement info See Appendices Appendix 1 – Parameter Overview Doc no. 100837-MAN – Rev. E1 – Rev. date 2022-10 © Danfoss IXA A/S | Page 13... - Page 14 Auto start: When Auto start is disabled on the WMS, the system enters Standby mode when the system is turned on or restarted. If Auto-start is enabled, the systems immediately starts Sensing mode. See Appendices Appendix 1 – Parameter Overview Doc no. 100837-MAN – Rev. E1 – Rev. date 2022-10 © Danfoss IXA A/S | Page 14...
- Page 15 - read only SW revision number 4-4* OS rev number - read only Operating system revision number See Appendices Appendix 1 – Parameter Overview Doc no. 100837-MAN – Rev. E1 – Rev. date 2022-10 © Danfoss IXA A/S | Page 15...
- Page 16 Appendix 1 – Parameter Overview 6-** Calibration 6-1* Verification Mode 6-2* pH Calibration 6-3* Turb. Calibration 6-4* PAH Calibration See Appendices Appendix 1 – Parameter Overview Doc no. 100837-MAN – Rev. E1 – Rev. date 2022-10 © Danfoss IXA A/S | Page 16...
- Page 17 7-** Measurement Info 7-** Measurement info 7-1* Set Start Date 6-3* Set End Date 7-3* Save Log See Appendices Appendix 1 – Parameter Overview Doc no. 100837-MAN – Rev. E1 – Rev. date 2022-10 © Danfoss IXA A/S | Page 17...
-
Page 18: Local Control
The USB stick must comply with the following: Max 16 G 1 partition only Formatted to FAT32 Illustration 19: Placement of the USB port Doc no. 100837-MAN – Rev. E1 – Rev. date 2022-10 © Danfoss IXA A/S | Page 18... -
Page 19: Diagnostics Report
After successful completion, a directory named Diagnostics will be placed in the root folder of the USB drive. If a USB device is not found, check or replace the USB drive, and start the sequence again by pressing OK. Doc no. 100837-MAN – Rev. E1 – Rev. date 2022-10 © Danfoss IXA A/S | Page 19... -
Page 20: Updating Software
Updating Software The software package obtained from Danfoss IXA consists of a directory with several files used for updating the software suite. The entire software directory must be placed on a USB drive before it is inserted into the WMS. Make sure that only one software folder exists on the USB drive, to ensure the intended version will be installed. -
Page 21: Save Setup
Ensure the USB drive is working and is not full, before creating the measurement log. To create a measurement log: 1. Insert a USB drive 2. Navigate to the measurement info menu Illustration 29: Measurement info submenu Doc no. 100837-MAN – Rev. E1 – Rev. date 2022-10 © Danfoss IXA A/S | Page 21... - Page 22 After successful completion, a directory named “measurementlog.csv” will be placed in the root folder of the USB drive. If a USB device is not found, check or replace the USB drive, and start the sequence again by pressing OK. Doc no. 100837-MAN – Rev. E1 – Rev. date 2022-10 © Danfoss IXA A/S | Page 22...
-
Page 23: Logging
= Off (low flow) = On (sufficient flow) State Indicates operational mode: (standby) (starting) (sensing) (stopping) (disconnected) Table 10: Legend to Table 9 Doc no. 100837-MAN – Rev. E1 – Rev. date 2022-10 © Danfoss IXA A/S | Page 23... -
Page 24: Ixa Modbus Tcp/Ip
00 05 00 00 00 06 00 05 00 00 00 00 RESP: Exception on write coil (85) – invalid parameter (03) 00 05 00 00 00 03 00 85 03 Table 13 Doc no. 100837-MAN – Rev. E1 – Rev. date 2022-10 © Danfoss IXA A/S | Page 24... -
Page 25: Supported Functions
Coil 29 Pressure Transmitter Sample Point 1 On when the signal from the pressure transmitter in WSU 1 is Disconnected Alarm lost, otherwise OFF Doc no. 100837-MAN – Rev. E1 – Rev. date 2022-10 © Danfoss IXA A/S | Page 25... -
Page 26: Read Holding Registers (Modbus Function 3)
WSU 4 temperature float value AB Offset 64 + Offset 65 PAHphe level float value AB Table 15: Read Holding Registers – Floating Point Doc no. 100837-MAN – Rev. E1 – Rev. date 2022-10 © Danfoss IXA A/S | Page 26... - Page 27 “1234” and address 1000 – 1002 (3 registers of 2 bytes) is requested, then Offset High byte Low byte 1000 ‘1’ ‘2’ 1001 ‘3’ ‘4’ 1002 Doc no. 100837-MAN – Rev. E1 – Rev. date 2022-10 © Danfoss IXA A/S | Page 27...
-
Page 28: Write Single Coil (Modbus Function 5)
Measurement log end time in integer value AB 10003 seconds since 1970 Offset 10004 + Offset Start measurement log download integer value AB 10005 offset Table 19 Doc no. 100837-MAN – Rev. E1 – Rev. date 2022-10 © Danfoss IXA A/S | Page 28... -
Page 29: Service And Maintenance
Trained and authorized in general safety rules for work on electrical equipment. Familiar with local requirements, rules, and regulations for the installation. Doc no. 100837-MAN – Rev. E1 – Rev. date 2022-10 © Danfoss IXA A/S | Page 29... -
Page 30: Maintenance Tasks
Make sure that both the PAH sensor and it’s paired DryCAL-set are shipped back to the WMS supplier for lamp replacement. Table 20: Maintenance Tasks Doc no. 100837-MAN – Rev. E1 – Rev. date 2022-10 © Danfoss IXA A/S | Page 30... -
Page 31: Cleaning The Measurement Chamber
Tighten the 6 bolts holding the bottom part of the measurement chamber with a cross pattern to ensure even pressure on the gasket. Tighten with torque 1.98 Nm. Illustration 35: Removing the bottom of the measurement chamber Doc no. 100837-MAN – Rev. E1 – Rev. date 2022-10 © Danfoss IXA A/S | Page 31... -
Page 32: Cleaning The Sensors
Be sure not to touch the window surface with your fingers! Do not use any aggressive cleaning solutions, putty, sandpaper or cleaning solutions that contain abrasive substances to remove dirt. Doc no. 100837-MAN – Rev. E1 – Rev. date 2022-10 © Danfoss IXA A/S | Page 32... -
Page 33: Salt Bridge Replacement - Ph Sensor
It is recommended to replace electrolyte and salt bridge once every 12 months. Follow these steps: Remove the salt bridge by carefully turning it counter- clockwise with a spanner or pliers Doc no. 100837-MAN – Rev. E1 – Rev. date 2022-10 © Danfoss IXA A/S | Page 33... - Page 34 Insert the new salt bridge by turning it clockwise. Do not overtighten! Make sure the O-ring is properly seated. The salt bridge should be slightly below the surface. Doc no. 100837-MAN – Rev. E1 – Rev. date 2022-10 © Danfoss IXA A/S | Page 34...
-
Page 35: Su Inlet Filters
To perform the pH calibration, go to the pH Calibration menu 6-2*. The following illustrations shows LCP when performing the pH calibration. Doc no. 100837-MAN – Rev. E1 – Rev. date 2022-10 © Danfoss IXA A/S | Page 35... - Page 36 6-** pH Calibration Please clean the sensor in distilled water Press OK when done The pH sensor should be cleaned in distilled water. Doc no. 100837-MAN – Rev. E1 – Rev. date 2022-10 © Danfoss IXA A/S | Page 36...
- Page 37 The setup can be seen in above illustration. Press OK to start the calibration. Illustration 43: Calibrating the pH sensor 6-** pH Calibration Calibrating… Wait for the calibration to finish Doc no. 100837-MAN – Rev. E1 – Rev. date 2022-10 © Danfoss IXA A/S | Page 37...
- Page 38 Press OK when done. Illustration 47: Calibrating the pH sensor 6-** pH Calibration Calibrating… Wait for the calibration to finish Doc no. 100837-MAN – Rev. E1 – Rev. date 2022-10 © Danfoss IXA A/S | Page 38...
- Page 39 Calibration saved Press OK to return to the Calibration menu The calibration has been saved. Press OK to return to the Calibration menu. Doc no. 100837-MAN – Rev. E1 – Rev. date 2022-10 © Danfoss IXA A/S | Page 39...
-
Page 40: Turbidity Sensor Calibration
Illustration 53: Turb. Calibration menu 6-** Turb. Calibration Turb. Calibration Press OK to activate calibration mode Press OK to activate the Turb. calibration mode. Doc no. 100837-MAN – Rev. E1 – Rev. date 2022-10 © Danfoss IXA A/S | Page 40... - Page 41 Turb. Calibration Enter reference turbidity Measured value 724.1 FNU 0.1 FNU Field for entering reference value Press OK to enter reference turbidity value. Doc no. 100837-MAN – Rev. E1 – Rev. date 2022-10 © Danfoss IXA A/S | Page 41...
- Page 42 Press OK when the reference turbidity is entered. Illustration 62: Calibrating the turbidity sensor 6-** Turb. Calibration Calibrating… Wait for the calibration to finish. Doc no. 100837-MAN – Rev. E1 – Rev. date 2022-10 © Danfoss IXA A/S | Page 42...
- Page 43 Calibration saved Press OK to return to the Calibration menu The calibration has been saved. Press OK to return to the Calibration menu. Doc no. 100837-MAN – Rev. E1 – Rev. date 2022-10 © Danfoss IXA A/S | Page 43...
-
Page 44: Pah Calibration
Illustration 67: PAH Calibration menu 6-** PAH Calibration PAH Calibration Press OK to activate calibration mode Press OK to activate the PAH calibration mode. Doc no. 100837-MAN – Rev. E1 – Rev. date 2022-10 © Danfoss IXA A/S | Page 44... - Page 45 Illustration 71: Enter DryCal-0 PAH concentration 6-** PAH Calibration Enter DryCal-0 concentration µg/L 000.10 Toggle the digits by moving the cursor up, down, left and right. Doc no. 100837-MAN – Rev. E1 – Rev. date 2022-10 © Danfoss IXA A/S | Page 45...
- Page 46 6-** PAH Calibration Calibrating… Wait for the offset calibration to finish. After the calibration is performed with DryCal-0 repeat the process using DryCal-1. Doc no. 100837-MAN – Rev. E1 – Rev. date 2022-10 © Danfoss IXA A/S | Page 46...
- Page 47 Illustration 81: Confirm PAH calibration 6-** PAH Calibration Confirm calibration? Cancel Press OK to confirm and save the PAH calibration. Press Cancel to dismiss the PAH calibration. Doc no. 100837-MAN – Rev. E1 – Rev. date 2022-10 © Danfoss IXA A/S | Page 47...
-
Page 48: Verification Mode
Illustration 84: Maintenance submenu 6-** Maintenance 6-1* Verification Mode 6-2* pH Calibration 6-3* Turb. Calibration 6-3* PAH Calibration Press OK to enter the verification mode menu. Doc no. 100837-MAN – Rev. E1 – Rev. date 2022-10 © Danfoss IXA A/S | Page 48... - Page 49 1 FNU 20 °C Temperature Standby Press Start/Stop on LCP to deactivate verification mode and the system returns to standby mode as shown above. Doc no. 100837-MAN – Rev. E1 – Rev. date 2022-10 © Danfoss IXA A/S | Page 49...
-
Page 50: Verification Of Measurements
Place the turbidity sensor on the TTurbCAL Verify the measurement on the LCP Reinstall the turbidity sensor in the measuring chamber Deactivate verification mode as described in 5.4.1 Doc no. 100837-MAN – Rev. E1 – Rev. date 2022-10 © Danfoss IXA A/S | Page 50... - Page 51 Reinstall the bottom half of the measuring chamber Deactivate verification mode as described in 5.4.1 Illustration 88: Placing the DryCal-0 or DryCal-1 on the PAH sensor for verification Doc no. 100837-MAN – Rev. E1 – Rev. date 2022-10 © Danfoss IXA A/S | Page 51...
-
Page 52: Alarms And Troubleshooting
5. Too high resistance in discharge pipe line 6. Any manual valve in sample point 4 pipe line closed 7. Shaft seal in WSU 4 is defect Doc no. 100837-MAN – Rev. E1 – Rev. date 2022-10 © Danfoss IXA A/S | Page 52... - Page 53 3. Any manual valve in WSU 4 inlet cyclical sampling sequence. pipeline closed All stored sensor values for SP4 to be set to -1. Doc no. 100837-MAN – Rev. E1 – Rev. date 2022-10 © Danfoss IXA A/S | Page 53...
- Page 54 3. Damaged cable or loose connection WSU 2. All stored sensor values for SP2 to be set to -1. Doc no. 100837-MAN – Rev. E1 – Rev. date 2022-10 © Danfoss IXA A/S | Page 54...
- Page 55 5.5.3 for procedure. [A180] another. 3. Manual override function of 3/2-Valve is engaged Table 21: Alarms and Troubleshooting Doc no. 100837-MAN – Rev. E1 – Rev. date 2022-10 © Danfoss IXA A/S | Page 55...
-
Page 56: Reset Alarms
If correcting alarms as described in Table 21 still has not worked, please contact the supplier of the WMS. Doc no. 100837-MAN – Rev. E1 – Rev. date 2022-10 © Danfoss IXA A/S | Page 56... -
Page 57: Wau Flow Switch Adjustment
1 x yellow LED or 1 x yellow + 1 x green LED is shown on the flow switch. See the illustration below. Illustration 91: Flow indicator LED’s when adjusting the flow switch Doc no. 100837-MAN – Rev. E1 – Rev. date 2022-10 © Danfoss IXA A/S | Page 57... - Page 58 Start the WMS and observe that the flow switch is indicating correctly during operation, which is minimum 2 x green LED’s when the WMS is operating. Doc no. 100837-MAN – Rev. E1 – Rev. date 2022-10 © Danfoss IXA A/S | Page 58...
-
Page 59: Appendices
Turb. Calibration 6-4* PAH Calibration 7-** Measurement info 7-1* Set Start Date 7-2* Set End Date 7-3* Save Log Table 23: Parameter overview Doc no. 100837-MAN – Rev. E1 – Rev. date 2022-10 © Danfoss IXA A/S | Page 59... - Page 60 Page intentionally left blank Classified as Public...
Need help?
Do you have a question about the MES 1003 and is the answer not in the manual?
Questions and answers