Kval 700-DC Quick Start
Hide thumbs
Also See for 700-DC:
- Operation and service manual (52 pages) ,
- Operation and service manual (72 pages)
Table of Contents
Advertisement
Quick Links
Power-UP
Verify Area is safe, power and air are applied,
E-Stops are out and Fence Gates are closed.
1. At the Electrical Box, turn the Electrical Dis-
connect to the ON position.
2. Turn the Control Circuit Switch to the ON
position.
(Approximately 3 minute boot-up)
3. Push the Start button.
All the 6 lights should be illuminated. See re-
verse side for the 6-Light Description.
Power-Down
1. Push the Stop button.
2. Turn the Control Circuit Switch to the OFF
position.
3. Turn the Electrical Disconnect to the OFF
position on the Electrical Cabinet.
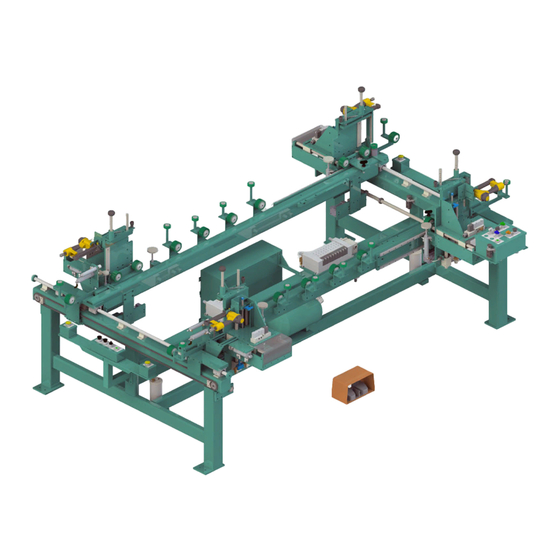
Mechanical Setup
Before processing the door, set the following mechanical
adjustments.
See the back of this Quick Start for information on these
settings.
Note: Some of these settings are options and may not be
located on your machine.
•
Ensure the proper staple guns are enabled and staples
are loaded.
•
Adjust the machine for the desired Door Width.
•
Adjust the Machine for Door Length
•
Adjust the machine for the Jamb Height.
•
Select the door hand by way of the Reset Left or
Reset Right switch. (See Step 1)
View machine videos at:
https://www.youtube.com/user/kvalinc
To view 700-DC specific videos, enter 700-DC
on the page search line.
Main Panel Setup
Before processing the door, verify or change the set-
tings at the Main Panel to match your job.
•
Enable or Disable the Movable and Fixed Sill and
Head Guns.
•
Set the Staple patterns for Head and Sill Modes.
Start the Process
Note: To move back a step at any time during the process,
•
Turn the Sill Sequence Switch to the REV position.
•
Press both Hands Free buttons to move back a step.
•
Repeat pressing the buttons until the desired step is reached.
•
After the desired step is reached, switch back to the FWD position.
•
Continue forward from the last step selected.
Step through the process to frame a door by using the button controls
located at the Head and Sill ends of the machine.
1. To select the door hand. Simultaneously select Reset Right (RH) or
Reset Left (LH) and the Right Sill Hands Free Button.
OR
OR
2. Pull in the door; verify header is clear so the Stapler Heads can come
in. Have a little wiggle room.
3. Push both Sill Hand Free Buttons.. (Brings in movable fence staplers.)
4. Insert the Jamb and Header.
Jamb Insert
Header Insert
5. Ensure the hinge jamb is in the correct position in relation to the head jamb.
At the Head End, push both Hand Free Buttons to clamp the Header.
Check Alignment
6. Push both Sill Hands Free Buttons. (Drops the door to lower position).
7. Set Sill in place. Push both Sill Hand Free Buttons (Clamps the door.)
Sill Insert
8. Fire Staple Guns. Simultaneously press the Fire Guns Button and the Right
Hand Free Button to fire all enabled staple guns.
9. Push both Sill Hand Free Buttons (Un-Clamp door.)
10. Pull out the Door. Note: If changing the hand of the door, repeat Step 1.
Control Sequence Summary
Machine Action
Control Action
Choose Hand
Right Hand Hands Free button +Reset Right or Reset Left
Bring in Side Staple Guns
(Sill End) Both Hands Free Buttons
Clamp the Head
(Head End) Both Hands Free buttons
Lower Door
(Sill End) Both Hands Free Buttons
Clamp the Door
(Sill End) Both Hands Free Buttons
Fire Staple Guns
Right Hand Hands Free Button + Fire Button
Unclamp
(Sill End) Both Hands Free Buttons
700-DC Quick Start rev 1
Advertisement
Table of Contents

Subscribe to Our Youtube Channel
Related Manuals for Kval 700-DC


Summary of Contents for Kval 700-DC
- Page 1 View machine videos at: Fire Staple Guns Right Hand Hands Free Button + Fire Button https://www.youtube.com/user/kvalinc Jamb Insert To view 700-DC specific videos, enter 700-DC Header Insert Unclamp (Sill End) Both Hands Free Buttons on the page search line. 700-DC Quick Start rev 1...
- Page 2 About the 6-Lights Mechanical Setup Control Power Stop This light will be on if Light turns on when the Control Trans- Width Adjust Machine Stop button is deac- former power is working, Indicates power 1. Pull up the width adjust button located on the main control panel or the tivated.
Need help?
Do you have a question about the 700-DC and is the answer not in the manual?
Questions and answers