Table of Contents
Advertisement
Quick Links
Advertisement
Table of Contents

Subscribe to Our Youtube Channel
Related Manuals for DMP Electronics CELLCOMEX Com Series


Summary of Contents for DMP Electronics CELLCOMEX Com Series
- Page 1 CELLCOMEX HOW-TO GUIDE: DSC PASSTHRU...
-
Page 2: Table Of Contents
TABLE OF CONTENTS DSC Passthru Overview ..................1 Procedure ................................1 Required Materials ............................1 Step 1: Mount the Communicator ................. 2 Step 2: Wire the Communicator ................2 Step 3: Configure DSC Settings ................4 Remotely (Dealer Admin) ..........................4 Step 4: Remote DLS Programming ..............5 Retrieve Codes for DSC Connection ...................... -
Page 3: Dsc Passthru Overview
DSC PASSTHRU OVERVIEW CellComEX Universal Communicators enable you to take over and manage DSC panels with connection to the DSC Bus. This feature is called DSC Passthru. This guide is designed to walk you through DSC passthru installation and setup. For more complete information on CellComEX setup, refer to the CellComEX Installation and Programming Guide (LT-2663). -
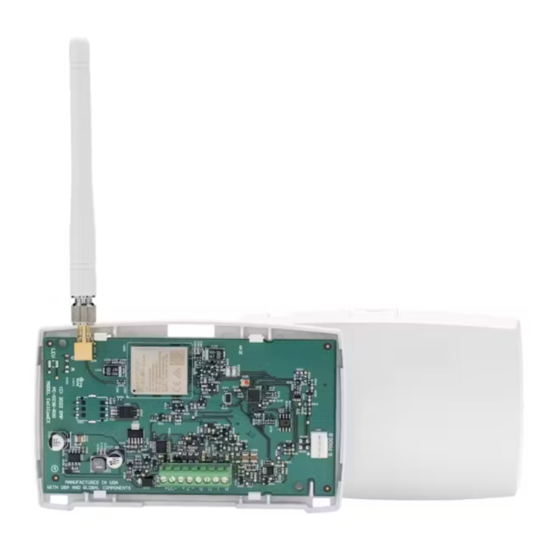
Page 4: Step 1: Mount The Communicator
STEP 1: MOUNT THE COMMUNICATOR The module comes in a high-impact plastic housing that you can mount directly to a wall, backboard, or other flat surface. For easy installation, the back and ends of the CellComEX housing have wire entrances. The back also contains multiple mounting holes that allow you to mount the module on a single-gang switch box. - Page 5 Communicator to DSC Wiring DSC Bus Typical Color Black Yellow Green Green RING Bell+ to Bell- (1k Ω EOL) Zones 1 - 8 (5.6k Ω EOL) N/A PROG PC Link (COM) Tab Up Green, Yellow Table 1: Wire Connections +DC- + Z - Remote Programming Connection...
-
Page 6: Step 3: Configure Dsc Settings
STEP 3: CONFIGURE DSC SETTINGS For the communicator to properly process data from the VISTA panel, keypad input must be set to ECP. You can perform this programming remotely with Dealer Admin. Why is this important? Dealer Admin configures the CellComEX to receive DSC data. Remotely (Dealer Admin) Go to Customers. -
Page 7: Step 4: Remote Dls Programming
STEP 4: CHANGING PROGRAMMING Option 1: Programming with Host Keypad If you have access to the host panel, you can make zone programming changes in the panel locally using a host keypad. To retrieve new zone programming, select Get Zones in the System Options tab in Dealer Admin. -
Page 8: Configure Dls
Press OK. 8. Go to Panel > Disconnect. Ensure the account number is correct, then press Disconnect. The panel must be disconnected in Remote Link before connecting in DLS. 9. Ensure the bottom right corner of the main Remote Link window displays DSC ON. 10. -
Page 9: Connect To The Dsc Panel And Complete Remote Programming
Connect to the DSC Panel and Complete Remote Programming Back in the DLS5 main window, open the account you just created by double-clicking it. 2. Press Connect. 3. In Access Code, enter the 6-digit Downloading Access Code. 4. In Device ID, enter the Panel Identification Code. 5. -
Page 10: Reference
REFERENCE Virtual Keypad Virtual Keypad enables users to manage their systems remotely, including arming, disarming, viewing zone status, bypassing zones, viewing history, managing users, and more. To use Virtual Keypad for remote management, the configuration must meet the following conditions: •...
Need help?
Do you have a question about the CELLCOMEX Com Series and is the answer not in the manual?
Questions and answers