
Related Manuals for Wilson Electronics weboost DRIVE REACH


Summary of Contents for Wilson Electronics weboost DRIVE REACH
- Page 1 A WILSON ELECTRONICS BRAND DRIVE REACH Vehicle Signal Booster Kit ® Installation Guide support.weboost.com 866.294.1660 NEED HELP?
- Page 2 ______ Index Package Contents Mount Outside Magnetic Antenna STEP 1: Mount Inside Antenna STEP 2: Connect Coax Cables To Booster STEP 3: Connect Power Supply To Booster STEP 4: Plug Power Adapter Into Vehicle’s Power Supply STEP 5: Booster Light Patterns Troubleshooting Specifications Warranty...
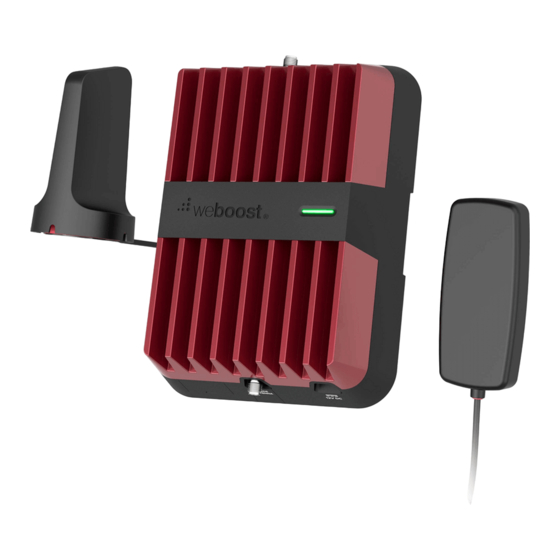
- Page 3 ________ Package Contents Outside Inside Power Booster Antenna Antenna Supply & Bracket Optional: Adhesive disk for aluminum vehicles DRIVE REACH VEHICLE SIGNAL BOOSTER...
- Page 4 ______ Step 1: Mount Outside Magnetic Antenna Identify a location on the top of your vehicle that is: • Near the center of the roof • At least 12 inches away from any other antennas • At least 12 inches away from any windows (including sunroofs) Cle an the surface where you will place the outside antenna.
- Page 5 ______ (STEP 1 cont.) See options below on how cable can be routed with different vehicles. Car/Sedan: Cable routed into rear side door. NOTE: When going through a car wash, remember to remove your antenna. SUV/Van/Hatchback: Cable routed into top of hatchback door. Truck: Cable routed into side door.
-
Page 6: Step 2: Mount Inside Antenna
______ Step 2: Mount Inside Antenna Identify a place to mount the In-Vehicle Antenna, either on the side of the seat or on the dash and mount. The location should be at least 18 inches but no more than 36 inches from where the cellular device will be used. - Page 7 ______ Step 3: Connect Coax Cables To Booster Connect the cable from the Outside Antenna to the port labeled “Outside Antenna” on the Drive Reach booster. NOTE: Bracket can be used to fasten booster in a specific location if desired. The Velcro®...
- Page 8 ______ Step 4: Connect Power Supply To Booster Connect the power supply cord to the end of the booster, labeled “ .” NOTE: Do NOT connect the power to the Signal Booster until you have connected both the Inside and Outside Antennas. from Outside Antenna from Inside Antenna Power Supply...
-
Page 9: Need Help
______ Step 5: Plug Power Adapter Into Vehicle’s Power Supply Plug the power adapter into vehicle’s 12V DC power supply. The Drive Reach will automatically power on when plugged in. If your Drive Reach is working correctly, the light on the power adapter will be red, and the light on the booster will be green. - Page 10 ______ Booster Light Patterns Solid Green This indicates that your booster is functioning properly and there are no issues with installation. Blinking Red, Then Solid Green This indicates that one or more of the booster bands has reduced power due to a minor feedback loop condition called oscillation.
-
Page 11: Troubleshooting
______ Troubleshooting FIXING BLINKING OR SOLID RED ISSUES This section is only applicable if the booster is red or blinking red and you are not experiencing the desired signal boost. Unplug the Booster’s power supply. Relocate the inside and outside antenna further from each other. The objective is to increase the separation distance between them, so that they will not create this feedback condition discussed before. -
Page 12: Antenna Kit Options
______ Antenna Kit Options MOBILE INSIDE ANTENNA KIT OPTIONS Kit # Coax Type Ln(ft) Antenna Type Ω 314401 LMR-100 4G Slim Low Profile MOBILE OUTSIDE ANTENNA KIT OPTIONS Kit # Coax Type Ln(ft) Antenna Type Ω 301126 LMR-100 Mini-Mag 304415 RG-58 4G Trucker 304420... -
Page 13: Specifications
______ Specifications Drive Reach Model Number 530054 Connectors SMB-Jack Antenna Impedance 50 Ohms Frequency 824-894 MHz, 1850-1995 MHz, 1710-1755/2110-2155 MHz Maximum Power 800 MHz 1700 MHz 1900 MHz Power output for single cell Band 5 Band 4 Band 2/25 phone (Uplink) dBm 29.50 28.50 28.30... -
Page 14: Year Warranty
2 YEAR WARRANTY weBoost Signal Boosters are warranted for two (2) years against defects in workmanship and/or materials. Warranty cases may be resolved by returning the product directly to the reseller with a dated proof of purchase. Signal Boosters may also be returned directly to the manufacturer at the consumer’s expense, with a dated proof of purchase and a Returned Material Authorization (RMA) number supplied by weBoost. - Page 15 Notes support.weboost.com 866.294.1660 NEED HELP? DRIVE REACH VEHICLE SIGNAL BOOSTER...
- Page 16 3301 East Deseret Drive, St. George, UT 866.294.1660 www.weboost.com support.weboost.com Copyright © 2019 weBoost. All rights reserved. weBoost products covered by U.S. patent(s) and pending application(s) For patents go to: weboost.com/us/patents NOT AFFILIATED WITH WILSON ANTENNA...
- Page 17 UNA MARCA DE WILSON ELECTRONICS DRIVE REACH Kit de amplificador de señal para vehículo ® Guía de instalación support.weboost.com 866.294.1660 ¿NECESITA AYUDA?
- Page 18 ______ Índice Contenido del paquete Montar la antena magnética exterior PASO 1: Montar la antena interior PASO 2: Conectar los cables coaxiales al amplificador PASO 3: Conectar la fuente de alimentación al amplificador PASO 4: Enchufar el adaptador de corriente PASO 5: a la fuente de alimentación del vehículo Patrones de luces del amplificador...
- Page 19 ________ Contenido del paquete Antena exterior Antena Fuente de Amplificador interior alimentación y soporte Opcional: Disco adhesivo para vehículos de aluminio DRIVE REACH KIT DE AMPLIFICADOR DE SEÑAL PARA VEHÍCULO...
- Page 20 ______ Paso 1: Montar la antena magnética exterior Identifique un lugar en la parte de arriba de su vehículo que esté: • Cerca del centro del techo • Al menos a 30,5 cm (12 pulgadas) de cualquier otra antena • Al menos a 30,5 cm (12 pulgadas) de cualquier ventana (incluidos los techos solares) Limpie la superficie donde vaya a colocar la antena exterior.
- Page 21 ______ (PASO 1 cont.) Vea las opciones a continuación sobre cómo puede encaminarse el cable con distintos vehículos. Automóvil/sedán: El cable se encamina en la puerta lateral trasera. NOTA: Cuando pase por un túnel de lavado, recuerde quitar la antena. SUV/camioneta/carro con puerta trasera: El cable se encamina en la parte superior de la puerta trasera.
- Page 22 ______ Paso 2: Montar la antena interior Identifique un lugar para montar la antena dentro del vehículo, ya sea en el lateral del asiento o en el tablero, y móntela. El lugar debe estar como mínimo a 45,7 cm (18 pulgadas) pero a un máximo de 91,4 cm (36 pulgadas) de donde vaya a usarse el dispositivo celular.
- Page 23 ______ Paso 3: Conectar los cables coaxiales al amplificador Conecte el cable de la antena exterior al puerto etiquetado “Outside Antenna” (Antena exterior) en el amplificador Drive Reach. NOTA: El soporte puede usarse para sujetar el amplificador en un lugar específico si se desea.
- Page 24 ______ Paso 4: Conectar la fuente de alimentación al amplificador Conecte el cable de la fuente de alimentación al extremo del amplificador etiquetado “ .” NOTA: NO conecte la corriente al amplificador de señal hasta que haya conectado las antenas interior y exterior. desde la antena exterior desde la antena interior Fuente de alimentación...
- Page 25 ______ Paso 5: Enchufar el adaptador de corriente a la fuente de alimentación del vehículo Enchufe el adaptador de corriente a la fuente de alimentación del vehículo de 12 V de CC. El Drive Reach se encenderá automáticamente cuando esté enchufado. Si el Drive Reach funciona correctamente, la luz del adaptador de corriente estará...
- Page 26 ______ Patrones de luces del amplificador Verde continuo Indica que su amplificador funciona adecuadamente y no hay problemas con la instalación. Rojo intermitente, luego verde continuo Esto indica que una o más bandas del amplificador tienen una potencia reducida debido a una condición menor del bucle de retroalimentación llamada oscilación.
-
Page 27: Localización Y Corrección De Fallas
______ Localización y corrección de fallas ARREGLAR PROBLEMAS DE LA LUZ ROJA INTERMITENTE O CONTINUA Esta sección se aplica solamente si el amplificador está en rojo o rojo intermitente y usted no recibe la amplificación de señal deseada. Desenchufe el amplificador de la fuente de alimentación. Reubique las antenas interior y exterior para que estén más alejadas entre sí. - Page 28 ______ Opciones de kit de antena OPCIONES DE KIT DE ANTENA INTERIOR MÓVIL Kit n. Tipo de cable coaxial Long. (ft) Tipo de antena Ω 314401 LMR-100 4G compacta perfil bajo OPCIONES DE KIT DE ANTENA EXTERIOR MÓVIL Kit n. Tipo de cable coaxial Long.
-
Page 29: Especificaciones
______ Especificaciones Drive Reach Número de modelo 530054 Conectores Conector SMB Impedancia de la antena 50 Ohm Frecuencia 824-894 MHz, 1850-1995 MHz, 1710-1755/2110-2155 MHz Máxima potencia 800 MHz 1700 MHz 1900 MHz Salida de potencia de un teléfono Bande 5 Bande 4 Bande 2/25 celular único (enlace ascendente) - Page 30 GARANTÍA DE 2 AÑOS Los Amplificadores de señal weBoost tienen una garantía de dos (2) años contra defectos de mano de obra y de materiales. Los casos de garantía pueden resolverse devolviendo el producto directamente al revendedor con la prueba de compra fechada.
- Page 31 Notas support.weboost.com 866.294.1660 ¿NECESITA AYUDA? DRIVE REACH KIT DE AMPLIFICADOR DE SEÑAL PARA VEHÍCULO...
- Page 32 3301 East Deseret Drive, St. George, UT 866.294.1660 www.weboost.com support.weboost.com Copyright © 2019 weBoost. Reservados todos los derechos. Productos weBoost cubiertos por patente(s) de EE. UU. y solicitud(es) pendiente(s) Para consultar las patentes, visite: weboost.com/us/patents NO AFILIADO CON LA ANTENA WILSON GDE000214_Rev01_03.09.20...
Need help?
Do you have a question about the weboost DRIVE REACH and is the answer not in the manual?
Questions and answers