
Related Manuals for Jetson JRYDER-GRY


Summary of Contents for Jetson JRYDER-GRY
- Page 1 Ryder Electric Scooter. A guide for your ride. IMPORTANT: READ CAREFULLY AND RETAIN FOR FUTURE REFERENCE. MODEL: JRYDER-GRY Designed in Brooklyn...
- Page 3 Jetson's top two riding rules: Be safe. Have fun!
-
Page 5: Table Of Contents
Contents Safety Warnings ................................4 Safety Checklist ................................7 Warranty ..................................7 Product Overview ..............................8 Specs & Features ..............................10 Online Resources ..............................11 Unfolding/Folding the Handlebar ..........................12 Adjusting the Handlebar ............................15 Securing the Bell ..............................18 Adjusting the Headlight ............................19 Attaching the Seat ..............................20 Attaching the Basket ..............................22 Inflating the Tires ..............................25... -
Page 6: Safety Warnings
Safety Warnings • Before use, please read the user manual and safety warnings carefully, and make sure you understand and accept all the safety instructions. The user will be responsible for any loss or damage caused by improper use. • Please check the drive system and frame before riding to ensure safety. •... - Page 7 • Applying brakes too hard or too suddenly can lock up a wheel, which could cause you to lose control and fall. Sudden or excessive application of the brake may result in injury or death. • If the brake loosens, please adjust with the hexagon wrench, or please contact the Jetson Care Team. • Replace worn or broken parts immediately.
- Page 8 For all maintenance repairs and needs beyond the capability of the consumer, which may include but not be limited to: such as proper maintenance of brakes, control cables, bearing adjustments, wheel adjustments, lubrication, reflectors, tires and handlebar and seat adjustments, please contact the Jetson Care Team for assistance at: ridejetson.com/support US &...
-
Page 9: Safety Checklist
All new Jetson products, excluding parts and accessories, are warranted against defects in materials and workmanship for a period of one year from the date of original retail purchase when used in accordance with Jetson's user manuals (refer to ridejetson.com/support). -
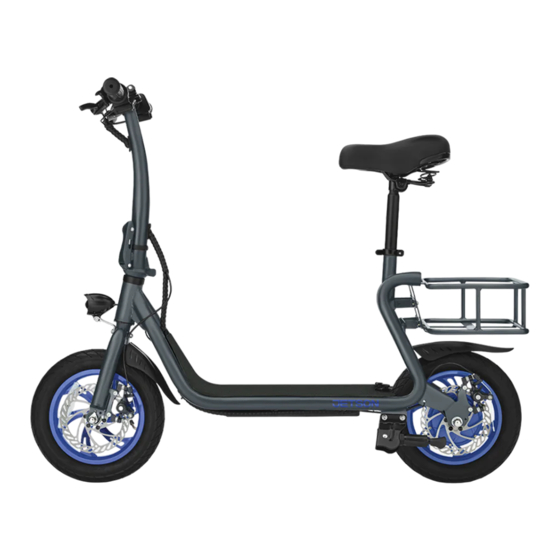
Page 10: Product Overview
Product Overview 1. HANDLEBAR 2. STEM QUICK RELEASE 13. SEAT POST a1. LEFT HANDBRAKE 3. HEADLIGHT 14. SEAT CLAMP (FRONT) 4. FRONT TIRE 15. SEAT TUBE a2. RIGHT HANDBRAKE 5. DISC BRAKE 16. CHARGING PORT (REAR) (FRONT AND REAR) 17. DECK b. - Page 11 NOTE: IMAGES MAY NOT REFLECT EXACT APPEARANCE OF ACTUAL PRODUCT.
-
Page 12: Specs & Features
Specs & Features • PRODUCT DIMENSIONS, UNFOLDED: 45.7” (L) × 19.1” (W) × 35.85” (H) • PRODUCT DIMENSIONS, FOLDED: 45.7” (L) × 12.8” (W) × 26.6” (H) • PRODUCT WEIGHT: 48 LBS • TIRE SIZE: 12 IN • BATTERY: 36V, 6.0AH LITHIUM-ION •... -
Page 13: Online Resources
Online Resources Scan for our most updated Ryder onboarding materials and support resources. WARNING FAILURE TO COMPLY WITH THE FOLLOWING INSTRUCTIONS MAY RESULT IN INJURY TO THE CHILD OR OTHERS. • KEEP SMALL PARTS AWAY FROM CHILDREN DURING ASSEMBLY. • ACCESSORY MUST BE ASSEMBLED AND REMOVED BY AN ADULT. •... -
Page 14: Unfolding/Folding The Handlebar
1. Getting Started Unfolding/Folding the Handlebar TO UNFOLD THE HANDLEBAR: 1. GENTLY RAISE THE HANDLEBAR UNTIL IT IS VERTICAL. - Page 15 2. PRESS THE STEM QUICK RELEASE LATCH CLOSED. 3. ROTATE THE LOCKING RING CLOCKWISE UNTIL THE TAB ON THE RING SLIDES INTO THE DESIGNATED SPACE BETWEEN THE LATCH AND THE STEM. STEM QUICK RELEASE LATCH LOCKING RING LOCKING RING LOCKING RING...
- Page 16 TO FOLD DOWN THE HANDLEBAR: 1. ROTATE THE LOCKING RING COUNTERCLOCKWISE UNTIL THE TAB ON THE RING IS CLEAR OF THE STEM QUICK RELEASE LATCH. 2. PULL THE LATCH AWAY FROM THE STEM TO OPEN IT. 3. GENTLY LOWER THE HANDLEBAR DOWN.
-
Page 17: Adjusting The Handlebar
Adjusting the Handlebar THE HANDLEBAR CAN BE ROTATED FORWARDS OR BACKWARDS IF THE HANDBRAKE POSITIONING NEEDS TO BE ADJUSTED. TO ADJUST THE HANDLEBAR: 1. USE THE ALLEN KEY TIP ON THE LARGER 2-BIT TOOL TO LOOSEN THE BOLT ON THE UNDERSIDE OF THE HANDLEBAR CLAMP. HANDLEBAR CLAMP LARGE 2-BIT TOOL... - Page 18 2. OPEN THE CLAMP BY PULLING THE LATCH UPWARDS. CLAMP LATCH...
- Page 19 3. ROTATE THE HANDLEBAR FORWARD OR BACKWARDS AS NECESSARY UNTIL THE HANDBRAKES ARE AT THE DESIRED HEIGHT. 4. CLOSE THE CLAMP LATCH AND TIGHTEN THE BOLT UNTIL THE HANDLEBAR IS SECURE. IMPORTANT: • BE MINDFUL OF THE ELECTRICAL COMPONENTS ON THE HANDLEBAR WHEN ROTATING. DO NOT OVER-ROTATE AND PULL THE WIRING OUT FROM THE HANDLEBAR STEM.
-
Page 20: Securing The Bell
Securing the Bell 1. USING THE SCREWDRIVER END OF THE LARGER 2-BIT TOOL, LOOSEN THE SCREW ON THE BELL CLAMP BY TURNING IT COUNTERCLOCKWISE. 2. ROTATE THE BELL CLAMP AROUND THE HANDLEBAR UNTIL THE BELL IS IN THE DESIRED POSITION. 3. -
Page 21: Adjusting The Headlight
Adjusting the Headlight • PRESS TO TILT THE HEADLIGHT UPWARDS OR DOWNWARDS UNTIL IT IS FACING THE DESIRED ANGLE. -
Page 22: Attaching The Seat
Attaching the Seat 1. OPEN THE LATCH ON THE SEAT CLAMP. 2. TWIST THE KNOB COUNTERCLOCKWISE TO WIDEN THE CLAMP OPENING. 3. SLIDE THE SEAT POST INTO THE STEM TUBE, MAKING SURE THAT: • IT IS INSERTED PAST THE MINIMUM INSERTION MARK ON THE POST SO THAT THE MARK IS NOT VISIBLE. •... - Page 23 4. RE-TIGHTEN THE KNOB BY TURNING IT CLOCKWISE. 5. CLOSE THE LATCH AND CHECK THAT THE SEAT IS SECURE. IMPORTANT: • DO NOT OVER-TIGHTEN THE KNOB. OVER-TIGHTENING PREVENT THE LATCH FROM OPENING AND CLOSING EASILY. • TO ADJUST THE SEAT HEIGHT, LOOSEN AND OPEN THE CLAMP, REPOSITION THE SEAT, AND THEN SECURE THE CLAMP.
-
Page 24: Attaching The Basket
SMALL 2-BIT TOOL BOLT WASHER Attaching the Basket 1. USING THE ALLEN KEY TIP OF THE SMALLER 2-BIT TOOL, LOOSEN THE 4 BOLTS ON THE BRACKET ABOVE THE REAR FENDER BY TURNING THEM COUNTERCLOCKWISE. 2. REMOVE THE BOLTS, AS WELL AS THE WASHERS UNDERNEATH THEM, KEEPING A WASHER ON EACH BOLT STEM. - Page 25 WASHER 3. POSITION THE BASKET IN PLACE ABOVE THE REAR FENDER SO THAT: • THE BASKET IS UPRIGHT. • THE FOUR HOLES IN ONE END OF THE BASKET ARE ALIGNED WITH THE FOUR HOLES ON THE BRACKET THAT IS ON THE BIKE. 4.
- Page 26 5. USE THE ALLEN KEY TO TIGHTEN EACH BOLT INTO THE BRACKET BY ROTATING THE BOLT CLOCKWISE. 6. CHECK THAT THE BASKET IS SECURE.
-
Page 27: Inflating The Tires
Inflating the Tires 1. REMOVE THE VALVE DUST CAP FROM THE TIRE VALVE ON EACH WHEEL. 2. CONNECT AN AIR PUMP TO THE VALVE AND PUMP AIR INTO EACH TIRE IN ACCORDANCE WITH THE DIRECTIONS OF YOUR AIR PUMP. 3. USE A GAUGE TO MONITOR TIRE PRESSURE, AND STOP INFLATING WHEN THE TIRE HAS REACHED A PRESSURE BETWEEN 35 AND 45 PSI. -
Page 28: Charging Your Scooter
CHARGING PORT Charging Your Scooter IMPORTANT CHARGING NOTES: • ONLY USE THE INCLUDED CHARGER. • PLUG THE CHARGER INTO THE WALL BEFORE PLUGGING IT INTO THE CHARGING PORT. • NEVER TURN ON YOUR SCOOTER WHILE IT IS CHARGING. • CHARGE THE BATTERY UNTIL IT IS FULLY CHARGED— UP TO 5 HOURS. -
Page 29: Powering On Your Scooter
Powering On Your Scooter • QUICK-PRESS THE POWER BUTTON TO TURN THE SCOOTER ON OR OFF. USE THE BATTERY INDICATOR LIGHTS TO KEEP AN EYE ON YOUR SCOOTER'S CHARGE LEVEL. NUMBER OF LIGHTS ILLUMINATED 1-25% CHARGE PERCENTAGE 76-100% 51-75% 26-50% (CHARGE YOUR SCOOTER IMMEDIATELY!) BATTERY INDICATOR LIGHTS... -
Page 30: Operating Your Scooter
2. Making Moves Operating your Scooter CRUISE CONTROL: • TO ACTIVATE CRUISE CONTROL, QUICK-PRESS THE BUTTON ON THE RIGHT SIDE OF THE HANDLEBAR WHILE RIDING AT THE DESIRED SPEED. TO DEACTIVATE CRUISE CONTROL, EITHER PRESS THE BUTTON AGAIN OR ENGAGE THE BRAKE OR THROTTLE. -
Page 31: Riding Your Scooter
Riding Your Scooter TWIST THROTTLE: • ROTATE THE TWIST THROTTLE TOWARDS YOU TO ENGAGE THE MOTOR. • THE MORE YOU ROTATE THE THROTTLE, THE FASTER THE RYDER WILL TRAVEL. • TO DECELERATE, EASE UP ON THE THROTTLE. IMPORTANT: TO AVOID SUDDEN BURSTS OF SPEED, ROTATE THE THROTTLE GENTLY. HANDBRAKES: •... - Page 32 BEFORE EACH RIDE, CHECK THAT: • THE HANDLEBAR AND SEAT ARE BOTH SECURE AND IN PROPER ALIGNMENT. • THE TIRE PRESSURE IS SUFFICIENT (35-45 PSI). • THE BRAKE SYSTEM WORKS PROPERLY. IMPORTANT: KEEP YOUR FEET ON THE DECK. DO NOT RIDE WITH YOUR FEET DANGLING ALONGSIDE THE SCOOTER. ALWAYS STAY SEATED WHILE RIDING.
-
Page 33: Using The Kickstand
Using the Kickstand • TO LOWER THE KICKSTAND, PIVOT IT DOWN FROM THE SIDE OF THE SCOOTER DECK. TILT THE SCOOTER TO REST IT ON THE KICKSTAND. • TO RAISE THE KICKSTAND, PIVOT THE KICKSTAND UPWARDS TOWARDS THE REAR WHEEL OF THE SCOOTER DECK. IMPORTANT: ALWAYS RAISE THE KICKSTAND BEFORE RIDING. -
Page 34: Using The Basket
BASKET Using the Basket • THE WEIGHT LIMIT FOR YOUR CARRYING BASKET IS 33 LBS. -
Page 35: Helmet Safety
Helmet Safety PROPER POSITIONING: IMPROPER POSITIONING: THE FOREHEAD IS COVERED THE FOREHEAD IS EXPOSED. BY THE HELMET. A FALL COULD RESULT IN SERIOUS INJURY. * WEAR A HELMET, APPROPRIATE CLOTHING, SHOES, AND SAFETY GEAR. AVOID CLOTHING THAT CAN GET CAUGHT INTO OR UNDER THE WHEELS. -
Page 36: Care & Maintenance
• AVOID INTENSE PHYSICAL IMPACT AND/OR SEVERE VIBRATION. • PROTECT FROM WATER AND MOISTURE. • DO NOT DISASSEMBLE. • IF THERE ARE ANY ISSUES WITH THE BATTERY, PLEASE CONTACT THE JETSON CARE TEAM. STORING YOUR SCOOTER • COVER TO PROTECT THE SCOOTER AGAINST DUST. - Page 37 Stay connected. Be sure to follow @ridejetson on social media to learn about fantastic offers, giveaways, and all the latest Jetson news. Loving your ride? Then be sure to leave a review at ridejetson.com/reviews. We can’t wait to hear from you!
- Page 38 US/CANADA: 1-888-976-9904 MEX: +001 888 976 9904 UK: +44 (0)33 0838 2551 Manufactured in Shenzhen, China Imported by Jetson Electric Bikes LLC. P.O. Box 320149, 775 4th Ave #2, Brooklyn, NY 11232 www.ridejetson.com Made in China Date Code: 08/2022 Document Edition: v2.0...
Need help?
Do you have a question about the JRYDER-GRY and is the answer not in the manual?
Questions and answers