
Related Manuals for Jetson JRACER-BLK


Summary of Contents for Jetson JRACER-BLK
- Page 1 Racer Folding Electric Scooter. A guide for your ride. IMPORTANT, RETAIN FOR FUTURE REFERENCE: READ CAREFULLY. MODEL: JRACER-BLK Designed in Brooklyn | Made in China...
- Page 3 Remember to be safe and, most importantly, have fun!
-
Page 5: Table Of Contents
Table of Contents Safety Warnings ................................ 4 What’s in the Box ............................... 6 Specs & Features ..............................9 Charging the Battery .............................. 10 Unfolding / Folding the Racer ..........................11 Handlebar Assembly .............................. 14 Operating the Racer ............................... 15 Using the Thumb Throttle / Handbrake ......................... -
Page 6: Safety Warnings
Safety Warnings • Before use, please read the user manual and safety warnings carefully, and make sure you understand and accept all the safety instructions. The user will be responsible for any loss or damage caused by improper use. • Before each cycle of operation, the operator shall perform the preoperation checks specified by the manufacturer: That all guards and pads originally supplied by the manufacturer are in proper place and in serviceable condition;... - Page 7 For more information go to www.p65warnings.ca.gov/product MODIFICATIONS Do not attempt to disassemble, modify, repair, or replace the unit or any components of the unit without instruction from Jetson Customer Care. This will void any warranty, and can lead to malfunctions which may cause injury.
-
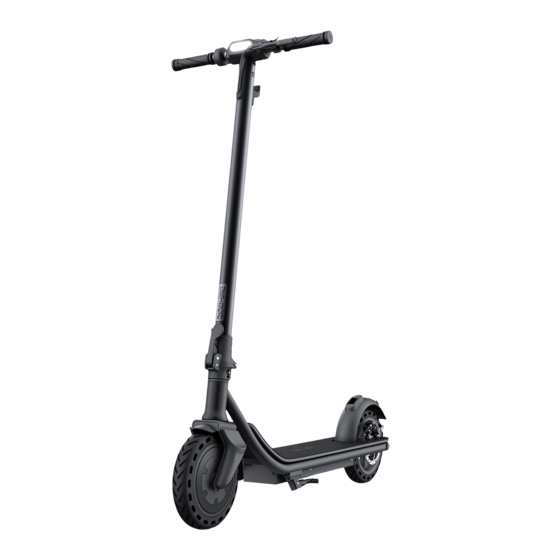
Page 8: What's In The Box
What’s in the Box 1. HANDLEBAR 10. DECK 2. HEADLIGHT 11. REAR FENDER 3. USB CHARGING PORT 12. REAR BRAKE LIGHT 4. HOOK 13. REAR WHEEL 5. BELL 14. REAR DISC BRAKE 6. RELEASE LEVER 15. CHARGER 7. FRONT FORK 16. - Page 9 PLEASE NOTE: IMAGES MAY NOT REFLECT EXACT APPEARANCE OF ACTUAL PRODUCT.
-
Page 11: Specs & Features
Specs & Features • PRODUCT DIMENSIONS: 42.3” (L) × 18.5” (W) × 46.3” (H) • PRODUCT FOLDED DIMENSIONS: 42.3” (L) × 18.5” (W) × 17.7” (H) • WEIGHT LIMIT: 220 LB • PRODUCT WEIGHT: 31 LB • RECOMMENDED AGE: 12+ •... -
Page 12: Charging The Battery
1. Get Started Charging the Battery CHARGING PORT ONLY USE THE INCLUDED CHARGER • PLUG THE CHARGER INTO THE WALL BEFORE THE CHARGING PORT. • DON’T TURN ON THE RACER WHILE IT’S CHARGING. • CHARGE THE BATTERY UNTIL IT IS FULLY CHARGED - UP TO 5 HOURS. •... -
Page 13: Unfolding / Folding The Racer
Unfolding / Folding the Racer PRESS THE LOWER LOCK ON REAR FENDER TO RELEASE HANDLEBAR STEM WARNING: ALWAYS CARRY THE RACER WHEN NOT IN USE. ROLLING IT MAY CAUSE DAMAGE. - Page 14 LIFT HANDLEBARS AWAY FROM DECK...
- Page 15 LOCK THE RELEASE LEVER BY LIFTING IT UP UNTIL IT CLICKS • MAKE SURE THE STEM AND HANDLEBAR ARE SECURE. • TO FOLD THE CANYON, SLIDE UP THE MINI TAB LOCK ON THE SIDE OF RELEASE LEVER AND RELEASE.
-
Page 16: Handlebar Assembly
Handlebar Assembly • SLIDE THE HANDLEBAR INTO THE STEM TUBE, TUCKING ANY EXCESS WIRE INTO THE STEM TUBE. • LINE UP THE SCREW HOLES. INSERT AND TIGHTEN THE FOUR SCREWS USING THE ALLEN KEY. MAKE SURE THE SCREWS ARE TIGHT AND THE HANDLEBAR IS SECURE. SCREWS... -
Page 17: Operating The Racer
Operating the Racer • POWER: HOLD DOWN THE POWER BUTTON FOR 2 SECONDS TO TURN THE RACER ON OR OFF. • ODOMETER: PRESS POWER BUTTON ONCE TO TOGGLE/SWITCH BETWEEN TOTAL ODOMETER (ODO) AND YOUR TRIP’S ODOMETER (TRIP). • FRONT AND REAR LIGHTS: HOLD DOWN THE LIGHT BUTTON FOR 1 SECOND TO TURN ON LIGHTS. HOLD DOWN AGAIN TO TURN LIGHTS OFF. - Page 18 SPEED MODE BATTERY LEVEL HEADLIGHT SPEED SINGLE RANGE / TOTAL RANGE SPEED MODES: PRESS LIGHT BUTTON TO CYCLE THROUGH SPEED MODES. MODE 1 MODE 2 MODE 3 ERROR CODE MEANINGS: • E0: COMMUNICATION ERROR UP TO 4MPH UP TO 9MPH UP TO 15.5MPH •...
-
Page 19: Using The Thumb Throttle / Handbrake
2. Make Moves Using the Thumb Throttle / Handbrake HANDBRAKE HANDBRAKE: SQUEEZE THE HANDBRAKE SLOWLY TO AVOID STOPPING ABRUPTLY OR LOSING CONTROL. THUMB THROTTLE: PUSH DOWN ON THE THUMB THROTTLE TO ACCELERATE. TAKE IT EASY ON THE THROTTLE UNTIL YOU GET USED TO IT. THUMB THROTTLE... -
Page 20: Riding The Racer
Riding the Racer • PLACE ONE FOOT IN FRONT. • PLACE THE OTHER FOOT IN BACK, AT A 70-90° ANGLE. • TURN THE HANDLEBAR TO THE LEFT OR RIGHT TO MAKE TURNS. TO DECELERATE: • RELEASE THE THROTTLE LEVER • OR PRESS HANDBRAKE •... -
Page 21: Helmet Safety
Helmet Safety THE FOREHEAD IS COVERED THE FOREHEAD IS EXPOSED. BY THE HELMET. COULD CAUSE SERIOUS INJURY. -
Page 22: Care & Maintenance
• PROTECT FROM WATER OR MOISTURE. • DO NOT DISASSEMBLE THE RACER OR ITS BATTERY. • IF THERE ARE ANY ISSUES WITH THE BATTERY, PLEASE CONTACT JETSON CUSTOMER SUPPORT. STORAGE • FULLY CHARGE THE BATTERY BEFORE STORING. THE BATTERY SHOULD BE FULLY CHARGED ONCE A MONTH AFTER THIS. - Page 23 Enjoying the ride? Leave a review on ridejetson.com/reviews or share your photos with us online using the #RideJetson hashtag! Follow us @ridejetson #MakeMoves...
- Page 24 Questions? Let us know. support.ridejetson.com Hours of Operation: 7 Days a Week, 10am-6pm Manufactured in Shenzhen, China Imported by Jetson Electric Bikes LLC. 86 34th Street 4th Floor, Brooklyn, New York 11232 www.ridejetson.com Made in China Date Code: 07/2021...
Need help?
Do you have a question about the JRACER-BLK and is the answer not in the manual?
Questions and answers