Table of Contents

Summary of Contents for Jetson Hex
- Page 1 Big Wheel Kick Scooter. A guide for your ride. IMPORTANT: READ CAREFULLY AND RETAIN FOR FUTURE REFERENCE. MODELS: JHEX-BLU | JHEX-PNK | JHEX-RED | JHEX-GRN JHEX-ABL | JHEX-RGD | JHEX-SGR Designed in Brooklyn | Made in China...
- Page 3 Jetson's top two riding rules: Be safe. Have fun!
-
Page 5: Table Of Contents
......................6 Specs & Features ......................9 Unfolding/Folding the Hex ....................10 Assembly ... -
Page 6: Safety Warnings
Safety Warnings • Before use, please read the user manual and safety warnings carefully, and make sure you understand and accept all the safety instructions. The user will be responsible for any loss or damage caused by improper use. • Before each cycle of operation, the operator shall perform the preoperation checks specified by the manufacturer: That all guards and pads originally supplied by the manufacturer are in proper place and in serviceable condition;... - Page 7 California to cause cancer and birth defects or other reproductive harm. For more information go to: www.P65warnings.ca.gov. MODIFICATIONS Do not attempt to disassemble, modify, repair, or replace the unit or any components of the unit without instruction from Jetson Customer Care. This will void any warranty, and can lead to malfunctions which may cause injury.
-
Page 8: Product Overview
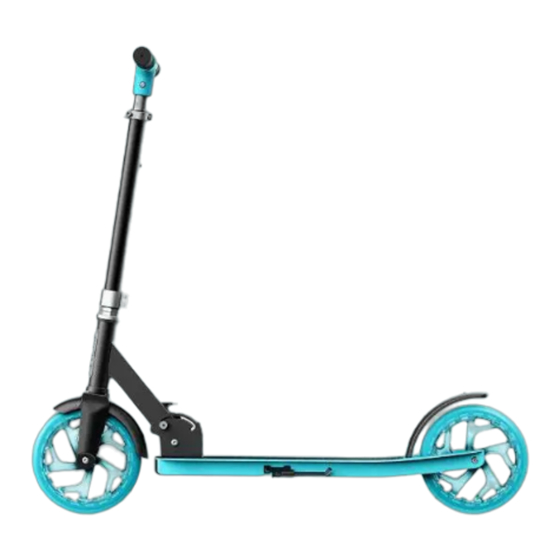
Product Overview 1. HANDLEBAR 2. STEM CLAMP 3. FRONT WHEEL 4. FOLDING LEVER 5. KNOB & LOCKING CLAMP (ON OPPOSITE SIDE) 6. KICKSTAND 7. DECK 8. REAR FOOT BRAKE 9. REAR WHEEL TOOLS INCLUDED: ALLEN KEY *ADULTS MUST ASSIST CHILDREN IN THE INITIAL ASSEMBLY AND ADJUSTMENT PROCEDURES OF THE PRODUCT. - Page 9 PLEASE NOTE: IMAGES MAY NOT REFLECT EXACT APPEARANCE OF ACTUAL PRODUCT.
-
Page 11: Specs & Features
Specs & Features • WEIGHT LIMIT: 220 LB • PRODUCT WEIGHT: 9.8 LB • WHEEL SIZE: 8” • FOLDED DIMS: 31.7” × 15.6” × 12.4” • UNFOLDED DIMS: 35.6” × 15.6” × 35.6” • DECK DIMS: 23.2” × 6” • STEM HEIGHT: 35.6”- 39.2” •... -
Page 12: Unfolding/Folding The Hex
1. Getting Started Unfolding/Folding the Hex LOOSEN KNOB... - Page 13 OPEN THE LOCKING CLAMP (LOCATED ON THE RIGHT SIDE OF THE HEX)
- Page 14 LIFT UP THE FOLDING LEVER • RAISE STEM UP. ONCE YOU HEAR IT CLICK, IT’S FULLY UNFOLDED. • TIGHTEN THE KNOB AND CLOSE THE LOCKING CLAMP. • REVERSE THESE STEPS TO FOLD THE HEX.
-
Page 15: Assembly
Assembly • USING THE ALLEN KEY PROVIDED, REMOVE BOLTS FROM THE TOP OF THE HANDLEBAR CLAMP. BOLT... - Page 16 • ALIGN THE HOLES IN THE TOP OF THE HANDLEBAR CLAMP AND THE HANDLEBAR WITH THE PRE-DRILLED HOLES IN THE BOTTOM OF THE HANDLEBAR CLAMP. • PLACE BOLTS THROUGH THE TOP OF THE HANDLEBAR CLAMP, HANDLEBAR, AND THE BOTTOM OF THE HANDLEBAR CLAMP.
-
Page 17: Adjusting The Handlebar
Adjusting the Handlebar STEM CLAMP • OPEN THE STEM CLAMP. • PUSH IN THE STEM PIN, THEN LIFT OR LOWER THE HANDLEBAR. STEM PIN... - Page 18 • RAISE OR LOWER THE HANDLEBAR UNTIL THE STEM PIN CLICKS INTO ONE OF THE HOLES. • CLOSE STEM HANDLE TO SECURE HANDBAR IN PLACE. CAUTION: THE STEM PIN ALONE WILL NOT KEEP THE HANDLEBAR STEM SECURE. ALWAYS RIDE WITH THE STEM CLAMP CLOSED.
-
Page 19: Using The Brake
Using the Brake PRESS DOWN WITH YOUR FOOT TO SLOW DOWN OR COME TO A COMPLETE STOP. -
Page 20: Helmet Safety
Helmet Safety PROPER POSITIONING: IMPROPER POSITIONING: THE FOREHEAD IS COVERED THE FOREHEAD IS EXPOSED. BY THE HELMET. COULD CAUSE SERIOUS INJURY. * WEAR A HELMET, APPROPRIATE CLOTHING, SHOES, AND SAFETY GEAR. AVOID CLOTHING THAT CAN GET CAUGHT INTO OR UNDER THE WHEELS. CLOSED-TOE, FLAT SHOES ARE RECOMMENDED. WEAR AN ASTM F1492 APPROVED HELMET AND PROTECTIVE GEAR TO PREVENT INJURY IN THE EVENT OF AN ACCIDENT. -
Page 21: Riding The Hex
• ROTATE THE HANDLEBAR TO THE LEFT OR RIGHT TO MAKE TURNS. • TO MOVE, PLACE THE REAR FOOT ON THE GROUND AND USE IT TO PROPEL THE HEX FORWARD. NOTE: ALWAYS BE SURE TO FOLD AWAY THE KICKSTAND WHEN RIDING THE HEX. -
Page 22: Care & Maintenance
All new Jetson products, excluding parts and accessories, are warranted against defects in materials and workmanship for a period of one year from the date of original retail purchase when used in accordance with Jetson's user manuals (refer to ridejetson.com/support). - Page 23 Stay connected. Be sure to follow @ridejetson on social media to learn about fantastic offers, giveaways, and all the latest Jetson news. Loving your ride? Then be sure to leave a review at ridejetson.com/reviews. We can’t wait to hear from you!
- Page 24 Made in China Date Code: 05/2022 © 2022, JETSON. ALL RIGHTS RESERVED. Manufactured by JETSON ELECTRIC BIKES LLC. No portion of this document, including shape, copy, graphics, and design, may be reproduced or transmitted in any form or by any means.


Need help?
Do you have a question about the Hex and is the answer not in the manual?
Questions and answers