
Related Manuals for Ruijie Reyee RG-EG105GWT


Summary of Contents for Ruijie Reyee RG-EG105GWT
- Page 1 Ruijie Reyee RG-EG105GW(T) Router Hardware Installation and Reference Guide Document Version: V1.0 Date: 2022-08-22 Copyright © 2022 Ruijie Networks...
- Page 2 Due to product version upgrades or other reasons, the content of this document will be updated from time to time. Ruijie Networks reserves the right to modify the content of the document without any notice or prompt. This manual is for reference only. Ruijie Networks endeavors to ensure content accuracy and will not shoulder...
-
Page 3: Preface
Intended Audience This document is intended for: Network engineers Technical support and servicing engineers Network administrators Technical Support The official website of Ruijie Reyee: https://www.ruijienetworks.com/products/reyee Technical Support Website: https://www.ruijienetworks.com/support Case Portal: https://caseportal.ruijienetworks.com Community: https://community.ruijienetworks.com... - Page 4 Note This manual provides the device installation steps, hardware troubleshooting, module technical specifications, and specifications and usage guidelines for cables and connectors. It is intended for the users who have some experience in installing and maintaining network hardware. At the same time, it is assumed that the users are already familiar with the related terms and concepts.
-
Page 5: Table Of Contents
Contents Preface ..............................I 1 Product Overview ..........................1 1.1 Package Contents........................1 1.2 Product Appearance ........................2 1.2.1 RG-EG105GW(T) ......................2 1.2.2 LED ..........................3 1.2.3 Power Supply ......................... 4 1.3 Technical Specifications ......................4 1.4 Cooling ............................6 2 Preparing for Installation ........................ - Page 6 3.2.1 Pre-installation Checklist ..................... 11 3.2.2 Precautions ........................11 3.3 Installing the Router ......................... 11 3.3.1 Installing the Router on a Wall ..................11 3.3.2 Installing the Router on a Workbench ................. 13 3.4 Connecting the Power Cord..................... 14 3.5 Connecting the Ethernet Cables ....................14 3.6 Bundling the Cables .........................
- Page 7 7 Common Troubleshooting ....................... 20 7.1 General Troubleshooting Procedures..................20 7.2 Common Faults ........................20 7.2.1 Fault 1: The LED is still off after the router is powered on.......... 20 7.2.2 Fault 2: The Ethernet port does not work after the Ethernet cable is plugged in..20 7.2.3 Fault 3: The client cannot find the router.
-
Page 8: Product Overview
Product Overview Product Overview The RG-EG105GW(T) is an AC1300M Wi-Fi5 router developed by Ruijie Networks for enterprises. The device can be used as an AP. The software system of RG-EG105GW(T) supports enterprise-class application control and access authentication. The device also supports the expansion of four wired RJ45 interfaces and allows the access of wireless clients. -
Page 9: Product Appearance
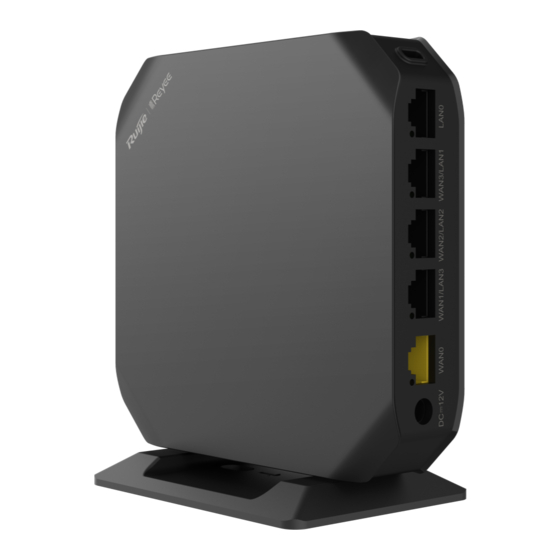
Hardware Installation and Reference Guide Product Overview Product Appearance 1.2.1 RG-EG105GW(T) Figure 1-1 Appearance of a RG-EG105GW(T) Router... -
Page 10: Led
Hardware Installation and Reference Guide Product Overview Table 1-2 Panel Specifications Description DC⎓12V: Power plug WAN0: Configure the WAN0 port to establish an Internet connection. LAN0-LAN3: Connect the LAN0-LAN3 ports to the switch, the access point or other network devices with an Ethernet cable. Note: If the LAN port is connected to the AP directly, a power supply module needs to be installed on the AP. -
Page 11: Power Supply
Hardware Installation and Reference Guide Product Overview Table 1-3 LED Specifications Status Description MESH LED 1. Mesh pairing is not implemented. (White) 2. Wireless relay is not set up. Flashing Mesh pairing is in progress. alternately Three bars on 1. The Mesh signal strength is high. 2. - Page 12 Hardware Installation and Reference Guide Product Overview Operating Bands 802.11b/g/n: 2.4 GHz to 2.4835 GHz 802.11a/n/ac: 5 GHz: 5.150 GHz to 5.350 GHz, 5.47 GHz to 5.725 GHz, 5.725 GHz to 5.850 GHz Note: The operating band varies in different countries. Antenna Type Built-in omnidirectional antenna Spatial Streams...
-
Page 13: Cooling
Hardware Installation and Reference Guide Product Overview Power ≤ 15 W Consumption Environment Operating temperature: 0° C to 40° C (32° F to 104° F) Storage temperature: –40° C to 70° C (–40° F to 158° F) Operating humidity: 5% to 95% (non-condensing) Storage humidity: 5% to 95% (non-condensing) Mounting Wall mounting, tabletop or workbench mounting... -
Page 14: Preparing For Installation
Hardware Installation and Reference Guide Preparing for Installation Preparing for Installation Safety Precautions Note ● To avoid personal injury and device damage, carefully read the safety precautions before you install the device. ● The following safety precautions may not cover all possible dangers. General Safety Precautions ... -
Page 15: Installation Environment Requirements
Hardware Installation and Reference Guide Preparing for Installation Installation Environment Requirements The RG-EG105GW(T) router must be used indoors. To ensure normal operation and prolong the service life of the device, the installation site must meet the following requirements. 2.4.1 Installation Requirements ... -
Page 16: Emi Requirements
Hardware Installation and Reference Guide Preparing for Installation Apart from dust, the salt, acid, and sulfide in the air in the server room must meet strict requirements. These harmful substances will accelerate metal corrosion and component aging. Therefore, the equipment room should be properly protected against the intrusion of harmful gases, such as sulfur dioxide, hydrogen sulfide, nitrogen dioxide, ammonia and chlorine gas. -
Page 17: Installing The Router
Hardware Installation and Reference Guide Installing the Router Installing the Router The RG-EG105GW(T) router must be installed indoors. Installation Procedure To avoid damage to the router, please follow the steps for installation. Prepare for installation Read precautions Install the device Connect the power cord Connect the cables Bundle the cables... -
Page 18: Pre-Installation Checklist
Hardware Installation and Reference Guide Installing the Router 3.2.1 Pre-installation Checklist Carefully plan and arrange the installation position, networking mode, power supply, and cabling before installation. Confirm the following requirements before installation: The installation site provides sufficient space for heat dissipation. ... - Page 19 Hardware Installation and Reference Guide Installing the Router 墙上桩孔两个,孔间距 Drill two holes on the wall with the center-to-center 在30mm~38mm之间。 distance of 30 mm (1.18 in.) to 38 mm (1.50 in.). (2) Tap the two expansion anchors into the holes and make the outer edge of the anchors flush with the wall. 膨胀管压实入孔内。...
-
Page 20: Installing The Router On A Workbench
Hardware Installation and Reference Guide Installing the Router 主机沿着支架卡口向下卡入固定。 Gently slide the router onto the mounting bracket until it clicks into place. (5) Secure the router on the mounting bracket. 3.3.2 Installing the Router on a Workbench The router can be also installed on a workbench vertically and horizontally, as shown in the following figures. Note ●... -
Page 21: Connecting The Power Cord
○ Connect the AP to the LAN port on the router with an Ethernet cable. After power-on, the router will broadcast the SSID @Ruijie-XXXXX. ○ Connect the PC to the LAN port of the router with an Ethernet cable. Enable Automatic (DHCP) on the PC to obtain an IP address automatically. -
Page 22: Checking Power Supply
Hardware Installation and Reference Guide Installing the Router 3.7.2 Checking Power Supply Verify that the power cord is properly connected and compliant with safety requirements. -
Page 23: Configuring The Router
Configuring the Router To better use the router, please configure the device on the Web management system subject to specific needs. For details, see Ruijie Reyee RG-EG-W Series Routers Web-based Configuration Guide, Release ReyeeOS 1.99. Setting up a Mesh Network (1) Connect the first router to the network and configure it as the primary device. - Page 24 Hardware Installation and Reference Guide Configuring the Router The MESH LEDs on both routers are blinking for about 2 minutes. When the MESH LEDs stop blinking and turn solid white, mesh pairing succeeds. (4) Place the second router where you want to have Wi-Fi coverage and then power on the router. Wait for 3 to 5 minutes until the MESH LED turns solid on.
-
Page 25: Installation Troubleshooting
Hardware Installation and Reference Guide Installation Troubleshooting Installation Troubleshooting Power Troubleshooting You can check whether the power supply is faulty by observing the LEDs on the router. For the LED status, see Chapter 1. If a fault occurs, check the following items: ... -
Page 26: Monitoring And Maintenance
Hardware Installation and Reference Guide Monitoring and Maintenance Monitoring and Maintenance Monitoring When the router is running, you can monitor the device by observing the LED. Hardware Maintenance If the hardware is faulty, please contact our Technical Assistance Center (TAC) for help. -
Page 27: Common Troubleshooting
Check the device installation Check the power connection Check the LEDs on the device Check the cable connection Contact Technical Support of Ruijie Networks Common Faults 7.2.1 Fault 1: The LED is still off after the router is powered on. -
Page 28: Fault 4: The Router Cannot Be Removed
Hardware Installation and Reference Guide Common Troubleshooting (3) Verify that the router is correctly configured. (4) Move the client endpoint to adjust the distance between the client and the router. 7.2.4 Fault 4: The router cannot be removed. Hold the router with your hands and push it upward and away from the bracket in the opposite orientation of the arrow on the bracket. -
Page 29: Appendix A Connectors And Media
Hardware Installation and Reference Guide Appendix A Connectors and Media Appendix A Connectors and Media 1000BASE-T/100BASE-TX/10BASE-T The 1000BASE-T/100BASE-TX/10BASE-T is a 10/100/1000 Mbps self-adaptive port that supports auto MDI/MDIX Crossover. Compliant with IEEE 802.3ab, 1000BASE-T requires Category 5e 100-ohm UTP or STP (STP is recommended) with a maximum distance of 100 meters (328 feet). - Page 30 Hardware Installation and Reference Guide Appendix A Connectors and Media Table 8-3 100BASE-TX/10BASE-T Twisted Pair Connection...
Need help?
Do you have a question about the Reyee RG-EG105GWT and is the answer not in the manual?
Questions and answers