
Related Manuals for Ruijie Reyee RG-EG300GH-E Series


Summary of Contents for Ruijie Reyee RG-EG300GH-E Series
- Page 1 Ruijie Reyee RG-EG300GH-E Series Routers Hardware Installation and Reference Guide Document Version: V1.0 Date: 2022.3.25 Copyright © 2022 Ruijie Networks...
- Page 2 Due to product version upgrades or other reasons, the content of this document will be updated from time to time. Ruijie Networks reserves the right to modify the content of the document without any notice or prompt. This manual is for reference only. Ruijie Networks endeavors to ensure content accuracy and will not shoulder...
-
Page 3: Preface
Intended Audience This document is intended for: ⚫ Network engineers Technical support and servicing engineers ⚫ ⚫ Network administrators Technical Support ⚫ The official website of Ruijie Reyee: https://www.ruijienetworks.com/products/reyee ⚫ Technical Support Website: https://www.ruijienetworks.com/support ⚫ Case Portal: https://caseportal.ruijienetworks.com ⚫ Community: https://community.ruijienetworks.com... - Page 4 Note This manual provides the device installation steps, hardware troubleshooting, module technical specifications, and specifications and usage guidelines for cables and connectors. It is intended for the users who have some experience in installing and maintaining network hardware. At the same time, it is assumed that the users are already familiar with the related terms and concepts.
-
Page 5: Table Of Contents
Contents Preface ..............................I 1 Product Overview ..........................1 1.1 RG-EG300GH-E ........................1 1.2 Package Contents........................1 1.2.1 RG-EG305GH-P-E ......................1 1.2.2 RG-EG310GH-E ......................2 1.2.3 RG-EG310GH-P-E ......................2 1.3 Product Appearance ........................3 1.3.1 RG-EG305GH-P-E ......................3 1.3.2 RG-EG310GH-E ......................5 1.3.3 RG-EG310GH-P-E ...................... - Page 6 2.2.2 Ventilation Requirements ..................... 15 2.2.3 Space Requirements ....................15 2.2.4 Temperature/Humidity Requirements ................15 2.2.5 Cleanliness Requirements ................... 16 2.2.6 Grounding Requirements ..................... 16 2.2.7 Anti-interference Requirements ................... 17 2.2.8 Lightning Protection Requirements ................18 2.2.9 Installation Site Requirements ..................18 2.3 Cabinet Installation Requirements ...................
- Page 7 3.9.1 Precautions ........................25 3.9.2 Bundling Steps ......................25 3.10 Verifying Installation ....................... 25 3.10.1 Verifying the Device ....................25 3.10.2 Verifying Cable Connection ..................25 3.10.3 Verifying Power Supply ....................25 4 Verifying Operating Status ....................... 26 4.1 Setting up Configuration Environment ..................26 4.2 Checklist...........................
-
Page 8: Product Overview
Product Overview RG-EG300GH-E The RG-EG300GH-E series routers are independently developed by Ruijie Networks with independent intellectual property rights. RG-EG300GH-E routers are a new generation of products for the small and micro enterprise offices, small hotels, and villas, providing 1000Mbps of egress bandwidth to meet the user need of high-speed bandwidth. -
Page 9: Rg-Eg310Gh-E
Hardware Installation and Reference Guide Product Overview Item Quantity Warranty Card RG-EG310GH-E 1.2.2 RG-EG310GH-E Package Contents Table 1-3 Item Quantity Router Mounting bracket Foot pad GB819-85 M4 x 8 mm screw Power cord Power cord retention clip User Manual Warranty Card RG-EG310GH-P-E 1.2.3 RG-EG310GH-P-E Package Contents... -
Page 10: Product Appearance
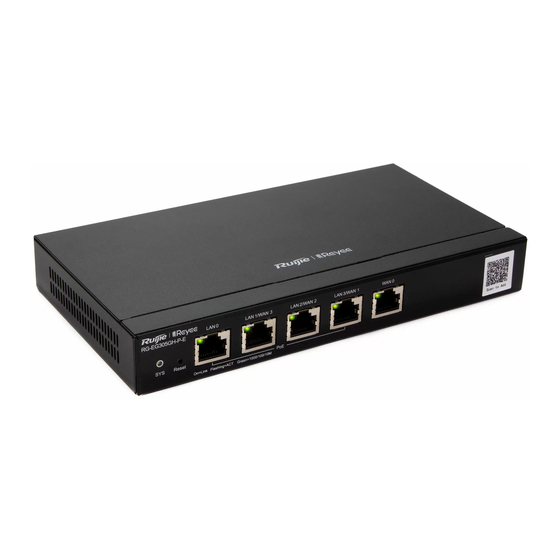
Hardware Installation and Reference Guide Product Overview Product Appearance RG-EG305GH-P-E 1.3.1 RG-EG305GH-P-E Router Appearance Figure 1-1 Front Panel of an RG-EG305GH-P-E Router Figure 1-2 Front Panel Specifications Table 1-5 Item Description Fast blinking green: The router is starting up. Solid green: The router is functioning properly. System Status LED Slow blinking green: 1. - Page 11 Hardware Installation and Reference Guide Product Overview Item Description 10/100/1000BASE-T Ethernet RJ45 with auto negotiation, compliant with the LAN/WAN Switchable Port IEEE 802.3af (PoE) and 802.3at (PoE+) standards. The port is switchable between the WAN port and the LAN port. 10/100/1000BASE-T Ethernet RJ45 with auto negotiation.
-
Page 12: Rg-Eg310Gh-E
Hardware Installation and Reference Guide Product Overview RG-EG310GH-E 1.3.2 RG-EG310GH-E Router Appearance Figure 1-4 Front Panel of an RG-EG310GH-E Router Figure 1-5 Front Panel Specifications Table 1-7 Item Description Fast blinking green: The router is starting up. Solid green: The router is functioning properly. System Status LED Slow blinking green: 1. - Page 13 Hardware Installation and Reference Guide Product Overview Item Description Solid green: The port has made a successful link. Link/ACT Port LED Blinking green: The port is transmitting or receiving traffic. Note After the router is restored to factory default settings, the default management address is http://192.168.110.1 (No password by default).
-
Page 14: Rg-Eg310Gh-P-E
Hardware Installation and Reference Guide Product Overview RG-EG310GH-P-E 1.3.3 RG-EG310GH-P-E Router Appearance Figure 1-7 Front Panel of an RG-EG310GH-P-E Router Figure 1-8 Front Panel Specifications Table 1-9 Item Description Fast blinking green: The router is starting up. Solid green: The router is functioning properly. System Status LED Slow blinking green: 1. -
Page 15: Technical Specifications
Hardware Installation and Reference Guide Product Overview Item Description 10/100/1000BASE-T Ethernet RJ45 with auto negotiation. Connect the WAN WAN Port port to the DSL/Cable Modem to establish an Ethernet connection. Solid green: The port has made a successful link. Link/ACT Port LED Blinking green: The port is transmitting or receiving traffic. - Page 16 Hardware Installation and Reference Guide Product Overview ports and one WAN port. One LAN port can be switched to the WAN port. Four ports are IEEE 802.3af/at-compliant. AC input: Rated Voltage Range: 100 V AC to 240 V AC Maximum Voltage Range: 90 V AC to 264 V AC Power Supply Frequency: 50 Hz/60 Hz Rated current: 1.5 A...
-
Page 17: Rg-Eg310Gh-E
202 mm x 108 mm x 28 mm (7.95 in. x 4.25 in. x 1.10 in., without the panel) Weight 0.45 kg (0.99 lbs) Caution Please use the power adapter and power cord delivered with the router by Ruijie Networks. RG-EG310GH-E 1.4.2 Technical Specifications of an RG-EG310GH-E Router... -
Page 18: Rg-Eg310Gh-P-E
Hardware Installation and Reference Guide Product Overview EN 55032:2015+AC:2016 EN 61000-3-2:2014 EN 61000-3-3:2013 EN 55035:2017 ETSI EN 300 386 V2.1.1 (2016-07) GB4943-2011 Safety Regulation Compliance EN 62368-1 440 mm x 201.5 mm x 43.6 mm (7.95 in. x 4.31 in. x 1.10 in., with the panel) Dimensions (W x D x H) 440 mm x 200 mm x 43.6 mm (7.95 in. - Page 19 Hardware Installation and Reference Guide Product Overview EEE Function Supported PoE Function IEEE 802.3af/at-compliant PoE output power ≤ 110 W Power Consumption < 130 W Operating 0ºC to 40ºC (32°F to 104°F) Temperature Storage Temperature -40ºC to 70ºC (-40°F to 158°F) Operating Humidity 10% to 90% RH (non-condensing) Storage Humidity...
-
Page 20: Preparing For Installation
Hardware Installation and Reference Guide Preparing for Installation Preparing for Installation Safety Precautions Note ● The devices mentioned in this manual cannot be mounted to a wall. ● To avoid personal injury and device damage, carefully read the safety precautions before you install the device. -
Page 21: Electrostatic Discharge Safety
Hardware Installation and Reference Guide Preparing for Installation ⚫ If a power supply system is equipped with a leakage protector (also referred to as “leakage current switch” or “leakage current breaker”), the power supply will be cut off automatically when the electric leakage or electric shock occurs. -
Page 22: Ventilation Requirements
Hardware Installation and Reference Guide Preparing for Installation ◼ Install the router into an open cabinet. If the router is installed into a closed cabinet, ensure that the cabinet has proper ventilation and heat dissipation. ◼ The cabinet is strong enough to support the weight of the router and its accessories. ◼... -
Page 23: Cleanliness Requirements
Hardware Installation and Reference Guide Preparing for Installation Cleanliness Requirements 2.2.5 Dust poses a major threat to the switch. The indoor dust takes on a positive or negative static electric charge when falling on the switch, causing poor contact of the metallic joint. Such electrostatic adhesion may occur more easily when the relative humidity is low, not only affecting the service life of the switch, but also causing communication faults. -
Page 24: Anti-Interference Requirements
Hardware Installation and Reference Guide Preparing for Installation Caution ● Please adopt protection grounding connections in buildings so that the device can be connected to the protection ground. ● Check whether the AC socket is reliably connected to the protection ground of the building. If not, a protection ground wire should be used to connect the protection ground lug of the AC socket to the protection ground of the building. -
Page 25: Lightning Protection Requirements
Hardware Installation and Reference Guide Preparing for Installation ⚫ Take electromagnetic shielding measures when necessary. Lightning Protection Requirements 2.2.8 ⚫ The device can guard against lightning strikes. As an electric device, it may still be damaged by strong lightning strikes. Take the following lightning protection measures: Ensure that the grounding cable of the cabinet is in good contact with the ground. -
Page 26: Tools
Hardware Installation and Reference Guide Preparing for Installation (3) The distance between the square hole strip on the rack column and the outer side of the front cabinet door is greater than 180 mm (7.09 in.) and the thickness of the front cabinet door is smaller than 25 mm (0.98 in.). Therefore, the available space is greater than 155 mm (6.10 in.). -
Page 27: Installing The Router
Hardware Installation and Reference Guide Installing the Router Installing the Router Caution Ensure that requirements in Chapter 2 are all met. Installation Procedure The installation steps are shown in the following figure. Installation Procedure Figure 3-1... -
Page 28: Preparing
Hardware Installation and Reference Guide Installing the Router Prepare for installation Read precautions Install the device Ground the device Connect the power supply Connect the cables Bind the cables Verify the installation Preparing Carefully plan and arrange the installation position, networking mode, power supply and cabling before installation. -
Page 29: Precautions
Hardware Installation and Reference Guide Installing the Router Precautions To ensure the normal operation and prolonged service life of the device, please observe the following precautions: Do not power on the device during installation. ⚫ ⚫ Install the device in a well-ventilated position. ⚫... -
Page 30: Simple Installation Steps
Hardware Installation and Reference Guide Installing the Router Simple Installation Steps 3.4.2 (1) Plan the available space before installing the cabinet. Reserve enough space for the front and rear doors for device maintenance. (2) Install and fasten the cabinet in the designed position as planned. (3) Install the appropriate cable troughs and cables. -
Page 31: Connecting The Ground Cable Of The Device
Hardware Installation and Reference Guide Installing the Router (2) Place the device on the workbench to ensure adequate airflow and good heat dissipation. Caution The workbench on which the device is mounted and operated must not be moved. Connecting the Ground Cable of the Device The router has a grounding lug for grounding protection. -
Page 32: Connecting Cables
Hardware Installation and Reference Guide Installing the Router Connecting Cables ⚫ Connect one end of the RJ45 connector for configuring Ethernet cables to the Ethernet interface of the device module and the other end to the NMS or a control client. ⚫... -
Page 33: Verifying Operating Status
Wireless Connection: Connect the access point to the LAN port of the router with an Ethernet cable. The access point will automatically broadcast SSID “@Ruijie-mXXXX” (XXXX are the last four characters of the MAC address on the device label.) after power-on. Perform configuration on the device after the PC is connected to the wireless network. -
Page 34: Configuring The Router
Hardware Installation and Reference Guide Verifying Operating Status Configuring the Router You can perform specific configuration on the device as required. For details, please refer to the related user manual. -
Page 35: Troubleshooting
Check the device installation Check the power connection Check the LEDs on the device Check the cable connection Contact Technical Support of Ruijie Networks Common Troubleshooting Procedures Password Loss 5.2.1 Press the Reset button for more than 5 seconds to restore the device to factory default settings and reset the system login password. -
Page 36: Appendix
Hardware Installation and Reference Guide Appendix Appendix Connectors and Media ⚫ 1000BASE-T/100BASE-TX/10BASE-T The 1000BASE-T/100BASE-TX/10BASE-T is a 10/100/1000 Mbps adaptive port that supports auto MDI/MDIX Crossover. Compliant with IEEE 802.3ab, 1000BASE-T requires Category 5e 100-ohm UTP or STP (STP is recommended) with a maximum distance of 100 meters (328 feet). - Page 37 Hardware Installation and Reference Guide Appendix 100BASE-TX/10BASE-T Connection Figure 6-2...
-
Page 38: Cabling
Hardware Installation and Reference Guide Appendix Cabling When the RG-EG300GH-E router is installed in a standard 19-inch cabinet, secure the cables around the cable management brackets. Top cabling or bottom cabling is adopted according to the actual situation in the equipment room. - Page 39 Hardware Installation and Reference Guide Appendix without sharp corners. ⚫ The metal hole traversed by cables should have a smooth and fully rounding surface or an insulated lining. ⚫ Use cable ties to bundle up cables properly. Please do not connect two or more cable ties to bundle up cables. ⚫...
- Page 40 Hardware Installation and Reference Guide Appendix ⚫ The power cords connecting moving parts such as door grounding wires should be reserved with some access after being assembled to avoid suffering tension or stress. After the moving part is installed, the remaining cable part should not touch heat sources, sharp corners, or sharp edges.
- Page 41 Hardware Installation and Reference Guide Appendix 10 mm to 30 mm (0.39 in. to 1.18 in.) 150 mm to 200 mm (5.91 in. to 7.87 in.) 30 mm (1.18 in.) 200 to 300 ⚫ No knot is allowed in cabling or bundling. ⚫...
Need help?
Do you have a question about the Reyee RG-EG300GH-E Series and is the answer not in the manual?
Questions and answers