Table of Contents
Advertisement
Quick Links
Advertisement
Table of Contents

Related Manuals for Rocker CD 200


Summary of Contents for Rocker CD 200
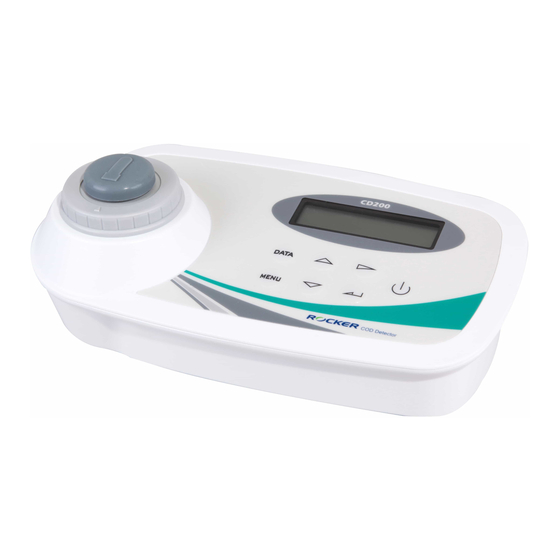
- Page 1 CD 200 Chemical Oxygen Demand (COD) Detector...
-
Page 2: Important Notice
Important notice Please study this instruction manual carefully before using this product. Please operate the instrument at room temperature and proceed with COD measurement after the vial cools down to the room temperature and the uniformly-mixed reagent is completely precipitated. - Page 3 If you have any questions, please keep serial no. & shipping carton and contact your local dealer for help. Item Assembly CD 200 Detector Vial Dust Cap Transformer Instruction manual CD 200 Composition table Position Designation Position Designation Transformer button Vial Dust Cap...
- Page 4 Buttons and Symbols Introduction (1). Operation Button Description︰ Buttons Function Description Data Data Show the data in the display Menu Menu Back to the previous menu Scrolls up through selected menus or stored data Arrow Down Scrolls down through selected menus or stored data Arrow Right ...
- Page 5 (2). Screen Symbol Description︰ Symbols Description Show the state of using a transformer 100% full power. 66% power. 33% power. 5% low battery, replace the battery as soon as possible. (Backlight and sound closed) << Selected option < Selected option...
-
Page 6: Operation
Please ensure that the power supply voltage matches the voltage rating for CD 200 (100-240V AC power), the output voltage is DC12V. In the absence of the power supply case, the user can directly use 9V square battery. Please press the power button, and you can start to use CD 200. Operation menu items... - Page 7 7: User-4 User-4 curve Need calibration 8: User-5 User-5 curve Need calibration 9: User-6 User-6 curve Need calibration Measuring range 10 ~ 150 mg/L Curve range Measuring range 1500 menu 100 ~ 1500 mg/L Measuring range 15000 1000 ~ 15000 mg/L Start COD test screen Standard curve...
- Page 8 COD test description Item Steps Display Turn on the power, the screen shows LOGO 1 : H A C H < < Curve menu appears after 2 seconds 2 : L o v i b o n d Press button and button to select the standard curve(HACH,...
- Page 9 Insert the blank vial into the vial H A C H - 1 5 0 0 holder and OK message will appear B l a n k O K after 2 seconds Pull out the Blank vial and Insert H A C H - 1 5 0 0 Sample message appears I n s e r t S a m p l e Insert the sample vial into the vial...
- Page 10 User curve calibration description Item Steps Display Turn on the power, the screen shows LOGO 1 : H A C H < < Curve menu appears after 2 seconds 2 : L o v i b o n d Press button and button to select User curve(User-1 ~ User-6)...
- Page 11 Insert the blank vial into the vial U s e r - 1 - 1 5 0 holder and OK message will appear B l a n k O K after 2 seconds Pull out the Blank vial and check if it U s e r - 1 - 1 5 0 is correct, press ...
- Page 12 parameter CAL: go back to the calibration parameter Select CAL button to go back to the U s e r - 1 - 1 5 0 calibration parameter I n s e r t S t d 2 Repeat steps 10 to 12 for continuous adjustment of other standard U s e r - 1 - 1 5 0 concentration up to six.
- Page 13 Review the calibration concentration description Item Steps Display Turn on the power, the screen shows LOGO 1 : H A C H < < Curve menu appears after 2 seconds 2 : L o v i b o n d Press ...
- Page 14 Press button and button to check concentration value and press button U s e r - 3 - 1 5 0 0 or Menu button back to the previous S 1 = 1 5 0 0 . 0 m g / L < menu Note: Standard curve can show the displayed range of reading value.
- Page 15 Press button , button and button U s e r - 2 to change the name (up to 10 words) = > U s e r - 2 After typing, press button to store and U s e r - 2 leave or press the Menu button to leave = >...
- Page 16 After checking data, press the Menu 1 : H A C H < < button to leave 2 : L o v i b o n d Note: Save up to 100 records. Time setup description Item Steps Display Turn on the power and press the Menu 1 : H A C H <...
- Page 17 Backlight setting description Item Steps Display Turn on the power and press the Menu 1 : H A C H < < button back to the Main Menu 2 : L o v i b o n d Press button to select the Backlight, ”<<”...
- Page 18 Sound settings description Item Steps Display Turn on the power and press the Menu 1 : H A C H < < button back to the Main Menu 2 : L o v i b o n d Press button to select the Sound, ”<<” symbol represents the position of the 3 : B a c k l i g h t option, Press ...
- Page 19 10. Auto Shut setting description Item Steps Display Turn on the power and press the Menu 1 : H A C H < < button back to the Main Menu 2 : L o v i b o n d Press...
- Page 20 11. Memory setting description Item Steps Display Turn on the power and press the Menu 1 : H A C H < < button back to the Main Menu 2 : L o v i b o n d Press button to select the Memory, ”<<”...
-
Page 21: Maintenance
12. Shutdown description Item Steps Display Press the power button and Press button to select an option, and press S h u t d o w n ? button to save. Y e s < < N o Yes: Turn off the power No: Back to the previous menu Maintenance Clean the exterior of the instrument with a moist cloth and a mild soap solution and then... -
Page 22: Troubleshooting
Troubleshooting Possible cause Solution No electrical supply Check the power supply conform to power specified on main unit or the Instrument fails to start switch is broken Battery error Change a new 9V square battery Internal part failure Contact technical support The screen is not displayed Contact technical support Backlight setting ... -
Page 23: Ordering Information
HACH COD vial 150 mg/l (25/PK) HAC-2125815 HACH COD vial 150 mg/l (150/PK) HAC-2125925 HACH COD vial 1500 mg/l (25/PK) HAC-2125915 HACH COD vial 1500 mg/l (150/PK) HAC-2415925 HACH COD vial 15000 mg/l (25/PK) Rocker Scientific Co., Ltd. / www.rocker.com.tw / +886-2-26033311 / EnV2017.5...
Need help?
Do you have a question about the CD 200 and is the answer not in the manual?
Questions and answers