
Related Manuals for Rocker CR 25


Summary of Contents for Rocker CR 25
- Page 1 INSTRUCTION MANUAL Chemical Oxygen Demand Reactor Model No. CR 25 Instruction Video Please read this instruction manual before using this product.
-
Page 2: Important Notice
Important Notice This instrument is designed for laboratory usage only. Please read this manual carefully before installing and operating. The instrument shall not be modified in any way. Any modification will void the warranty and may result in potential hazard. We are not responsible for any injury or damage caused by any non-intended purposes and modifying the instrument without authorization. - Page 3 If there is any problem, please keep the serial number along with packing case and contact your local distributor immediately for assistance. Item Content CR 25 Main Unit Power Cord Instrument Manual Main Part Diagram (1). Main Part...
-
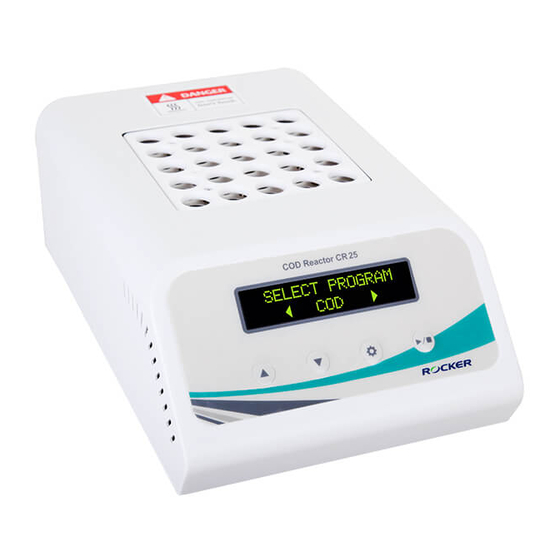
Page 4: Operation Panel
(2). Operation Panel Position Designation Position Designation Display Setting / Calibration Button Up Button Start / Stop Button Down Button Button / Symbol / Display Explication (1). Buttons Button Designation Description Select program or change setting value. ▲ Up Button (Hold the button to change value continuously) Select program or change setting value. - Page 5 (2). Symbols Symbol Description ▲ ▼ Hold down both to switch Standard Timing Mode (T1) or T1 / T2 Preheated Timing Mode (T2) during heating state. Reach the set temperature, ready to start the program. Heats the block to set temperature. \ | / - Timing state indication Heating state indication, symbols alternate every 0.5 sec...
-
Page 6: Program Operation
Operation (1). Program Menu Item Description Remark 1: COD Heats for 2 hours at 150 °C. Standard Timing Mode (T1) 2: COD2 Heats for 20 mins at 165 °C. Preheated Timing Mode (T2). 3: TP Heats for 30 mins at 150 °C. Standard Timing Mode (T1) 4: TN Heats for 30 mins at 105 °C. - Page 7 T1 Standard Timing Mode (4): one beep indicates set temperature has been reached C O D 1 5 0 ° C 1 2 0 / and time will automatically count down to 2 6 ° C zero. The instrument will beep for 15 seconds to indicate the program is complete and stop C O D 1 5 0 °...
- Page 8 (b). COD2, TPN Prede ned Programs (Preheated Timing Mode, T2) Step Operation Screen Display Switch on the instrument and LOGO shows on C O D R e a c t o r the screen. Program menu shows on the screen in 2 C O D 1 5 0 °...
- Page 9 Note 2. (b). (1) The machine will memorize the selected program and maintain when machine is switch on next time. (2) How to stop or select other program: Press 「/」 then comes with a “STOP HEATING?” message. Press 「/」 to stop heating and return to program list.
- Page 10 (c). PRG1, PRG2 User Programs Step Operation Screen Display Switch on the instrument and LOGO shows on C O D R e a c t o r the screen. Program menu shows on the screen in 2 C O D 1 5 0 °...
- Page 11 Note 2. (c). (1) The machine will memorize the selected program and maintain when machine is switch on next time. (2) How to stop or select other program: Press 「/」 then comes with a “STOP HEATING?” message. Press 「/」 to stop heating and return to program list.
- Page 12 (3). Procedure for Temperature Calibration Insert thermometer into 16 mm vial which filled with nearly 5 mL glycerol and touches the bottom of vial. Insert the vail on center of heating block as shown on the right. Calibrate temperature as following procedure.
- Page 13 Note 3. (1) The calibration parameters of each program are independent and have no impact on other programs when executing calibration procedure for specific program. (2) If heating block is hotter than set temperature, you should wait for temperature declining. (3) How to stop calibration procedure: Press 「/」...
-
Page 14: Maintenance
Maintenance Please operate the instrument in well ventilated area. The instrument is not autoclavable. Please clean the surface by pure water or 75% ethanol. If a vial overflows, or liquid is spilled, please switch off the instrument, unplug the power cord immediately. -
Page 15: Ordering Information
Ordering Information 179250-11(22) CR 25, COD Reactor, AC110V,60Hz (AC220V,50Hz) 198200-01(02) CD 200, COD Detector, AC100~240V adaptor, US plug (EU plug) 191100-01(02) WD 100, Multiparameter Colorimeter, AC100~240V adaptor, US plug (EU plug) 179250-43 Protective Lid AWE770110 1000~5000 ul Pipette (Adjustable) SSI 5000-50... - Page 16 Rocker Scienti c Co., Ltd. Tel: +886-2-26033311 Fax: +886-2-26036622 E-mail:export@rocker.com.tw https://www.rocker.com.tw...
Need help?
Do you have a question about the CR 25 and is the answer not in the manual?
Questions and answers