
Related Manuals for Rocker Tanfil 100


Summary of Contents for Rocker Tanfil 100
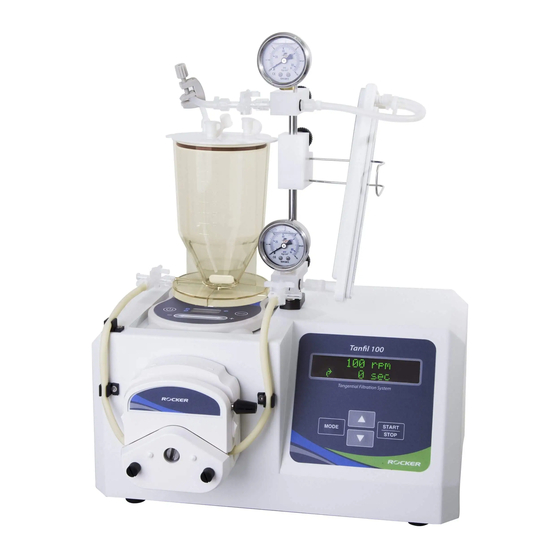
- Page 1 INSTRUCTION MANUAL Tangential Flow Filtration System Model No. Tanfil 100 Video List Please read this instruction manual before using this product.
-
Page 3: Table Of Contents
Table of Contents Important Notice Unpacking Main Part Diagram Main Part (2) Accessories (components, luer, tubing) (3) Material Button / Symbol / Display Explication Operation (2) Buttons (3) Symbols (4) Display Installation Support Base Set (2) Gauge Mounting Set (3) Magnetic Stirrer and Reservoir (4) Three-Way Stopcock (5) Tubing Operation... - Page 4 Usage and Maintenance of Capsule Using the Capsule for the First Time (2) Cleaning after Using (3) Storage of Capsule Maintenance Troubleshooting...
-
Page 5: Important Notice
1. Important Notice This instrument is designed for laboratory usage only. Please read this manual carefully before installing and operating. The instrument shall not be modified in any way. Any modification will void the warranty and may result in potential hazard. We are not responsible for any injury or damage caused by any non-intended purposes and modifying the instrument without authorization. - Page 6 Pressure in tubing should be less than 40 psi, or the tubing would be expanded due to overpressure. Please turn off and unplug the instrument before changing the fuse.
-
Page 7: Unpacking
If there is any problem, please keep the serial number along with packing case and contact the local distributor or contact us by e-mail: export@rocker.com.tw immediately for assistance. Item... -
Page 8: Main Part Diagram
3. Main Part Diagram (1) Main Part Item Designation Item Designation Main Unit Reservoir Operation Panel Lid Kit of Reservoir Pump Head Screw Clamp for Tubing Magnetic Stirrer Retentate Pressure Gauge Feed Pressure Gauge Base for Capsule Bracket Support Rod Support Base Retentate Gauge Mounting SPDT Power Switch... -
Page 9: Accessories (Components, Luer, Tubing)
(2) Accessories (components, luer, tubing) Male Luer Lock - 1/8” hose barb (12) Three-Way Stopcock (4) Male Luer Coupler (2) Female Luer Lock - 1/8” hose barb (1) Female Luer Caps (2) Tube Tubing Clamps (13) -ULTR-C / 1.5 m (1) Screw Clamp for Tubing (1) Retentate Gauge Mounting Set Base for Capsule Bracket (1) -
Page 10: Material
(3) Material Item Material Item Material Reservoir Gauge Wetted Parts SS316 Reservoir Lid Gauge Mounting Block O-ring (Reservoir) Silicon Luer Connector SS316, PP Magnetic Stir Bar PTFE Coated O-ring (Luer) Silicone (platinum-cured), Three-Way Stopcock PC, POM Tube Capillary Tube PTFE... -
Page 11: Button / Symbol / Display Explication
4. Button / Symbol / Display Explication (1) Operation Position Designation Display MODE Button UP/DOWN Button START/STOP Button (2) Buttons Symbol Name Designation Select program or change setting value. UP Button (Hold the button to change value continuously) DOWN Select program or change setting value. -
Page 12: Symbols
(3) Symbols Symbols Designation Description Direction of Pump CW/CCW Head Type of Timer Timer/Countdown Timer Fast Clean Mode Maximum rpm, CW/CCW (4) Display Position Designation Position Designation Speed (rpm) Type of Timer Direction of Pump Head Fast Clean Mode Timer (sec/min) -
Page 13: Installation
5. Installation (1) Support Base Set To install the support base set on the platform of case, using a hex wrench to fasten and fix the 2 hex socket head cap screws. Please notice the direction of support rod, the machining plane of support rod is facing to the aft side. -
Page 14: Magnetic Stirrer And Reservoir
Place the magnetic stirrer in the groove of the platform and plug the AC socket on the backward of Tanfil 100. Install the filter disc on to the lit, and put the reservoir (with lid) on to the magnetic stirrer. -
Page 15: Tubing
Silicone Tube Model / Tubing Name Length Luer Connectors Color Pump Tubing Pharmed / Milky White 50 cm Male Luer 1/8” hose barb (dual) Retentate Tubing Ultra-C / Translucent 15 cm Male Luer 1/8” hose barb (dual) Concentrate Tubing Ultra-C / Translucent 15 cm Male Luer 1/8”... -
Page 16: Operation
6. Operation There are several operation procedures in this system, please follow the steps below to set up the flow path you need. For cleaning procedure and solution for capsules, please refer to the instruction manuals of capsules. (1) Cleaning Figure 1 a. -
Page 17: Draining And Collection
(2) Draining and Collection Figure 2 a. When the pump is stopped, setting the three-way stopcocks as shown in figure 2. b. Open one of the lid caps on the reservoir lid, the solution would flow through the recovery tubing to the container automatically by gravity. Figure 3... - Page 18 c. If you need to collect the solution in the system after experiment, please turn off the pump first and adjust the three-way stopcocks, then exchange the capsule to the cleaning tubing as shown in figure 3. Figure 4 d. Turn on the pump to collect all the solution into the reservoir and turn off the pump after collection.
- Page 19 e. Setting the three-way stopcock at the bottom of the reservoir to adjust the flow path as shown in figure 5. Open one of the lid caps on the reservoir lid, the solution would drain automatically by gravity. Figure 6 To drain the solution completely, please set the three-way stopcock of the reservoir and adjust the flow path as shown in figure 6.
-
Page 20: Capsule Rinsing
(3) Capsule Rinsing Figure 7 I. Rinsing Capsule a. Set the three-way stopcocks and adjust the flow path as shown in figure 7. Pour the rinsing solution into the reservoir. b. Turn on the pump. Increase the speed (rpm) slowly until the feed pressure achieves to the suggested value that depends on the capsule. - Page 21 Figure 8 II. Rinsing the Capsule and the System a. Set the three-way stopcocks and adjust the flow path as shown in figure 8 b. Turn on the pump. Increase the speed (rpm) slowly until the feed pressure achieves to the suggested value that depends on the capsule. ◆...
-
Page 22: Pretreatment And Concentration
(4) Pretreatment and Concentration Figure 9 I. Pretreatment a. Set the three-way stopcocks and adjust the flow path as shown in figure 9. b. Pour the buffer into the reservoir. Turn on the pump and increase the speed (rpm) slowly to fill the tube without bubbles. The feed pressure depends on capsule itself. -
Page 23: Continuous Sampling
II. Concentration a. Pour the sample solution into the reservoir, turn on the pump. The feed pressure depends on capsule itself. b. Adjust the screw clamp and the speed (rpm) of pump until the feed pressure and retentate pressure achieve to the pressure as suggested. Suggested pressure depends on capsule itself. - Page 24 7. Usage and Maintenance of Capsule In this manual, we take Pall Minimate TFF Capsule as example. For other capsules, please refer to manufacture’s instruction manuals. (1) Using the Capsule for the First Time I. Flushing Pour about 500 mL deionized water into the reservoir. Slowly adjust the flow rate until the feed pressure reaches <...
- Page 25 II. Cleaning Steps: Drain the Waste: After recover the sample, place the tubing from the retentate and filtrate ports into a waste container. Flushing with Deionized Water: Refer to (1) I. Flushing. Cleaning with Cleaning Solution: follow the steps below to clean the capsule. Make sure that the feed pressure should NOT exceed 2 bar (about 30 psi).
- Page 26 8. Maintenance Please unplug the instrument before cleaning it. Please operate the instrument in well ventilated area and keep it clean all the time. If there is any solvent splash to the case, please wipe it off to avoid the damage caused by corrosion.
- Page 27 Ordering Information 184100-01(02) Tanfil 100, Tangential Flow Filtration System, AC100-240V, 50/60Hz, US plug (EU plug) 184100-20 High Flow Rate Pump Head, ~ 2160 mL/min 184100-40 Reservoir Set 184100-62 Tanfil 100 Repair Kit 203100-01 MS 100, Low Profile Magnetic Stirrer, AC100-240V, 50/60Hz, US plug 203100-10 PTFE Magnetic Stirring Bar, Ø...
- Page 28 Rocker Scientific Co., Ltd. Tel: +886-2-26033311 Fax: +886-2-26036622 E-mail: export@rocker.com.tw https://www.rocker.com.tw...
Need help?
Do you have a question about the Tanfil 100 and is the answer not in the manual?
Questions and answers