
Related Manuals for Eden 6 Series


Summary of Contents for Eden 6 Series
- Page 1 6 SERIES SINGLE DOOR GLASSHOUSE ASSEMBLY INSTRUCTIONS Phone: 0508 333 654 / 03 479 9224...
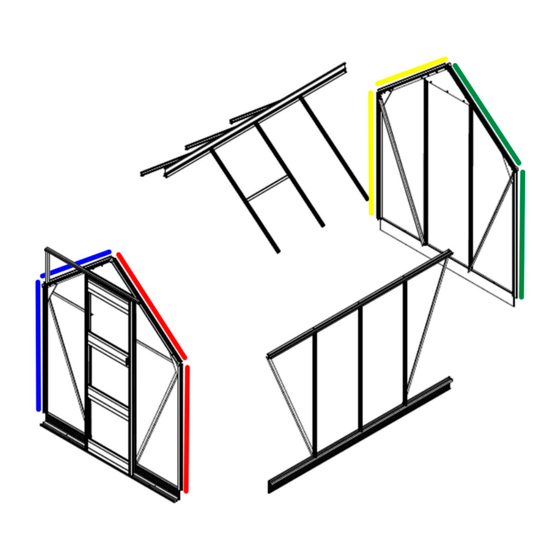
- Page 2 GLASSHOUSE LAYOUT DIAGRAM Throughout this instruction booklet and in the boxes of parts you have received you will find these colours used to show which end and side your parts are.
- Page 3 FRONT WALL LAYOUT...
- Page 4 REAR WALL LAYOUT...
- Page 5 SIDE WALL LAYOUT Please note that the Side Walls shown have the Eden Base Kit attached.
- Page 6 ANCHORING THE GLASSHOUSE The anchors should be on all four corners of the glasshouse. Longer models will have extra anchors which can be spaced out along the side. Please note that the holes in the base for the anchor posts are not factory drilled- you will need to drill your own where best fits.
- Page 7 YOUR EDEN GLASSHOUSE COMES WITH SILL + BASE PRE-ASSEMBLED. If you have ordered ‘No Base Kit’ you will receive only the Sills with no Base panels. GUSSETS Gussets are placed on the inside of the Glasshouse, with the stickers facing outward. The coloured sticker dots should be covered by the Vertical of the same colour when looking from the outside of the Glasshouse.
- Page 8 ASSEMBLY INSTRUCTIONS OVERVIEW Please read instructions fully before assembling. - Identify the position for the anchor posts and dig holes where necessary. - Assemble Side Walls. - Assemble Rear Wall. - Assemble Front Wall. - Attach all Walls. NOTE - Keep braces and gussets finger-tight only at this point. - Attach Roof Bars, Roof Braces, and Ridge Bar.
- Page 9 6 SERIES GLASSHOUSE NOTES PLEASE OPEN ONLY ONE BOX AT A TIME AND COMPLETE SECTION ASSEMBLY BEFORE OPENING THE NEXT BOX. All bolts are 10mm standard size. Do not fully tighten all bolts until the glasshouse has been glazed. This allows for movement in the frame if the base is not completely level or square.
- Page 10 PRELOADING The below diagram illustrates how bolts are pre-loaded. - Bolts slide down the bottom tracks of Side + Roof Bars, Mitres, Posts and Head Sections. - Bolts will need to be pre-loaded in the Front Wall, Rear Wall, and Mid Wall sections. - In some cases, several bolts will need to be pre-loaded onto one part.
- Page 11 SIDE WALL ASSEMBLY: Gutter + Sill length, and number of Side Bars depends on model size. NOTE: Side and Roof Bars come with glazing rubber pre-installed to 50mm from the top end (which attaches to the Gutters). This has been done to make glazing the glasshouse easier, as you will need to slide the top pane of glass slightly underneath the Gutter, the gap in the rubber stops unnecessary pressure being applied.
- Page 12 PRE-LOAD DIAGRAM: SIDE WALLS Pre-load one bolt at either end of each Side Bar, to attach to the Gutter and Side Sill.
- Page 13 SIDE WALL ASSEMBLY Keep bolts finger tight at this point. NOTE: Lay Side Bars, Gutters, Side Braces, and Side Sills according to the diagram below (with bolts pre-loaded). First, attach Side Bars to Gutters and Sills, and then attach Side Braces to Sills and Gutters.
- Page 14 - Rear Brace (1563mm) x2 Red – Right Side of the Front Wall - Rear Sill with Base Kit (unless specified) - 6 Series Top Triangle Gusset (in glass crate) Green – Left Side of the Rear Wall - LH + RH Mitres (1990mm) Yellow –...
- Page 15 PRE-LOAD DIAGRAM: REAR WALL Pre-load 3 Bolts into the Rear Crossmember. - 3 for the Top Triangle Pre-load 2 Bolts into each of the LH and RH Mitres. - 1 for the Top Triangle - 1 for the Rear Sill...
- Page 16 REAR WALL ASSEMBLY Lay out all parts from the “Rear Wall” box according to the below diagram. Attach LH and RH Verticals to Side Gussets Attach LH and RH Slopes to Side Gussets Fix Rear Crossmember to Top Triangle Bolt Top Triangle to LH and RH Slopes Attach Rear Base to LH and RH Verticals Fix Mitres to Top Triangle and Rear Sill Flip the frame over...
-
Page 17: Front Wall
Track Support (478mm) Door Brace (605mm) x2 Red – Right Side of the Front Wall Front Sill (1835mm) 6 Series Triangle Gusset (in glass crate) Green – Left Side of the Rear Wall Front Gussets (Red + Blue) Head Section (438mm) LH + RH Door Posts (1990mm) Yellow –... - Page 18 PRE-LOAD DIAGRAM: FRONT WALL Pre-load 3 bolts into the Door Crossmember. - 3 for the Top Triangle Pre-load 3 bolts into each of the LH and RH Door Posts - 2 at the top end for the Top Triangle and Door Braces - 1 at the bottom end for the Front Door Sill...
- Page 19 FRONT WALL ASSEMBLY LAY OUT ALL PARTS ACCORDING TO THE DIAGRAM BELOW. NOTE: Track Supports sit in front of the Support Brackets and behind the Top Track. The flat face with NO bolt holes on will sit facing forward.
- Page 20 FRONT WALL ASSEMBLY - Attach LH and RH Verticals to Gussets - Attach LH and RH Slopes to Gussets - Bolt Door Crossmember to Top Triangle - Attach Top Triangle to LH and RH Slopes - Attach Front Door Sill to LH and RH Verticals - Attach Top Track to LH and RH Slopes - Bolt Track Support Brackets to LH and RH Slopes...
-
Page 21: Door Assembly
DOOR ASSEMBLY - Slide Door Handle to the centre of the Door Style. - Preload bolts into Door Styles as shown. Single Door – With Base Kit Single Door – No Base Kit... - Page 22 DOOR ASSEMBLY Parts Needed. 2x Door Styles (2081mm with Base Kit, 1976mm No Base) (Lapped Door Panels) 1x Door Handle 4x Door Panels (600mm) 1x Door Head (622mm) 2x Door Guides (in parts bag!) 4x Strips Glazing Rubber (477mm) Assembly Instructions - Pre-load Bolts into Door Styles as shown previously.
-
Page 23: Internal View
ATTACHING SECTIONS REMINDER: Slopes and Verticals are labelled ‘LH’ (Left Hand) and ’RH’ (Right Hand). - Looking from the outside of the Glasshouse at the front, BLUE will be LH and RED will be RH. - Looking from the outside of the Glasshouse at the rear, GREEN will be LH and YELLOW will be RH. - Page 24 ATTACHING SECTIONS REMINDER: Slopes and Verticals are labelled ‘LH’ (Left Hand) and ’RH’ (Right Hand). - The Side Walls are joined to Front and Rear walls by the same bolt track as on the Side Sills. - Pre-load a bolt into the top end of the Vertical, and bottom end of the Slope (use a nut to keep the bolt in place for ease) - Bring the Side Wall Gutter against the Gusset, underneath the Slope and inside the Vertical.
- Page 25 MID-WALL JOINERS & EXTENSIONS If your glasshouse is 16’, 20’, 24’ or above you will find one or more ‘MID-WALL JOINERS’ within your glasshouse parts. Your glasshouse has been separated into either 8’, 10’, or 12’ sections to allow for the strongest possible construction – and between these sections is a MID-WALL JOINER.
- Page 26 MID-WALL JOINERS & EXTENSIONS...
-
Page 27: Roof Assembly
ROOF ASSEMBLY Once the Ridge Bar has been attached, you can begin attaching the Roof Bars and Roof Braces between the Ridge Bar and Gutters. ROOF BAR TO RIDGE ROOF BRACE TO RIDGE BAR ROOF AND SIDE BAR TO GUTTER Select where you would like to place the Roof Vents –... - Page 28 ROOF ASSEMBLY Vent Packs Vent Packs are made up of the LH and RH Vent Bars, Vent Bottom, the Vent Hinge, and Vent Sill (used later). Vent Packs are glazed with 2 clips. - The Vent Bars are attached to the Hinge and Bottom by the bolt track on the under-side of each.
- Page 29 ROOF ASSEMBLY Vent Packs Roof Vents will take the place of the top pane of glass. The Vent Sill is bolted to the underside of the Roof Bars holding the Roof Vent and allow the Vents to close properly (shown below). The Vent Hinge slides onto the Ridge Bar in the small, rounded channel on the Ridge itself (as below).
- Page 30 LOUVRE ASSEMBLY - First, place a pane of ‘A’ glass into the bottom of the section where you would like your Louvre to be positioned and clip glass in. - Sit the Louvre ‘T-Bar’ atop this glass with the flat face on the inside. Fix the ‘T-Bar’...
- Page 31 HANGING THE DOOR Once the glasshouse is constructed and the Door has been assembled you can attach the Door. Slide the Door Head wheels inside the Top Track at the top (shown adjacent). At the same time as above, slide the Door Style into the Door Sill –...
- Page 32 GLAZING NOTE: Please handle glass with care as some panes may be sharp! - For ease of installation, your glasshouse should be glazed from the bottom row up (excluding the ‘A’ pane supporting the Louvre) Glaze the entire first layer of the glasshouse, moving upward and finishing at the ridge.
- Page 33 GLASS INSTRUCTIONS ANCHORING...
- Page 34 Congratulations on completing your Eden glasshouse! We hope you enjoyed this project. Edenlite values your feedback, and we would like to know if there is anything we can do to make this process of installing glasshouses easier for our customers.
Need help?
Do you have a question about the 6 Series and is the answer not in the manual?
Questions and answers