Table of Contents
Advertisement
Quick Links
Advertisement
Table of Contents

Related Manuals for Woodpecker E-COM


Summary of Contents for Woodpecker E-COM
- Page 1 E-COM Endo Motor INSTRUCTION MANUAL...
-
Page 2: Table Of Contents
Contents 1 Product introduction ................1 2 Installation ..................... 4 3 Function and operation of product ............7 4 Operation instruction ................8 5 Oiling of contra-angle ................. 1 4 6 Cleaning, Disinfection and Sterilization ..........1 4 7 Troubleshooting .................. 2 3 8 Storage, maintenance and transportation ........... -
Page 3: Product Introduction
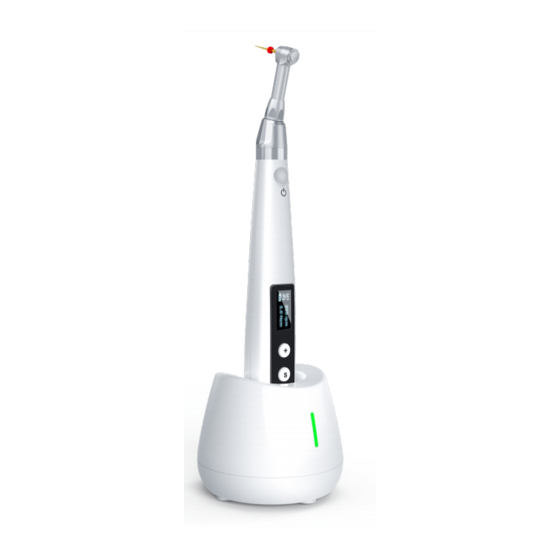
Ultrasurgery, Endo Motor, etc. 1 Product introduction 1.1 Product description E-COM is mainly used in Endodontic treatment. During root canal preparation procedure, it is used to mold and clean the root canal. Features: a) Wireless handpiece enables more convenient operation. - Page 4 1.4 Performance and composition The device is composed of charging base, handpiece, contra-angle, and power adapter, etc. contea-angle power adapter handpiece power adapter Charging base socket Charging LED indicator 1.5 Contraindication Patients with implanted pacemakers (or other electrical equipment) who are warned not to use household appliances such as electric razors, hair dryers, etc.
- Page 5 compatibility (EMC) and must be in strict accordance with the EMC information for installation and use. Do not use this equipment especially in the vicinity of fluorescent lamps, radio transmitting devices, remote control devices, handheld and mobile high-frequency communication devices. 1.6.5 Long time use of Reciprocating Motion Mode may result in handpiece overheat, thus it should be left to cool for use.
-
Page 6: Installation
1.7 Device safety classification 1.7.1 Type of operation mode: Continuous operating device 1.7.2 Type of protection against electric shock: Class II equipment with internal power supply 1.7.3 Degree of protection against electric shock: BF type applied part 1.7.4 Degree of protection against harmful ingress of water: Ordinary equipment (IPX0) 1.7.5 Degree of safety application in the presence of a flammable anesthetic mixture with air, oxygen, or nitrous oxide: Equipment cannot... - Page 7 Motor handpiece Contra-angle Charging base Lubricator Power adapter 2.2 Instructions for contra-angle 2.2.1 The contra-antgle adopts precision gear transmission, and the transmission ratio is 1: 1. The material for contra-angle is copper. (Model:CA001) 2.2.2 Before the first use and after treatments, please clean and disinfect contra-angle with disinfectant of neutral PH value.
- Page 8 indicates that it is well installed. By aligning those three pins on contra- angle with those six holes on handpiece, the contra-angle can be installed in different angle. (As shown below) 2.3.2 Removal Pull out the contra-angle horizontally when the motor handpiece does not start.
-
Page 9: Function And Operation Of Product
stopped. b) After the file is well installed, without pressing the push cover, the file should be firmly locked while slightly pulling the file. 2.5 Installation and removal of disposable insulation sleeves 2.5.1 Installation Before each use of the handpiece and after the handpiece is cleaned and disinfected,put on a disposable isolation sleeve. -
Page 10: Operation Instruction
3.2 OLED display a) Customized program sequence number 1-9, totally 9 programs b) Operation mode c) Battery consumption d) Set speed e) Set torque f) File system g) Operation mode h) Torque setting i) Real-time torque j) Set apical stop k) File position 4 Operation instruction 4.1 Starting and Stopping... - Page 11 Press the key again, and then the handpiece backs to Standby mode. 4.2 Selecting memory a) E-COM allows 9 memorizing programs. Under standby state, please press key switchover those memorizing programs. And the serial number will change correspondingly.
- Page 12 Torque setting: In the Torque Setting Interface, press to increase torque, press to decrease torque, and long press to fast increase or fast decrease torque. Operation Mode Setting: Direction In the Operation Mode Setting Interface, press key or key to switch operation mode. Continuous Rotation Mode, Continuous Rotation Mode Reverse Rotation Mode and...
- Page 13 4.4 Preset programs Select the self-defining program that need to be replaced. Long press key to get into the interface of file system. Press key W3-Pro W3-ONE or key to select needed W3-Single file system. Press the key confirm, and press the key to W3-Pro log out.
- Page 14 When the battery capacity is the too low, the device may indicate “Low Battery!” and automatically power off. Connect the power adapter with the base. Confirm that it is well connected, and then place the handpiece into the base. If the indicator light on base turns yellow, it indicates that it is charging.
- Page 15 after 3 minutes without any button-pressing operation. The handpiece will also automatically shut down while it is put into the charging base. In Standby Interface, long press setting key , and then long press Adjusting key , finally the device will automatically shut down 2s later.
-
Page 16: Oiling Of Contra-Angle
the handpiece for a while until the temperature drops. 5 Oiling of contra-angle Only the original oil injection nozzle can be used for oiling of contra- angle. After disinfection of contra-angle and before sterilization, oiling should be conducted under high pressure and high temperature. 1.Firstly, screw the injecting nozzle into jet of oil bottle. - Page 17 before each usage to prevent any contamination. This concerns the first use, as well as all subsequent uses. 6.2 General recommendations 6.2.1 Use only a disinfecting solution which is approved for its efficacy (VAH/DGHM-listing, CE marking, FDA and Health Canada approval) and in accordance with the DFU of the disinfecting solution manufacturer.
- Page 18 and disinfected with automatic equipment. Manual cleaning and disinfection is required. 6.3.1.1 Manual cleaning steps: 1. Take out the handpiece, charger, and base on the workbench. 2. Wet the soft cloth completely with distilled water or deionized water, and then wipe all the surfaces of the components such as the handpiece, charger, base, etc.
- Page 19 3. Wet the dry soft cloth with 75% alcohol, and then wipe all surfaces of the handpiece, charger, base and other components for 3 minutes. 4. Put the handpiece, charger, base and other components back into the clean storage area. Note: a) The cleaning and disinfection must be performed within 10min before use.
- Page 20 6.4.1.2Post-operative treatment The post-operative treatment must be carried out immediately, no later than 30 minutes after the completion of the operation. The steps are as follows: 1. Remove the products from the base, and rinse away the dirt on the surface of handpiece with pure water (or distilled water/deionized water);...
- Page 21 a) Press the push-button and pull out the shank/file. b) When removing the protective silicon cover, pull it straight out slowly. c) When inserting and removing the contra-angle, turn thehandpiece power off beforehand. 6.4.3 Cleaning The cleaning should be performed no later than 24 hours after the operation.
- Page 22 Cleaning and disinfecting steps by using Washer-disinfector 1. Carefully place the product into the disinfection basket. Fixation of product is neededonly when the product is removable in the device. The products are not allowed to contact each other. 2. Use a suitable rinsing adaptor, and connect the internal water lines to the rinsing connection of the washer-disinfector.
- Page 23 f) After cleaning, the chemical residue should be less than 10mg / L. g)The air used for drying must be filtered by HEPA. h) Regularly repair and inspect the disinfector. 6.4.5 Drying If your cleaning and disinfection process does not have an automatic drying function, dry it after cleaning and disinfection.
- Page 24 6.4.7 Packaging Install the disinfected and dried product and quickly package it in a medical sterilization bag (or special holder, sterile box). Notes: a) The package used conforms to ISO 11607; b) It can withstand high temperature of 138 °C and has sufficient steam permeability;...
-
Page 25: Troubleshooting
result in damage to the product; d) Please use the recommended sterilization procedures for sterilization. It is not recommended to sterilize with other sterilization procedures such as ethylene oxide, formaldehyde and low temperature plasma sterilization. The manufacturer assumes no responsibility for the procedures that have not been recommended. -
Page 26: Storage, Maintenance And Transportation
Contra-angle 1.Calibration failure 1.Recalibration. calibration failure. caused by strong 2.Clean the contra- resistance of contra- angle, and recalibrate angle. after oil injection. After plugging the The power adapter is Check whether the handpiece into charging not well connected. power adapter is well base, the charging connected. -
Page 27: Environmental Protection
should be carried out by authorized person or authorized after service center. 8.2.2 Keep the equipment in a dry storage condition. 8.2.3 Do not throw, beat or shock the equipment. 8.2.4 Do not smear the equipment with pigments. 8.3 Transportation 8.3.1 Excessive impact and shake should be prevented in transportation. -
Page 28: Statement
The pictures are only for reference. The final interpretation rights belong to GUILIN WOODPECKER MEDICAL INSTRUMENT CO., LTD. The industrial design, inner structure, etc, have claimed for several patents by WOODPECKER, any copy or fake product must undertake legal responsibilities. - Page 29 ZMN-SM-069 V1.7 - 20210427...
Need help?
Do you have a question about the E-COM and is the answer not in the manual?
Questions and answers