Table of Contents
Advertisement
Advertisement
Table of Contents

Related Manuals for Woodpecker Endo Smart+


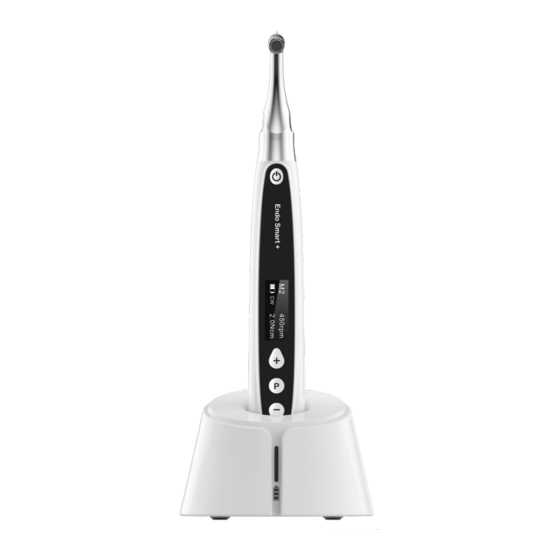
Summary of Contents for Woodpecker Endo Smart+
-
Page 2: Table Of Contents
Contents 1 Product introduction ................1 2 Installation .................... 5 3 Function and operation of product ............ 1 1 4 Operation instruction ................. 1 3 5 Troubleshooting .................. 2 5 6 Cleaning, Disinfection and Sterilization ..........2 6 7 Storage, maintenance and transportation ........... 3 5 8 Environmental protection .............. -
Page 3: Product Introduction
Woodpecker owns a sound quality control system. Guilin Woodpecker Medical Instrument Co., Ltd has two brands, Woodpecker and DTE. Its main products include Ultrasonic Scaler, Curing light, Apex locator, Ultrasurgery, Endo Motor, etc. - Page 5 1.5 Scope of application 1.5.1 The device can be used for preparation and enlargement of root canals, or connect to the matched Apex locator to add a canal measur- ement function. 1.5.2 The device must be operated in hospital and clinic by the qualified dentists.
- Page 6 neutral pH value or ethyl alcohol to wipe its surface. 1.7.10 Before the contra angle stopping rotating, do not press the push cover of contra angle. Otherwise the contra angle will be broken. 1.7.11 Before the motor handpiece stopping rotating, do not remove the contra angle.
-
Page 7: Installation
1.9 Primary technical specifications 1.9.1 Battery Lithium battery in motor handpiece: 3.7V /2000mAh 1.9.2 Power adapter (Model: ADS-6AM-06N 05050/UE08WCP- 050100SPA) Input: ~100V-240V 50Hz/60Hz 0.4A Max Output: DC5V/1A 1.9.3 Torque rang: 0.4Ncm-5.0Ncm ( 4mNm ~ 50mNm ) 1.9.4 Speed rang: 100rpm~1200rpm 1.9.5 Wireless charging Frequency range: 112-205KHz Maximum RF output power of the product: 9.46dBuA/m@3m... - Page 8 2.2.1 Display Screens for 4 Operation Modes and Standby 2.2.1.2 CW Mode The motor handpiece rotates forward 360º, clockwise direction. Used rotaty files likes WOODPECKER W3-Pro . 2.2.1.3 CCW Mode The motor handpiece rotates counterclockwise direction only. This mode is used to inject calcium hydroxide and other medicant. When this mode is being used, a double-beep sounds continuously.
- Page 9 Forward Angle<Reverse Angle, such as F : 30/R : 150, effective cutting angle is Reverse Angle, it is suitable for used the reciprocating files likes WOODPECKER W3-ONE. Forward Angle>Reverse Angle, such as F : 180/R : 30, effective cutting angle is Forward Angle, it is suitable for used the reciprocating files likes SENDONELINE S1.
- Page 10 2.2.3 Canal Measurement Display (Connected to the matched Apex locator to add an apex locator function) This appears when a file is inside the canal and the lip hook is contacting the patient mouth. Bars in meter show the location of the file tip.
- Page 11 The contra angle rotates 360° so that the OLED display can always be viewed easily. 2.4.2 Removal Pull out the contra angle horizontally when the motor handpiece does not run. Warnings: a) Before plugging in or pulling out contra angle, please first stop the motor handpiece.
- Page 12 Warnings: After plugging the file into contra angle, let go the hand on push cover to assure that the file cannot be taken out. Be careful when inserting files to avoid injury to fingers. Inserting and removing files without holding the push button may damage the chuck of contra angle.
-
Page 13: Function And Operation Of Product
and disinfected,put on a disposable isolation sleeve. Take the isolation sleeve out of the isolation sleeve box, then insert the isolation sleeve into the motor handpiece from the thin end of the handpiece, and install the isolation sleeve until there is no obvious wrinkle. After installing the disposable isolation sleeve, wrap the barrier film around the handpiece surface. - Page 14 With the motor handpiece turned off, hold down the Setting button “P” and press Main button to entry handpiece functions setting, press Setting button “P” till target setting, press Adjusting button “+”/“-” to adjust, then press Main button to confirm. 3.2 Screen display Standby interface a.
-
Page 15: Operation Instruction
Activating in REC and ATR operation mode. ATR mode: adjustable every 10 degrees, Forward Angle adjustment range: 60º-400º. REC mode: adjustable every 10 degrees, adjustment range: 20º-400º. Activating in REC operation mode Adjustable every 10 degrees, adjustment range: 20º-400º. Reverse Angle Activating in ATR operation mode Adjustable every 10 degrees, adjustment range: 20º-forward angle. - Page 16 and then the motor handpiece will enter Standby interface. The interface displays are as follow: Standby interface b) Under Standby interface, press Main button, and then the motor handpiece will enter Working interface. The interface displays are as follow: Working interface c) Press the Main button again, and then the motor handpiece backs to Standby interface.
- Page 17 It has 4 operation modes for canal shaping: CW, CCW, REC and ATR(See chapter 3.3 Terms and definition to get the explanations of these modes.) Press Setting button “P” once during standby state, press Adjusting button “+”/“-” to select correct Operation mode. CCW mode is used to inject calcium hydroxide and other medicant.
- Page 18 Forward Angle<Reverse Angle, such as F: 30º/R: 150º, effective cutting angle is Reverse Angle, it is suitable for used the reciprocating files likes WOODPECKER W3-ONE. Forward Angle>Reverse Angle, such as F: 180º/ R: 30º, effective cutting angle is Forward Angle, it is suitable for used the reciprocating files likes SENDONELINE S1.
- Page 19 Actions that happen automatically when the file tip reaches the point inside the canal determined by the Flash Bar setting. Benefit from integration of length determination, when the file reaches the reference point, the motor will response according to setting, it can be Reverse , Stop and OFF.
- Page 20 Rotation automatically slows down as the file tip approaches the reference point. P ress Adjusting button “+”/“-” to change. OFF: Disable Apical Slow Down function. ON: Rotation automatically slows down as the file tip approaches the reference point. 4.4 Preset program selection For convenience, we preset some common file system.
- Page 21 With the motor handpiece turned off, hold down the Setting button “P” and press Main button to entry handpiece functions setting, the software version number will appear on the display screen. After 3 seconds of displaying the Software Version on the screen, the time of "Auto Power OFF"...
- Page 22 Press Setting button “P”again, the "Calibration" can be change, press Adjusting button “+”/“-” to select “ON”, then press to "Main" button to calibration. Before calibrating, making sure the original contra angle is installed, and do not install the file. The torque will not correct if calibration without original contra angle or any load on contra angle chuck, andhas risk of file separate.
- Page 23 Cautions: 1. Protective function of automatic reverse is ONLY suitable for CW mode. 2. In REC mode, when the load value is higher than preset torque value, if Forward angle is greater than Reverse angle, the file rotation automatically change to reverse rotation, and if Forward angle is less than Reverse angle, the file rotation automatically change to forward rotation.
- Page 24 Connecting the USB wire and measuring wire. Note Please ensure that the lip hook is well plugged into the white female socket of measuring wire. After connecting the USB wire, if it is well connected, the device will display “CONNECTED!” and make a prompt tone.
- Page 25 Connection testing Strongly recommend check the connection testing every time before use. Touch the lip hook with the file in the contra angle and check that all the bars on the meter on the screen light up, and the motor should be reversed continuously, otherwise, the USB wire, measuring wire or contra angle should be replace.
- Page 26 1) Make sure that Endo Smart + is well connected with the Apex locator. 2) Hook the lip hook in the corner of the patient’s mouth. 3) Power on the motor handpiece to operate. 4) The position of the file tip inside the canal can be monitored during the procedure.
-
Page 27: Troubleshooting
4.10 Oiling of contra angle Only the original oil injection nozzle can be used for oiling of contra angle. The contra angle needs to be lubricated after cleaning and disinfection, but before sterilization. 1. Firstly, screw the injecting nozzle into jet of oil bottle. (Around 1 to 3 circles) 2. -
Page 28: Cleaning, Disinfection And Sterilization
Contra angle Calibration failure Clean the contra angle, calibration failure caused by strong and recalibrate after oil resistance of contra injection. angle Motor handpiece Under Reciprocating Stop use. Use after the heating Motion Mode, the temperature of motor using time is too long. handpiece drops. - Page 29 6.2.4 For your own safety, please wear personal protective equipment (gloves, glasses, mask). 6.2.5 The user is responsible for the sterility of the product for the first cycle and each further usage as well as for the usage of damaged or dirty instruments where applicable after sterility.
- Page 30 6.3.1.2 Manual disinfection steps: 1. Soak the dry soft cloth with 75% alcohol. 2. Wipe all surfaces of headpiece, charger, base and other components with a wet soft cloth for at least 3 minutes. 3. Wipe the surface of the component with a dry soft nap-free cloth. Note: a) The cleaning and disinfection must be performed within 10min before use.
- Page 31 6.4 The cleaning, disinfection and sterilization of contra-angle,lip hook, file clip,protective silicon cover,touch probeare as follow. Unless otherwise stated, they will be hereinafter referred to as “products”. Warnings: The use of strong detergent and disinfectant (alkaline pH>9 or acid pH <5) will reduce the life span of products. And in such cases, the manufacturer takes no responsibility.
- Page 32 Tools: tray, soft brush, clean and dry soft cloth. 1. Remove the shanks/files. 2. Remove the file clip, isolation sleeve,Contra-angle and connecting wire from the handpiece in sequence, and then put them into a clean tray; 3. Use a clean soft brush to carefully brush file clip,protective silicon cover,touch probe, head and back cover of the contra-angle until the dirt on surface is not visible.
- Page 33 ▪The cleaning procedure is suitable for the product, and the irrigating period is sufficient. It is recommended to use a washer-disinfector in accordance with EN ISO 15883. For the specific procedure, please refer to the automated disinfection section in the next section "Disinfection". Notes: a) The cleaning agent does not have to be pure water.It can be distilled water, deionized water or multi-enzyme.
- Page 34 b) With this equipment, cleaning, disinfection and drying will be carried out together. c) Cleaning: (c1) The cleaning procedure should be suitable for the product to be treated. The flushing period should be sufficient (5-10 minutes). Pre-wash for 3 minutes, wash for another 5 minutes, and rinse it for twice with each rinse lasting for 1 minute.
- Page 35 Notes: a) The drying of product must be performed in a clean place. b) The drying temperature should not exceed 138 °C; c) The equipment used should be inspected and maintained regularly. 6.4.6 Inspection and maintenance 6.4.6.1 Inspection In this chapter, we only check the appearance of the product. 1.
- Page 36 steam permeability; c) The packaging environment and related tools must be cleaned regularly to ensure cleanliness and prevent the introduction of contaminants; d) Avoid contact with parts of different metals when packaging. 6.4.8 Sterilization Use only the following steam sterilization procedures (fractional pre- vacuum procedure*) for sterilization, and other sterilization procedures are prohibited: ·The steam sterilizer complies with EN13060 or is certified according...
-
Page 37: Storage, Maintenance And Transportation
106KPa, and a temperature of -20 °C to +55 °C; 2. After sterilization,the product should be packaged in a medical sterilization bag or a clean sealing container, and stored in a special storage cabinet. The storage time should not exceed 7 days. If it is exceeded, it should be reprocessed before use. -
Page 38: Environmental Protection
7.3 Transportation 7.3.1 Excessive impact and shake should be prevented in transportation. Lay it carefully and lightly and don’t invert it. 7.3.2 Don’t put it together with dangerous goods during transportation. 7.3.3 Avoid solarization and getting wet in rain and snow during transportation. -
Page 39: Statement
The pictures are only for reference. The final interpretation rights belong to GUILIN WOODPECKER MEDICAL INSTRUMENT CO., LTD. The industrial design, inner structure, etc, have claimed for several patents by WOODPECKER, any copy or fake product must undertake legal responsibilities. 12 EMC-Declaration of conformity The device has been tested and homologated in accordance with EN 60601-1-2 for EMC. - Page 40 RF emissions The model Endo Smart + Class B CISPR11 is suitable for used in all establishments, including Harmonic emissions Class A domestic establishments and lEC 61000-3-2 those directly connected to the public low-voltage power Voltage fluctuations / supply network that supplies flicker emissions Complies buildings used for domestic...
- Page 41 Voltage <5 % UT <5 % UT Mains power quality dips, short (>95% dip in (>95% dip in UT.) should be that of a interruptions UT.) for 0.5 cycle typical commercial or and voltage for 0.5 cycle <5 % UT hospital environment.
- Page 42 Portable and mobile RF communications equipment should be used no closer to any part of the models Endo Smart +, including cables, than the recommended separation distance calculated from the equation applicable to the frequency of the transmitter. Recommended separation distance 3 Vrms d=1.2×P1/2 150 kHz to 80...
- Page 43 a Field strengths from fixed transmitters, such as base stations for radio (cellular/ cordless) telephones and land mobile radios, amateur radio, AM and FM radio broadcast and TV broadcast cannot be predicted theoretically with accuracy. To assess the electromagnetic environment due to fixed RF transmitters, an electromagnetic site survey should be considered.
- Page 44 For transmitters rated at a maximum output power not listed above, the recommended separation distance d in meters (m) can be estimated using the equation applicable to the frequency of the transmitter, where P is the maximum output power rating of the transmitter in watts (W) accordable to the transmitter manufacturer.
- Page 45 ZMN-SM-205 V1.3-20210701...
Need help?
Do you have a question about the Endo Smart+ and is the answer not in the manual?
Questions and answers