
Related Manuals for bemodern 2599R


Summary of Contents for bemodern 2599R
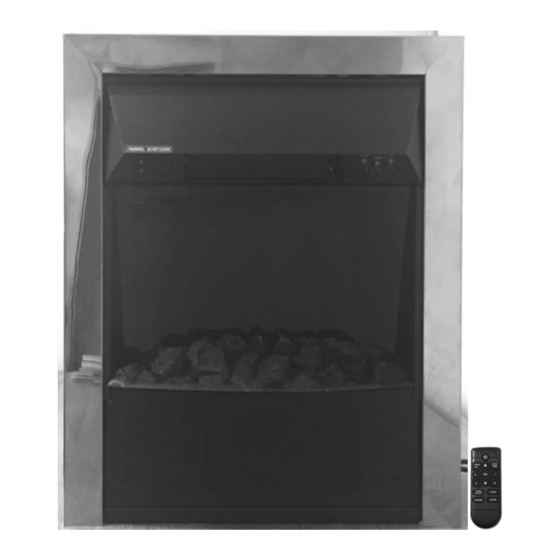
- Page 1 INSTALLATION AND USER INSTRUCTION GUIDE 2kW Electric Inset Fire with Remote Control Model: 2599R / 2599MS Read these instructions thoroughly before use and keep for future reference.
- Page 2 WARNING: For indoor use only. Do not use outdoors. This appliance is only suitable for well insulated spaces or occasional use. In order to avoid overheating do not cover the heater. In order to avoid a hazard due to inadvertent resetting of the thermal cut-out, this appliance must not be supplied through an external switching device, such as a timer, or connected to circuit that is regularly switched on and off by utility.
- Page 3 • Before cleaning the appliance, make sure it is unplugged from the mains power and that it is completely cool • Do not clean the appliance with abrasive or chemicals. • Never use accessories that are not recommended or supplied by the manufacturer. •...
- Page 4 Unpacking the Appliance · The heater is supplied in a single pack carton. · All instructions should be read prior to unpacking or installing the appliance. · Ensure all parts including loose items have been removed prior to discarding the packaging. ·...
- Page 5 Inset Installation (Without spacer) · Mark the centre of the opening of fireplace, measure 215.5mm to the left and then again to the right. From there · measure from the floor 560mm up the wall. Once measured, mark the two locations, which are the centre of fixing screws.
- Page 6 Operation Instructions ➢ The Controls ▪ Switching ON / OFF · Use the ON / OFF switch to power on the heater (set it to standby mode). · In standby mode, the heater can be operated either manually by the switches located on the left and right hand sides of the canopy or by the mantel switches located at the right side wall of mantel or by the supplied remote control.
- Page 7 ▪ Mantel switch Operation (Option for the models with mantel switch) NOTE: The heater should be powered on using the ON / OFF switch before it can be operated using the mantle switches Heater powered off Heater powered on, set to standby mode Press to switch the flame effect ON/OFF Press and hold to toggle between 5 different flame dim levels Press to activate low level heating (1000W)
- Page 8 Remote Operation · NOTE: The heater should be powered on using the ON / OFF switch before it can be operated using remote control. · The remote control requires 2xAAA size batteries. · Open the battery compartment by sliding the cover down and insert the batteries noting the polarity indicated in the battery compartment.
- Page 9 ➢ Display ➢ Settings ▪ Setting weekday and time key. When the day is flashing press the ▲ or ▼ key to select the day. · Press the DAY / TIME key again, then press the + or – key to set the hour. ·...
- Page 10 or press the - key to delete a day. · Press the TIMER SET key to set the on time. The hour digit starts blinking. · Press the + or – key to set the hour. · Press the TIMER SET key. The minute digit starts blinking. ·...
- Page 11 may occur to the finish. Technical Specification · Supply: 220-240V~ 50Hz · Rated power: 1800-2000W · Lighting: LEDs General Information Item Symbol Value Unit Item Unit Heat output Type of heat input, for electric storage local space heaters only (select one) Nominal heat output manual heat...
- Page 12 Electrical Connections - UK Plug Wiring Instruction · If the plug has to be changed because it is not suitable for your socket, or due to damage, please follow the wiring instructions shown below. · The wires in the mains lead are coloured in accordance with the following code: BROWN LIVE (L) BLUE...
- Page 13 Electric Fire Guarantee Be Modern Ltd. (the ‘Company’) provides a Twelve month guarantee in respect of electric fire (the ‘Product’) ranges. 1. The Twelve month Guarantee applies to: a. All products in the ranges manufactured by the ‘Company’ (but subject to the exceptions below): where b.
- Page 14 Environment Meaning of crossed –out wheeled dustbin: Electrical appliances should not be disposed as unsorted municipal waste. Separate collection facilities should be used in the disposal of electrical appliances. Contact your local government for the information about the available collection systems. If electrical appliances are disposed of in landfills or dumps, hazardous substances can leak into the groundwater and get into the food chain, damaging your health and well-being.
- Page 15 Serviceable / Replacement Parts 13 – Fuel Bed 63 – Remote Control...
Need help?
Do you have a question about the 2599R and is the answer not in the manual?
Questions and answers
Recently moved into a property that had said make electric fire but the cover is missing how would I go about getting a replacement thanks
The documents do not provide specific instructions for obtaining a replacement cover for the BeModern electric fire model 2599R. Therefore, the best course of action is to contact the manufacturer or a qualified service agent directly. Proof of purchase may be required, and the product must still be within the 12-month guarantee period under the original purchaser's name for warranty service. Otherwise, replacement parts may need to be purchased separately.
This answer is automatically generated