Wine Guardian DS050 Quick Start Installation Manual
Split ducted wine cellar
Hide thumbs
Also See for DS050:
- Installation, operation and maintenance manual (83 pages) ,
- Quick start installation manual (40 pages) ,
- Quick start installation manual (28 pages)

Related Manuals for Wine Guardian DS050


Summary of Contents for Wine Guardian DS050
- Page 1 Split Ducted Wine cellar Cooling System Models DS025, WGS40 Quick Start Installation Guide wineguardian.com Help.wineguardian.com info@wineguardian.com 15H0322-00 Rev A 10/2021 Part #...
- Page 2 Wine Guardian Split System This document is a pictorial guide for installing the Wine Guardian Split system. It is not intended to replace the detailed instructions found in the Installation, Operation and Maintenance (IOM) manual, which includes important safety messages all installers and owners should follow for safe and optimal performance of the system.
- Page 3 Humidification—Integral or Stand-alone Ideal for adding humidity to your wine cellar. Temperature/Humidity Remote Sensors Sense and control multiple locations (maximum of three) within your room. Ideal for odd shaped rooms or multi- room applications. Duct Collar Connections Air Innovations duct collars and duct kits are specifically designed to attach directly to the WG unit with no addition- al drilling or tapping required.
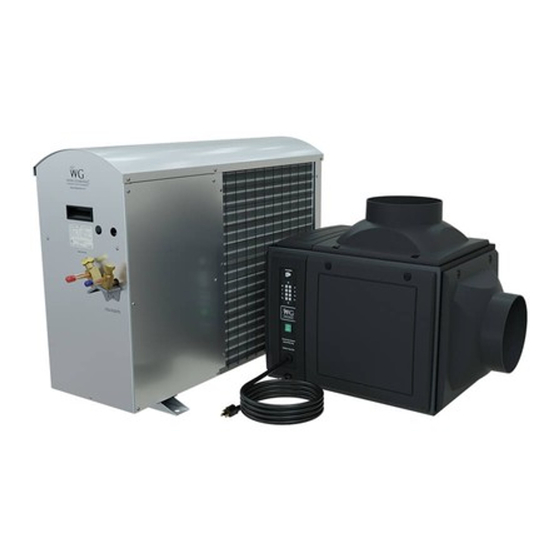
- Page 4 2. Installing the Fan Coil Wine Guardian split system fan coil units should be installed indoors located near the wine room. Provide a three-foot clearance around the unit for installation and future maintenance. The fan coil unit can be located either above, or below the condensing unit in height.
- Page 5 H. Connect RJ-9 cable to the back of the remote user interface and attach to the wall at the screw locations. Reconnect RJ-9 cable to side of the Wine Guardian unit at either COM1 or COM2. Note: For wireless installations or multiple...
- Page 6 Charge the system with the correct amount of refrigerant and mark the amount, with a permanent marker in the space provided on the unit nameplate. (See chart on below) See the full Wine Guardian Operations and installation manual for compre- hensive charging procedure, pressures, superheat, sub-cooling charts. MODEL...
- Page 7 DS050=59oz / 1.67kg (includes added charge required if an XLA system) WGS75=1.92kg (includes added charge required if an XLA system) **For each 1 foot, or 1 meter more or less than 25 feet / 7.62 meters piping, adjust total system refrigerant R134A charge from above baseline by .50 oz / .0465 kg”...
-
Page 8: Deutsch
Deutsch Montage des Split-Systems von Wine Guardian Dieses Dokument ist eine bildliche Anleitung für die Montage des Split-Systems von Wine Guardian. Diese Anleitung soll nicht die detaillierten Anweisungen des Installations-, Bedienungs- und Wartungshandbuchs (IBW) ersetzen, das wichtige Sicherheitsinformationen enthält, die alle Installateure und Besitzer für einen sicheren und optimalen Betrieb des Systems... - Page 9 - Einen (1) 18 cm langen, transparenten Plastik- Ablassschlauch (7“) 2. Montage des Gebläsekonvektors Gebläsekonvektoren des Wine Guardian Split-Systems sollten im Gebäude in der Nähe des Weinzimmers installiert werden. Stellen Sie sicher, dass um die Geräteeinheit herum, für die Installation und zukünftige Wartung, ein Abstand von einem Meter eingehalten wird.
- Page 10 Bodenmontage • Montieren Sie den Wine Guardian- Gebläsekonvektor auf einer Sperrholzplatte, mindestens 30 cm (12 Zoll) über dem Boden, damit dieser vor Wasser geschützt ist. Lassen Sie ausreichend Platz für das Routing und der Steigung des externen Abflusses. Bodenmontage Wandmontage •...
- Page 11 Remote-Schnittstelle an und befestigen Sie es an den Verschraubungen an der Wand. Verbinden Sie erneut das RJ-9-Kabel an der Seite der Wine Guardian-Einheit entweder mit COM1 oder COM2 . Hinweis: Informationen zu kabellosen Installationen oder mehreren Remote-Schnittstellen finden Sie im ausführlichen Handbuch unter wineguardian.com/...
- Page 12 Vakuum mit dem Kältemittel. Befüllen Sie das System mit der richtigen Menge an Kältemittel und markieren Sie den Wert mit einem Permanent- marker in dem auf dem Typenschild des Gerätes vorgesehenen Platz. (siehe Grafik unten). Siehe die vollständige Wine Guardian Betriebs- und Montageanleitung für mehr Informationen. MODELL FLÜSSIGKEITSLEITUNG...
- Page 13 DS050=59 oz / 1,67 kg (einschließlich zusätzlicher Füllung, die für ein XLA-System erforderlich ist) WGS75=1,92 kg (einschließlich zusätzlicher Füllung, die für ein XLA-System erforderlich ist) *Passen Sie für jede Rohrleitung, die 1 Fuß oder 1 Meter mehr oder weniger als 7,62 m lang ist, die Gesamtfüllmenge des Kältemittels R134A entsprechend der obigen Basisleitung um 0,50...
-
Page 14: Español
Español Sistema Split de Wine Guardian Este documento es una guía con imágenes para la instalación del sistema Split de Wine Guardian. Esta guía no reemplaza las instrucciones ampliadas que se pueden encontrar en el manual de instalación, operación y mantenimiento (IOM) - Page 15 Humidificación—Integral o Independiente Ideal para aportar humedad a su bodega. Sensores remotos de Temperatura/Humedad Sensores y control para varias localizaciones (máximo de tres) en su bodega. Ideal para bodegas con una configuración difícil y para aplicaciones en bodegas con varias salas. Conexiones de conductos tipo collar Los conjuntos de conductos y de conductos tipo collar de Air Innovations están específicamente diseñados...
- Page 16 Montaje en el suelo • Monte la bobina del ventilador Wine Guardian en una superficie de madera contrachapada al menos 12 pulgadas por encima del suelo para que no entre en contacto con el agua. Deje un espacio adecuado para el enrutamiento e inclinación del drenaje externo.
- Page 17 I. Vuelva a conectar el cable RJ-9 en el lateral de la unidad Wine Guardian ya sea a COM1 o COM2. Nota: Para instalaciones inalámbricas o múltiples interfaces remotas, consulte la versión completa del manual que se encuentra en wineguardian.com/manuals...
- Page 18 (Consulte la tabla más debajo) Consulte el Manual de Operaciones completo de Wine Guardian y el manual de instalación para ver más información detallada sobre el procedimiento de carga.
- Page 19 DS050= 59 oz/1,67 kg (incluye la carga adicional necesaria si es un sistema XLA) WGS75= 1,92 kg (incluye la carga adicional necesaria si es un sistema XLA) ** Por cada 1 pie o 1 metro más o menos de tubería de 25 pies/7,62 metros, ajuste la carga total de refrigerante R134A del sistema a partir de la línea de base anterior...
-
Page 20: Français
Français Système Split Wine Guardian Ce document est un guide illustré pour l’installation de votre cli- matiseur Split Wine Guardian. Il n’est pas destiné à remplacer les instructions détaillées du manuel d’installation, d’utilisation et d’entretien, lequel comprend d’importants messages de sécurité... - Page 21 Branchement des conduits de ventilation Les embouts de conduit et kits de ventilation Air Innovations sont conçus spécialement pour être directement branchés à l’unité Wine Guardian sans perçage ou taraudage supplémentaire. Le kit contient des embouts de conduit, des conduits de ventilation flexibles, des attaches et des fixations.
- Page 22 Montage au sol Montage au sol • Monter le ventilo-convecteur Wine Guardian sur une surface en contreplaqué, au moins 30 cm au- dessus du sol afin qu'il soit à l’abri de l’eau. Laisser un espace suffisant pour le montage et le cheminement de la conduite d’évacuation externe.
- Page 23 4. Évacuation du condensat Les systèmes de conduits de Wine Guardian sont fournis avec un tube transparent de 2 m (7 pieds) et de 13 mm (1/2 pouce) de diamètre intérieur. REMARQUE : Les appareils Wine Guardian sont dotés d’un purgeur.
- Page 24 (Voir tableau ci- dessous). Voir le manuel d'installation et d'utilisation complet de Wine Guardian pour plus de détails sur la procédure de chargement. MODÈLES...
- Page 25 WGS40 = 1,75 kg (comprend la charge supplémentaire requise s’il s’agit d’un système XLA) DS050 = 59 oz / 1,67 kg (comprend la charge supplémentaire requise s’il s’agit d’un système XLA) WGS75 = 1,92 kg (comprend la charge supplémentaire requise s’il s’agit d’un système XLA) * Pour chaque tuyauterie de 1 pied ou 1 mètre de plus ou moins de 25 pieds / 7,62 mètres, ajus-...
- Page 26 Chinese Wine Guardian 分体式系统 本文件是 分体式系统的图解安装指南。该指 Wine Guardian 南不能代替 安装、操作和维护 (IOM) 手册中的详细说 明,那里面有安装人员和所有者为确保安全并实现系统最优 性能而应遵守的所有重要的安全信息。 完整的 手册请浏览 wineguardian.com 资源与手册页面。 如有 Wine Guardian TTW 系统相关的其它问题,请联系您 的授权 分销商或当地 办事 Wine Guardian Wine Guardian 处。 请填写 拆分系统启动清单,该清单可通过从我们的网站 下载适用于您的模型拆分系统的完整安装,操作和维护手册 来找到。...
- Page 27 加湿——集成或单机式 酒窖加湿的理想选择 温度/湿度远程传感器 感知和控制您房间内的多个地点(最多三个) 适合不规则房间或多房间应用 风道箍环连接 Air Innovations风道箍环和风道组件包经专业 设计,直接与WG单元相连,无需额外钻孔。 组件包包括风道箍环、柔性管、绑扎带和紧固 件。 1. 拆包 将设备从箱内移出。检查是否有暗藏的损坏迹象,是否 所有可选的设备都已经提供。如果部件丢失或设备在运 输中受到损坏,立即联系Air Innovations。 装运设备包括: 一(1)台风机盘管制冷单元 一(1)台冷凝单元 一(1)台远程接口控制器(带50'控制电缆) 一(1)根 7’透明塑料排水软管...
- Page 28 2.安装风机盘管制冷机 Wine Guardian分体式系统风机盘管制冷单元应安装在酒窖 附近的室内。设备周围留有 三英尺的间隙,便于安装和以后的维护。风机盘管制冷单 元可以位于冷凝设备上方, 也可位于下方。高度间隙最大15’ (4.57米)。 落地安装 落地安装 • 将Wine Guardian fan安装在胶合板上,离地间隙12 英寸,注意防水。留足空间,用于外部排水的排走。 壁挂式安装 • 设备两端要有足够的支撑, 以承受系统的重量。通过 壁挂式安装 在墙上固定角钢支撑,构筑一个结构足够坚固的平 台。 吊顶式安装 • 吊顶安装时,构筑一个结构足够坚固的平台,以便固 定设备。系统的设计不是通过顶部悬挂,而是通过底 部 支撑。 吊顶式安装 3. 恒温器接线 设备随附 50 英尺(15 米)长的电缆,带有可连接至 远程接口控制器 RJ-9 型连接器。 将远程用户终端放在室内通风良好,远离窗户或热源 的墙上中间点上。...
- Page 29 3.恒温器接线 ——续 E. 卸下控制器的背板,并在所需位置标记安装点。 钻两个1/8” (3毫米)的孔,将锚钉插入安装表面。如果固定在墙 柱或墙架上,可能不需要锚钉。将螺钉插入锚钉中,并测试背面安装板的 匹配情况。紧固/松开螺钉以调整匹配度。 G. 将前盖板拧入背板上的适当位置,重新安装前盖板。 将RJ-9电缆连接到远程用户界面的背面,并使用螺钉固定在墙 上。 将RJ-9电缆插入COM1或COM2,重新连接到Wine Guardian设备的侧面。 注意:有关无线安装或多个远程接口的信息,请参阅 wineguardian.com/manuals 上的完整版手册 4.冷凝排水 A. Wine Guardian管道系统内部提供有7英尺(2 米)的 ½” (13 mm)透明管。 注意: 设备配有内部集水器。不要再设置集 Wine Guardian 水器管道。如未能遵守,可能会导致漏水,以及损坏周围 安装管道。管道斜度按照直线每英尺长度为¼ ( 直 1.25 cm/ 线米)。 5. 管道系统安装 分体式设备配有一(1)个送风箍环和一(1)个回风 箍环,作为标准设备。...
- Page 30 液体线路(OD) 吸入线路 (OD) DS025 / WGS40 1/4 英寸/ 0.635 厘米 3/8 英寸 / 0.952 厘米 DS050 / WGS75 1/4 英寸/ 0.635 厘米 1/2 英寸 / 1.27 厘米 DS088 / WGS100 3/8 英寸 / 0.952 厘米 5/8 英寸 / 1.59 厘米...
- Page 31 DS050=59盎司/1.67千克(包括XLA系统所需的额外费用) WGS75=1.92千克(包括XLA系统所需的额外费用) **对于每1英尺或每1米25英尺/7.62米以上或以下的管道,将总系统制冷剂R134A充注量从 基线以上调整0.50盎司/0.0465千克。” 对于系统:DS088/WGS100、DS200/WGS175: 对于25英尺/7.62米的典型基线互连管线组,以下是按型号列出的建议工厂系统总制冷剂充 注量: DS088=111盎司/3.14千克(包括XLA系统所需的额外费用) WGS100=3.18千克(包括XLA系统所需的额外费用) DS200=114盎司/3.23千克(包括XLA系统所需的额外费用) WGS175= 3.29千克(包括XLA系统所需的额外费用) **对于每1英尺或每1米25英尺/7.62米以上或以下的管道,将总系统制冷剂R134A充注量从 基线以上调整1盎司/0.093千克。” 7. 将设备连接到电源上 将电源与图示冷凝设备中的触点相连接。 采用24伏低压信号接线,连接风机盘管上的Y和C端口与冷 凝器外壳上的Y和C端口(如左图所示)。 系统启动前24小时,开启冷凝单元电源,让曲轴箱加热器 加热压缩机。 *完整接线图,请查看手册第21页。冷凝设备内部也有接线图。 8. 启动装置。 将断路开关拨到ON(开启)位置。设备开启时,LED灯显示 绿色。远程用户终端预置为室温55°F (13°C)。 按一下向上箭头。显示器会显示现有的目标温度。按“上 下”箭头 按钮,将温度调整到想要的设定值。 系统会在5分钟后启动,冷风段开始送冷风。如果系统无法 启动,请联系Air Innovations。...
- Page 32 Pycckий Сплит-система Wine Guardian Этот документ представляет собой иллюстрированное руководство по установке сплит-системы Wine Guardian Split system. Он не предназначен для замены подробных инструкций, приведенных в руководстве по установке, эксплуатации и техническому обслуживанию , обязательную для соблюдения монтажниками и владельцами в целях...
- Page 33 Увлажнение: Встроенный или отдельный модуль Идеально подходит для повышения влажности в винном погребе. Удаленные датчики температуры / влажности Контроль нескольких мест (максимум трех) на одном объекте. Идеально подходит для помещений сложной конфигурации или при наличии нескольких помещений. Патрубки воздуховодов Патрубки и комплекты воздуховодов Air Innovations специально...
- Page 34 разница в высоте не должна превышать 4, 57 м (15 футов). Монтаж на пол Монтаж на пол • Установите фанкойл Wine Guardian на фанерную поверхность на высоте не менее 30, 48 см (12 дюймов )от пола, чтобы исключить попадание воды. Оставьте достаточно места для прокладки ислива.
- Page 35 пользовательскому интерфейсу в задней панели и прикрепите к стене в местах расположения винтов. I. Подсоедините кабель RJ-9 к боковой стороне устройства Wine Guardian в порт COM1 или COM2. Примечание: для беспроводной установки или нескольких удаленных интерфейсов обратитесь к полной версии руководства, расположенной...
- Page 36 SS, DS и WGS поставляется с уже заправленным хладагентом на 16 унций / 0,453 кг. Для систем: SS018 / WGS25, DS025 / WGS40, DS050 / WGS75: Для типичного набора базовых линий межсоединения длиной 25 футов / 7,62м ниже приведены рекомендуемые заводские общие заправки...
- Page 37 SS018 = 51 унция / 1,45 кг; WGS25 = 1,53 кг; DS025 = 63 унции / 1,78 кг WGS40 = 1,75 кг; DS050 = 59 унций / 1,67 кг ; WGS75 = 1,92 кг ** Для каждого 1 фута или 1 м больше или меньше 25 футов / 7,62 м...
- Page 38 Fan Coil Supply duct collar (standard) Refrig conns. side COMM Ports (remote interface Multi-panel connections) design 24V control connect to condensing unit Humidifier control Condensate drain Remote Interface Power cord controller Condensing Unit Refrigerant Line High Pressure Connections Switch Condenser Coil Refrigerant Sight Glass...
-
Page 39: Pусский
Deustch J. Kältemittel-Leitungsanschlüsse A. Manschette für den Zuführungskanal (Standard) K. Kältemittel-Sichtglas B. Luftbefeuchter-Steueranschluss C. Multi-Panel-Design L. Kompressor D. 24V-Control an Kondensatoreinheit anschließen M. Hochdruckschalter E. Zwei (2) COMM-Anschlüsse N. Kondensator-Spule F. Kältemittelleitung an Kondensatoreinheit O. Außenhülle G. Kondensatablauf P. Hebegriffe H. - Page 40 Preserving it is Ours U. S. Headquarters 7000 Performance Drive North Syracuse, New York USA 13212 help.wineguardian.com wineguardian.com info@wineguardian.com European Office Wine Guardian GmbH Pestalozzistrasse 2 CH 8201 Schaffhausen Switzerland +41 52 224 0490 15H0322-00 Part No. Rev. A 08-2021...
Need help?
Do you have a question about the DS050 and is the answer not in the manual?
Questions and answers