Wine Guardian CS025 Quick Start Installation Manual
Wine wall ceiling system, wine cellar cooling units
Hide thumbs
Also See for CS025:
- Quick start installation manual (40 pages) ,
- Quick start manual (16 pages) ,
- Quick start installation manual (32 pages)
Advertisement
Quick Links
Wine Guardian®
Wine Wall Ceiling System Wine Cellar
Cooling Units
Models: CS025, CS050 (60Hz)
WGC40, WGC75 (50 Hz)
Quick Start Installation Guide
wineguardian.com
USA + 1 315-452-7400 | Europe + 41 52 224 0490
info@wineguardian.com
15H0428-00 Rev C 07/2024
Part #
1
Advertisement

Related Manuals for Wine Guardian CS025


Summary of Contents for Wine Guardian CS025
- Page 1 Wine Guardian® Wine Wall Ceiling System Wine Cellar Cooling Units Models: CS025, CS050 (60Hz) WGC40, WGC75 (50 Hz) Quick Start Installation Guide wineguardian.com USA + 1 315-452-7400 | Europe + 41 52 224 0490 info@wineguardian.com 15H0428-00 Rev C 07/2024 Part #...
- Page 2 Wine Guardian Ceiling System This document is a pictorial guide for installing the Wine Guardian Ceiling system. It is not intended to replace the detailed instructions found in the Installation, Operation and Maintenance (IOM) manual, which includes important safety messages all installers and owners should follow for safe and optimal performance of the system.
- Page 3 Unpackage Remove unit from box. Check for any signs of concealed damage, and that all optional equipment has been provided. Contact Wine Guardian immediately if components are missing or/if unit has been damaged in shipping. Shipment includes: - One (1) Wine Wall Fan-coil unit...
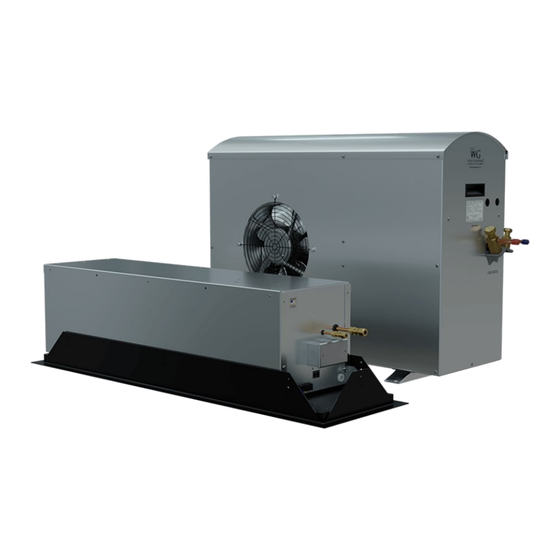
- Page 4 2. Installing the Fan-Coil Decide where the unit will be mounted, consider the supply/return orientation so that cold air supply is not directed at windows or glass panels and to ensure the Fig. 1 utilities can be connected to the correct side of the unit. The Wine Wall Ceiling system consists of a Fan-coil unit, a mounting flange, and a diffuser.
- Page 5 Swing the fan-coil chassis up into place and secure to the mounting flange at utility connection end using the ¼” hex head screws provided with the unit. Please note the connection points are slotted for adjustment of the fan-coil up or down as needed to create a flush, level installation.
- Page 6 Fan Coil A. Suction Line B. Liquid Line C. Optional Humidifier G. Junction Box for D. Drain Line E. RJ9 Control Cable Primary Power Connection F. 24-volt Connection to Condensing Unit H. Supply Air Section I. Controls & Pump Section J.
- Page 7 Condensing unit 24 Volt terminals Primary Power contactor Refrigerant Line Connections Refrigerant Sight Glass Compressor High Pressure Condenser Switch Coil...
- Page 8 Installing Thermostat (Wired) Remove the comm cable from the zip lock bag and attach it to the side of the Wine Guardian unit (Fig. 1) A.) Route the communication cable within the wall and/or ceiling structure of the wine cellar to the desired controller mounting location.
- Page 9 (See chart on below) See the full Wine Guardian Operations and installation manual for comprehensive charging procedure. At www.wineguardian.com. Includes charts for system Pressures, Superheat, and Sub-cooling.
- Page 10 That Must Required add for Be Added Present option 60Hz Models SS018 47 oz 16 oz 31 oz 4 oz CS025 58 oz 16 oz 42 oz 4 oz DS025 59 oz 16 oz 43 oz 4 oz CS050 66 oz...
-
Page 11: Warranty
Warranty The Wine Guardian unit serial number is noted on all pack- ing lists and bills of lading and, along with shipping date, is kept on file at Wine Guardian for warranty purposes. All correspondence regarding warranty must include the model number and serial number of the unit involved. -
Page 12: European Office
Preserving it is Ours U. S. Headquarters 7000 Performance Drive North Syracuse, New York USA 13212 +1 315-452-7400 wineguardian.com info@wineguardian.com European Office Wine Guardian GmbH Pestalozzistrasse 2 CH 8201 Schaffhausen Switzerland +41 52 224 0490 5H0428-00 Rev C 07/2024 Part No.
Need help?
Do you have a question about the CS025 and is the answer not in the manual?
Questions and answers