Table of Contents
Advertisement
Quick Links
SMART ARM-based MCUs
SAM C21 Xplained Pro
USER GUIDE
Preface
®
The Atmel
SAM C21 Xplained Pro evaluation kit is a hardware platform to
evaluate the Atmel ATSAMC21J18A microcontroller.
Supported by the Atmel Studio integrated development platform, the kit
provides easy access to the features of the ATSAMC21J18A and explains
how to integrate the device in a custom design.
The Xplained Pro MCU series evaluation kits include an on-board
Embedded Debugger, and no external tools are necessary to program or
debug the ATSAMC21J18A.
The Xplained Pro extension series evaluation kits offers additional
peripherals to extend the features of the board and ease the development of
custom designs.
Atmel-42460C-SAM C21 Xplained Pro_User Guide-10/2015
Arrow.com.
Downloaded from
Advertisement
Table of Contents

Related Manuals for Atmel SAM C21 Xplained Pro


Summary of Contents for Atmel SAM C21 Xplained Pro
-
Page 1: Preface
Preface ® The Atmel SAM C21 Xplained Pro evaluation kit is a hardware platform to evaluate the Atmel ATSAMC21J18A microcontroller. Supported by the Atmel Studio integrated development platform, the kit provides easy access to the features of the ATSAMC21J18A and explains how to integrate the device in a custom design. -
Page 2: Table Of Contents
4.5.3. Atmel Data Gateway Interface..................30 5. Appendix........................32 5.1. Getting Started with IAR......................32 5.2. Connecting a SAM-ICE to an Xplained Pro Board..............35 Atmel SAM C21 Xplained Pro [USER GUIDE] Atmel-42460C-SAM C21 Xplained Pro_User Guide-10/2015 Arrow.com. Arrow.com. Downloaded from Downloaded from... - Page 3 The QTouch Button PAD is not Connected..............42 6.4.2. Kit Does Not Work with 3.3V Target Voltage Selected..........42 7. Document Revision History..................43 8. Evaluation Board/kit Important Notice..............44 Atmel SAM C21 Xplained Pro [USER GUIDE] Atmel-42460C-SAM C21 Xplained Pro_User Guide-10/2015 Arrow.com. Arrow.com. Arrow.com.
-
Page 4: Introduction
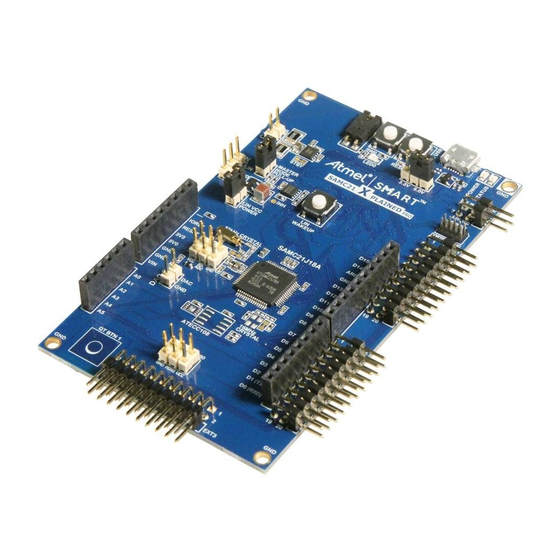
Supported with application examples in Atmel Software Framework 1.2. Kit Overview The Atmel SAM C21 Xplained Pro evaluation kit is a hardware platform to evaluate the Atmel ATSAMC21J18A. The kit offers a set of features that enables the ATSAMC21J18A user to get started with the SAM C peripherals right away and to get an understanding of how to integrate the device in their own design. - Page 5 Figure 1-1 SAM C21 Xplained Pro Evaluation Kit Overview Atmel SAM C21 Xplained Pro [USER GUIDE] Atmel-42460C-SAM C21 Xplained Pro_User Guide-10/2015 Arrow.com. Arrow.com. Arrow.com. Arrow.com. Arrow.com. Downloaded from Downloaded from Downloaded from Downloaded from Downloaded from...
-
Page 6: Getting Started
, Windows 7, and Windows 8. Once the Xplained Pro MCU board is powered the green power LED will be lit and Atmel Studio will auto detect which Xplained Pro MCU- and extension board(s) are connected. Atmel Studio will present relevant information like datasheets and kit documentation. -
Page 7: Xplained Pro
Atmel Data Visualizer is used to send and receive data through DGI. The EDBG controls two LEDs on SAM C21 Xplained Pro; a power LED and a status LED. Table 3-1 EDBG LED Control on page 7 shows how the LEDs are controlled in different operation modes. -
Page 8: Hardware Identification System
When an Xplained Pro extension is connected to an Xplained Pro MCU board the information is read and sent to Atmel Studio. The Atmel Kits extension, installed with Atmel Studio, will give relevant information, code examples, and links to relevant documents. -
Page 9: Xplained Pro Headers And Connectors
Transmitter line of target device UART SPI_SS_A Slave select for SPI. Should preferably be unique. SPI_MOSI Master out slave in line of serial peripheral interface. Always implemented, bus type. Atmel SAM C21 Xplained Pro [USER GUIDE] Atmel-42460C-SAM C21 Xplained Pro_User Guide-10/2015 Arrow.com. Arrow.com. Arrow.com. Arrow.com. -
Page 10: Xplained Pro Power Header
Xplained Pro Power Header The power header can be used to connect external power to the SAM C21 Xplained Pro kit. The kit will automatically detect and switch to any external power if supplied. The power header can also be used as supply for external peripherals or extension boards. -
Page 11: Hardware Users Guide
ATSAMC21J18A, on-board peripherals, and connectors. Caution: As the SAM C21 Xplained Pro can be powered by 5.0V care must be taken not to connect any Xplained Pro extensions that does not support this voltage, doing so may result in permanent damage. -
Page 12: Connectors
C21 Xplained Pro Connector Overview on page 12 shows all available connectors and jumpers on SAM C21 Xplained Pro. Figure 4-2 SAM C21 Xplained Pro Connector Overview Atmel SAM C21 Xplained Pro [USER GUIDE] Atmel-42460C-SAM C21 Xplained Pro_User Guide-10/2015 Arrow.com. -
Page 13: Xplained Pro Extension Headers
4.2.1. Xplained Pro Extension Headers The SAM C21 Xplained Pro headers EXT1, EXT2, and EXT3 offers access to the I/O of the microcontroller in order to expand the board e.g. by connecting extensions to the board. These headers are based on the standard extension header specified in Xplained Pro Standard Extension Header page 9. - Page 14 18 [SPI_SCK] PB01 SERCOM5 PAD[3] SPI SCK EXT3, Shield, Shield(2), and EDBG SPI 19 [GND] Ground. 20 [VCC] Power for extension board. Atmel SAM C21 Xplained Pro [USER GUIDE] Atmel-42460C-SAM C21 Xplained Pro_User Guide-10/2015 Arrow.com. Arrow.com. Arrow.com. Arrow.com. Arrow.com. Arrow.com.
-
Page 15: Arduino Connectors
Ground. 20 [VCC] Power for extension board. 4.2.2. Arduino Connectors SAM C21 Xplained Pro implements Arduino shield connectors based on the Arduino Uno. All references to Arduino pin names are taken from the official Arduino schematics of the Arduino Uno. - Page 16 Caution: The target section of SAM C21 Xplained Pro can be powered by 3.3V or 5.0V. The maximum voltage the I/O pins can tolerate depends on the supply voltage. Providing higher voltages like 5V to an I/O pin when the ATSAMC21J18A is powered by 3.3V could damage the board.
-
Page 17: Vcc Selection Header
4.2.3. VCC Selection Header The SAM C21 Xplained Pro has a 3-pin header labeled VCC_SEL on the board. This header can be used to select between 3.3V and 5.0V as the supply voltage for the ATSAMC21J18A, peripherals, and extension headers by placing a jumper on pin 1-2 or pin 2-3. Selecting 5.0V will supply the kit directly from the USB or an external 5.0V source. -
Page 18: Vref Header
VREF Header SAM C21 Xplained Pro has a 6-pin header labeled VREF on the board. This header can be used to select / apply a voltage reference to the ADC, DAC, and SDADC. Jumpers can be used to tie SADC VREF and ADC/DAC VREFT to the kit target voltage from pin 1-3 and 2-4, or external voltages can be applied across pin 3-5 and 4-6. -
Page 19: Peripherals
4.3. Peripherals 4.3.1. There is one yellow LED available on the SAM C21 Xplained Pro board that can be turned on and off. The LED is activated by driving the connected I/O line to low. Table 4-13 LED Connection SAM C21 pin... -
Page 20: Can
An ATA663211 LIN transceiver is mounted on the kit to convert the LIN signals from the SERCOM module in the SAM C21 device. The LIN compatible signals are available at a 3-pin header. Atmel SAM C21 Xplained Pro [USER GUIDE] Atmel-42460C-SAM C21 Xplained Pro_User Guide-10/2015 Arrow.com. -
Page 21: Qtouch Button
4.3.6. QTouch Button There is one self capacitance button available on the SAM C21 Xplained Pro board that can be used as I/O. This QTouch button is intended to be driven by the built-in Peripheral Touch Controller (PTC) of the device. -
Page 22: Kit Modifications
VCC_TARGET_P3V3 PADDLE 4.4. Kit Modifications SAM C21 Xplained Pro has several resistors and jumpers that can be removed/cut to disconnect I/O pins of the ATSAMC21J18A from connectors and on-board ICs and to disconnect/measure power to different sections. Table 4-25 Resistors Designator... - Page 23 R621 PA28 EDBG GPIO3 R800 RESETN Arduino shield RESET Remove to disconnect the reset system from the Arduino shield connectors Atmel SAM C21 Xplained Pro [USER GUIDE] Atmel-42460C-SAM C21 Xplained Pro_User Guide-10/2015 Arrow.com. Arrow.com. Arrow.com. Arrow.com. Arrow.com. Arrow.com. Arrow.com. Arrow.com.
- Page 24 Figure 4-3 Resistors Top Atmel SAM C21 Xplained Pro [USER GUIDE] Atmel-42460C-SAM C21 Xplained Pro_User Guide-10/2015 Arrow.com. Arrow.com. Arrow.com. Arrow.com. Arrow.com. Arrow.com. Arrow.com. Arrow.com. Arrow.com. Arrow.com. Arrow.com. Arrow.com. Arrow.com. Arrow.com. Arrow.com. Arrow.com. Arrow.com. Arrow.com. Arrow.com. Arrow.com. Arrow.com. Arrow.com. Arrow.com. Arrow.com. Downloaded from...
- Page 25 Figure 4-4 Resistors Bottom Atmel SAM C21 Xplained Pro [USER GUIDE] Atmel-42460C-SAM C21 Xplained Pro_User Guide-10/2015 Arrow.com. Arrow.com. Arrow.com. Arrow.com. Arrow.com. Arrow.com. Arrow.com. Arrow.com. Arrow.com. Arrow.com. Arrow.com. Arrow.com. Arrow.com. Arrow.com. Arrow.com. Arrow.com. Arrow.com. Arrow.com. Arrow.com. Arrow.com. Arrow.com. Arrow.com. Arrow.com. Arrow.com. Arrow.com.
- Page 26 Pull-up resistor to VS Mount this jumper voltage (JS501) to set the LIN transceiver as Master node. Default setting in production is mounted. Atmel SAM C21 Xplained Pro [USER GUIDE] Atmel-42460C-SAM C21 Xplained Pro_User Guide-10/2015 Arrow.com. Arrow.com. Arrow.com. Arrow.com. Arrow.com.
- Page 27 J504 CAN device, Standby Cut this jumper to explore the standby functionality of the CAN transceiver (ATA6561). The footprint is 0603 sized. Atmel SAM C21 Xplained Pro [USER GUIDE] Atmel-42460C-SAM C21 Xplained Pro_User Guide-10/2015 Arrow.com. Arrow.com. Arrow.com. Arrow.com. Arrow.com. Arrow.com.
- Page 28 Figure 4-5 Jumpers Top Atmel SAM C21 Xplained Pro [USER GUIDE] Atmel-42460C-SAM C21 Xplained Pro_User Guide-10/2015 Arrow.com. Arrow.com. Arrow.com. Arrow.com. Arrow.com. Arrow.com. Arrow.com. Arrow.com. Arrow.com. Arrow.com. Arrow.com. Arrow.com. Arrow.com. Arrow.com. Arrow.com. Arrow.com. Arrow.com. Arrow.com. Arrow.com. Arrow.com. Arrow.com. Arrow.com. Arrow.com. Arrow.com. Arrow.com.
-
Page 29: Embedded Debugger Implementation
ATSAMC21J18A using Serial Wire Debug (SWD). The Embedded Debugger also include a Virtual Com port interface over UART, an Atmel Data Gateway Interface over SPI, and TWI and it includes four of the SAM C21 GPIOs. Atmel Studio can be used as a front end for the Embedded Debugger. -
Page 30: Serial Wire Debug
Atmel Data Gateway Interface The Embedded Debugger features an Atmel Data Gateway Interface (DGI) by using either an SPI or I²C. The DGI can be used to send a variety of data from the ATSAMC21J18A to the host PC. For further... - Page 31 PB12 GPIO0 Shield EXT1 PB16 GPIO1 EXT2 PB17 GPIO2 EXT2 PA28 GPIO3 User Button EXT3 Atmel SAM C21 Xplained Pro [USER GUIDE] Atmel-42460C-SAM C21 Xplained Pro_User Guide-10/2015 Arrow.com. Arrow.com. Arrow.com. Arrow.com. Arrow.com. Arrow.com. Arrow.com. Arrow.com. Arrow.com. Arrow.com. Arrow.com. Arrow.com. Arrow.com.
-
Page 32: Appendix
In the category Debugger > CMSIS DAP, select the JTAG/SWD tab. Select SWD as the interface and optionally select the SWD speed. Figure 5-1 Select Target Device Atmel SAM C21 Xplained Pro [USER GUIDE] Atmel-42460C-SAM C21 Xplained Pro_User Guide-10/2015 Arrow.com. Arrow.com. - Page 33 Figure 5-2 Select Debugger Figure 5-3 Configure Flash Loader Atmel SAM C21 Xplained Pro [USER GUIDE] Atmel-42460C-SAM C21 Xplained Pro_User Guide-10/2015 Arrow.com. Arrow.com. Arrow.com. Arrow.com. Arrow.com. Arrow.com. Arrow.com. Arrow.com. Arrow.com. Arrow.com. Arrow.com. Arrow.com. Arrow.com. Arrow.com. Arrow.com. Arrow.com. Arrow.com. Arrow.com. Arrow.com. Arrow.com. Arrow.com.
- Page 34 Figure 5-4 Configure Reset Figure 5-5 Configure Interface Atmel SAM C21 Xplained Pro [USER GUIDE] Atmel-42460C-SAM C21 Xplained Pro_User Guide-10/2015 Arrow.com. Arrow.com. Arrow.com. Arrow.com. Arrow.com. Arrow.com. Arrow.com. Arrow.com. Arrow.com. Arrow.com. Arrow.com. Arrow.com. Arrow.com. Arrow.com. Arrow.com. Arrow.com. Arrow.com. Arrow.com. Arrow.com. Arrow.com. Arrow.com. Arrow.com.
-
Page 35: Connecting A Sam-Ice To An Xplained Pro Board
Cortex Debug Connector. You can connect the SAM-ICE to the debug connector on an Xplained Pro using either an Atmel-ICE adapter, SAM-ICE adapter, or a 10-pin 50-mil header to squid cable. When using a squid cable, see the table and figure below for how to connect the SAM-ICE to the Xplained Pro board. - Page 36 USB. Physically removing the connection between the EDBG and the debug header by removing 0Ω resistors, where available, or cutting the tracks to the EDBG can also be done. Atmel SAM C21 Xplained Pro [USER GUIDE] Atmel-42460C-SAM C21 Xplained Pro_User Guide-10/2015 Arrow.com.
-
Page 37: Hardware Revision History And Known Issues
6.1. Identifying Product ID and Revision The revision and product identifier of Xplained Pro boards can be found in two ways; either through Atmel Studio or by looking at the sticker on the bottom side of the PCB. By connecting an Xplained Pro MCU board to a computer with Atmel Studio running, an information window will pop up. - Page 38 Power source ON / OFF Power Switch Power switch VCC_MCU Jumper VCC_TARGET Power converter Power consumer SAMC21J18 Peripherals Atmel SAM C21 Xplained Pro [USER GUIDE] Atmel-42460C-SAM C21 Xplained Pro_User Guide-10/2015 Arrow.com. Arrow.com. Arrow.com. Arrow.com. Arrow.com. Arrow.com. Arrow.com. Arrow.com. Arrow.com. Arrow.com.
- Page 39 Figure 6-2 Revision 2 and 3 Connector Block Diagram Atmel SAM C21 Xplained Pro [USER GUIDE] Atmel-42460C-SAM C21 Xplained Pro_User Guide-10/2015 Arrow.com. Arrow.com. Arrow.com. Arrow.com. Arrow.com. Arrow.com. Arrow.com. Arrow.com. Arrow.com. Arrow.com. Arrow.com. Arrow.com. Arrow.com. Arrow.com. Arrow.com. Arrow.com. Arrow.com. Arrow.com. Arrow.com. Arrow.com.
- Page 40 Figure 6-3 Revision 2 and 3 Top Side Resistor Overview Atmel SAM C21 Xplained Pro [USER GUIDE] Atmel-42460C-SAM C21 Xplained Pro_User Guide-10/2015 Arrow.com. Arrow.com. Arrow.com. Arrow.com. Arrow.com. Arrow.com. Arrow.com. Arrow.com. Arrow.com. Arrow.com. Arrow.com. Arrow.com. Arrow.com. Arrow.com. Arrow.com. Arrow.com. Arrow.com. Arrow.com. Arrow.com.
- Page 41 The QTouch Button PAD is not Connected on page 42 Kit Does Not Work with 3.3V Target Voltage Selected on page 42 Revision 3 on page 42 Atmel SAM C21 Xplained Pro [USER GUIDE] Atmel-42460C-SAM C21 Xplained Pro_User Guide-10/2015 Arrow.com. Arrow.com. Arrow.com. Arrow.com.
-
Page 42: Revision 3
EXT1, EXT2, and EXT3. Make sure that connected extensions supports the selected target voltage. Related Links Revision 5 on page 37 Atmel SAM C21 Xplained Pro [USER GUIDE] Atmel-42460C-SAM C21 Xplained Pro_User Guide-10/2015 Arrow.com. Arrow.com. Arrow.com. -
Page 43: Document Revision History
10/2015 Fix broken link and updated with kit revision 5 42460B 07/2015 Updated with kit revision 3 42460A 05/2015 Initial document release Atmel SAM C21 Xplained Pro [USER GUIDE] Atmel-42460C-SAM C21 Xplained Pro_User Guide-10/2015 Arrow.com. Arrow.com. Arrow.com. Arrow.com. Arrow.com. Arrow.com. -
Page 44: Evaluation Board/Kit Important Notice
(WEEE), FCC, CE or UL (except as may be otherwise noted on the board/kit). Atmel supplied this board/kit "AS IS," without any warranties, with all faults, at the buyer's and further users' sole risk. The user assumes all responsibility and liability for proper and safe handling of the goods. - Page 45 DISCLAIMER: The information in this document is provided in connection with Atmel products. No license, express or implied, by estoppel or otherwise, to any intellectual property right is granted by this document or in connection with the sale of Atmel products. EXCEPT AS SET FORTH IN THE ATMEL TERMS AND...
Need help?
Do you have a question about the SAM C21 Xplained Pro and is the answer not in the manual?
Questions and answers