
Related Manuals for Kramer WP-SW2-EN7


Summary of Contents for Kramer WP-SW2-EN7
- Page 1 USER MANUAL MODEL: WP-SW2-EN7 4K AVoIP Encoder P/N: 2900-301580 Rev 1 www.kramerav.com...
-
Page 2: Table Of Contents
Getting Started Overview Typical Applications Defining WP-SW2-EN7 Mounting WP-SW2-EN7 Connecting WP-SW2-EN7 Connecting to WP-SW2-EN7 via RS-232 Operating and Controlling WP-SW2-EN7 Configuring the Network Switch Configuring the WP-SW2-EN7 Operating via Ethernet Connecting Ethernet Port Directly to a PC Using WP-SW2-EN7 Embedded Web Pages... -
Page 3: Introduction
Kramer Electronics Ltd. Introduction Welcome to Kramer Electronics! Since 1981, Kramer Electronics has been providing a world of unique, creative, and affordable solutions to the vast range of problems that confront the video, audio, presentation, and broadcasting professional on a daily basis. In recent years, we... -
Page 4: Overview
European Advanced Recycling Network (EARN) and will cover any costs of treatment, recycling and recovery of waste Kramer Electronics branded equipment on arrival at the EARN facility. For details of Kramer’s recycling arrangements in your particular country go to our recycling pages at www.kramerav.com/il/quality/environment. -
Page 5: Typical Applications
• Selectable Inputs – 1 HDMI and 1 USB-C input. • Analog/embedded audio input. • Plug-and-play with Netgear M4250 AVoIP switches, Kramer Control, KDS-USB2, etc. Typical Applications WP-SW2-EN7 is ideal for the following typical applications: • Real-time essential installations such as command and control rooms. -
Page 6: Defining Wp-Sw2-En7
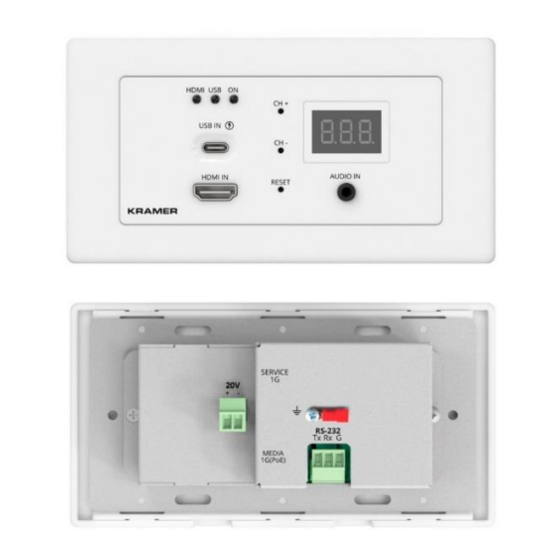
Kramer Electronics Ltd. Defining WP-SW2-EN7 Figure 1: WP-SW2-EN7 4K AVoIP Encoder WP-SW2-EN7 – Defining WP-SW2-EN7... - Page 7 All LEDs flash. On the US model, access to this button requires removal of the frame. Display Panel Shows the number of the channel used by WP-SW2-EN7 for streaming. AUDIO IN 3.5mm Connect to an audio source. Mini Jack LAN MEDIA Unicast: connect for streaming either directly to a decoder or via LAN.
-
Page 8: Mounting Wp-Sw2-En7
UK: 2 gang in-wall junction box (BS 4662), 135x75mm (W, H) and depth that can fit in both the device and the connected cables. EU/UK: 2 gang in-wall junction box (use the recommended Kramer in-wall box available at www.kramerav.com/product/WP-SW2-EN7). WP-SW2-EN7 – Mounting WP-SW2-EN7... -
Page 9: Connecting Wp-Sw2-En7
Always switch off the power to a device before connecting it to your WP-SW2-EN7. After connecting your devices, connect their power and then switch on the power to each device. -
Page 10: Connecting To Wp-Sw2-En7 Via Rs-232
5. On WP-DEC7, connect a mouse and a keyboard to the two USB type A ports. 6. Connect RS-232 3-pin terminal block connectors: ▪ On the WP-SW2-EN7, connect the RS-232 port to a laptop/controller. ▪ On the WP-DEC7, connect RS-232 to the display. -
Page 11: Operating And Controlling Wp-Sw2-En7
Before setting the system, make sure that your AV over IP network switch meets the following minimum requirements: • Support for PoE, if it is being used to power WP-SW2-EN7. • Jumbo Frames – On. (at least 8000 bytes). •... -
Page 12: Operating Via Ethernet
WP-SW2-EN7 to the Ethernet port to a network hub, switch or router using a straight-through cable with RJ-45 connectors. Make sure your PC is connected to the same LAN as the WP-SW2-EN7. By default, the WP-SW2-EN7 is DHCP-enabled. Make sure that there is a DHCP server in the network so the device can obtain a valid IP address. - Page 13 (TCP/IPv4) depending on the requirements of your IT system. 5. Click Properties. The Internet Protocol Properties window relevant to your IT system appears as shown in Figure 4 Figure Figure 4: Internet Protocol Version 4 Properties Window WP-SW2-EN7 – Operating and Controlling WP-SW2-EN7...
- Page 14 For TCP/IPv4 you can use any IP address in the range 192.168.1.1 to 192.168.1.255 (excluding 192.168.1.39) that is provided by your IT department. Figure 6: Internet Protocol Properties Window 7. Click OK. 8. Click Close. 9. Continue with Using WP-SW2-EN7 Embedded Web Pages on page 13. WP-SW2-EN7 – Operating and Controlling WP-SW2-EN7...
-
Page 15: Using Wp-Sw2-En7 Embedded Web Pages
2. Type the IP number of the device in the Address bar of your browser. For example, the default IP number: 3. If your device is password-protected, the Login window appears. Figure 7: Login Window WP-SW2-EN7 – Using WP-SW2-EN7 Embedded Web Pages... - Page 16 21. • Defining General Settings on page 22. • Defining Network Settings on page 25. • Defining an NTP Time and Date Server on page 28. • Setting WP-SW2-EN7 Security on page 29. WP-SW2-EN7 – Using WP-SW2-EN7 Embedded Web Pages...
-
Page 17: Setting Av Routing Parameters
Stream name is identical to Host name (see Defining General Settings on page 22) can include up to 24 characters; “-“ and “_” are allowed. The default name is the model name and MAC address connected by “-”. WP-SW2-EN7 – Using WP-SW2-EN7 Embedded Web Pages... -
Page 18: Defining Switching Mode
If you need to reboot the device after changing the switching mode, wait at least 30 seconds. Switching mode settings will be lost if the device is rebooted less than 30 seconds after the change. Auto switching mode is defined. WP-SW2-EN7 – Using WP-SW2-EN7 Embedded Web Pages... -
Page 19: Defining Signal Loss Timeouts
Signal Loss Switching Manual Override Delay – The length of time from manual override’s signal loss to the system switching to a different input (default 10). 3. Click SAVE. Signal loss timeouts are defined. WP-SW2-EN7 – Using WP-SW2-EN7 Embedded Web Pages... -
Page 20: Activating Hdcp Protection
▪ Maximum Video Frame Rate (%): use the slider to configure the maximum frame rate in proportion. 100% (default) means zero compression on the frame rate. 3. Click SAVE. HDCP protection is activated. WP-SW2-EN7 – Using WP-SW2-EN7 Embedded Web Pages... -
Page 21: Defining Audio Settings
HDMI or USB-C input. To define Audio settings: 1. Open the AV Settings page, Audio tab. Figure 14: AV Settings Page – Audio Tab WP-SW2-EN7 – Using WP-SW2-EN7 Embedded Web Pages... - Page 22 Last Connected or Priority modes. For example, if the active audio signal is lost (either becomes silent or is unplugged), after 10 seconds the second available audio source is automatically selected. 4. Click SAVE: Audio settings are updated. WP-SW2-EN7 – Using WP-SW2-EN7 Embedded Web Pages...
-
Page 23: Managing Edid
Custom: download the EDID file from an external source. To remove an EDID from the list: • Select an EDID file from the list. • Click REMOVE. To upload an EDID file: WP-SW2-EN7 – Using WP-SW2-EN7 Embedded Web Pages... -
Page 24: Defining General Settings
Changing the Device's Host Name To change the device's network ID (also known as the host name): 1. Open the General tab of the Device Setting page. Figure 16: Device Settings – General Tab WP-SW2-EN7 – Using WP-SW2-EN7 Embedded Web Pages... - Page 25 The Host Name has a maximum 24 characters and can include the special characters hyphen “-” and underscore “_”, but not at the start or end of the name. The default host name is WP-SW2-EN7-xxxxxxxxxxxx (“xxxxxxxxxxxx” = MAC address). Host name is changed.
- Page 26 2. Next to Device Reset: ▪ Click RESTART to reboot the device. ▪ Click RESET to restore default factory settings. 3. Refresh the page to see the new settings. Device is restarted / reset. WP-SW2-EN7 – Using WP-SW2-EN7 Embedded Web Pages...
-
Page 27: Defining Network Settings
Ethernet ports (SERVICE 1G and MEDIA 1G). By default, all network connections go to the MEDIA port with DHCP enabled and 802.1Q disabled. Figure 19: Ethernet Ports on the Rear of the WP-SW2-EN7 WP-SW2-EN7 can use the Service port (with a separate IP address) for P3K & Gateway traffic. - Page 28 If there is no valid DHCP server in the system, it will look for the random unique IP in the range of 169.254.X.Y. The allocated IP address is shown in the IP address field. WP-SW2-EN7 – Using WP-SW2-EN7 Embedded Web Pages...
- Page 29 The default values are TCP Port – 5000 and UDP Port – 50000. 3. Click SAVE. a RESTART Message appears (see Figure 21). Click RESTART to apply the change. TCP/UDP ports are managed. WP-SW2-EN7 – Using WP-SW2-EN7 Embedded Web Pages...
-
Page 30: Defining An Ntp Time And Date Server
2. Set NTP Time Server Usage to Yes. This enables the NTP fields. 3. Enter the NTP time server address and set a daily sync hour. 4. Click SAVE. The date and time are synchronized to the time server. WP-SW2-EN7 – Using WP-SW2-EN7 Embedded Web Pages... -
Page 31: Setting Wp-Sw2-En7 Security
1. Open the Device Settings page, Security tab. Figure 23: Device Settings Page – Security Tab 2. For HTTPS server, click On to enable HTTPS authentication service (default) or Off to disable HTTPS authentication. WP-SW2-EN7 – Using WP-SW2-EN7 Embedded Web Pages... - Page 32 “_” and “-“ characters within the username) and Password (up to 24 ASCII characters): Figure 25: Security Tab – EAP-MSCHAP V2 Authentication ▪ EAP-TLS – Enter a Username, click to upload the certificates and keys and enter the private key password (assigned by IT administrator). WP-SW2-EN7 – Using WP-SW2-EN7 Embedded Web Pages...
-
Page 33: Controlling User Access
Controlling User Access Device Settings, Users tab activates password-based device security and inactivity locking on the WP-SW2-EN7, preventing unauthorized access to the embedded web pages. The default password is admin (the user is always "admin"). By default, this security is disabled. - Page 34 2. Set Security Status to On (Off by default). The following message appears. Figure 28: Security Tab – Security Status 3. Click PROCEED and enter a password. The default user is "admin" and the default password is "admin". Security is enabled and access requires authentication. WP-SW2-EN7 – Using WP-SW2-EN7 Embedded Web Pages...
- Page 35 1. Open the Device Settings page, Security tab. 2. Set Security Status to On (this activates password use). By default, the device locks after 10 minutes. If necessary, enter a new time in minutes. WP-SW2-EN7 – Using WP-SW2-EN7 Embedded Web Pages...
-
Page 36: Defining Wp-Sw2-En7 Gateway Settings
Figure 30: Control > Settings Page – CEC Settings 2. Enable the CEC gateway. 3. Enter a CEC command in hex format, up to 32 hex digits. 4. Click SEND. 5. View the CEC-enabled device response. CEC Gateway is configured. WP-SW2-EN7 – Using WP-SW2-EN7 Embedded Web Pages... - Page 37 Kramer Electronics Ltd. Configuring RS-232 Settings Control systems connected by LAN to the WP-SW2-EN7, can transmit RS-232 commands to devices connected to the WP-SW2-EN7 RS-232 port. The RS-232 Gateway must be enabled for this feature. To set RS-232 Gateway: 1. Open the Control page, (default) Settings tab.
-
Page 38: Viewing Wp-Sw2-En7 Status
Off, when an input is not connected or there is no valid signal (gray circle). 5. View the LAN output status: ▪ On, when the LAN is transmitting a signal (green circle). ▪ Off, when the LAN has no signal output (gray circle). Device status is viewed. WP-SW2-EN7 – Using WP-SW2-EN7 Embedded Web Pages... -
Page 39: Viewing Wp-Sw2-En7 Connections Status
Kramer Electronics Ltd. Viewing WP-SW2-EN7 Connections Status View the IP addresses of the devices connected to the WP-SW2-EN7. To view Connections status: 1. Open the Diagnostics page, Connections tab. Figure 33: Diagnostics – Status Tab 2. View the active connections, including the communication protocol, client's IP address and port, and the device port. -
Page 40: Viewing The Wp-Sw2-En7 Logs
4. Click EXPORT to copy the system log to a (.txt) file. 5. View the Gateway Messages Counter to see a count of the RS-232 or CEC Messages. This shows the number of sent and received RS-232 and CEC messages. WP-SW2-EN7 – Using WP-SW2-EN7 Embedded Web Pages... -
Page 41: Viewing The About Page
Kramer Electronics Ltd. Viewing the About Page About page shows the device model name, the hardware version, the firmware version and the Kramer Electronics Ltd details. Figure 35: About Page WP-SW2-EN7 – Using WP-SW2-EN7 Embedded Web Pages... -
Page 42: Upgrading Firmware
Upgrade the firmware, view the date of the last upgrade, or rollback to the previous firmware revision in case of a problem. Click ROLLBACK to update to the previous FW version. If the device firmware version is lower than 0.6.3, contact Kramer tech support team at support@kramerav.com or go to our Web site at k.kramerav.com/support/downloads.asp. -
Page 43: Technical Specifications
5.4” x 2.95”) Net Weight EU version: 0.42kg (0.9lb) approx. US version: 0.44kg (0.97lb) approx. Shipping Weight EU version: 0.65 (1.4lb) approx. US version: 0.7 (1.5lb) approx. Specifications are subject to change without notice at www.kramerav.com WP-SW2-EN7 – Technical Specifications... -
Page 44: Default Communication Parameters
Red: (0.640, 0.330) Green: (0.300, 0.600) Blue: (0.150, 0.060) White: (0.313, 0.329) Established Timings I 640 x 480 @ 60Hz 800 x 600 @ 60Hz Established Timings II 1024 x 768 @ 60Hz Manufacturer's Timings: None WP-SW2-EN7 – Technical Specifications... - Page 45 SVD #007: (95) 3840x2160p @ 30 Hz 16:9 SVD #008: (94) 3840x2160p @ 25 Hz 16:9 SVD #009: (93) 3840x2160p @ 24 Hz 16:9 SVD #010: (100) 4096x2160p @ 30 Hz 256:135 SVD #011: (99) 4096x2160p @ 25 Hz 256:135 WP-SW2-EN7 – Technical Specifications...
- Page 46 HSync Delay: 70 HSync Width: 143 VSync Delay: 3 VSync Width: 3 Image size: 89 mm x 50 mm Border: 0 pixels x 0 lines Stereo mode: Normal display, no stereo Sync: Digital Separate, VSYNC+, HSYNC+ WP-SW2-EN7 – Technical Specifications...
-
Page 47: Default Parameters
IEE 802.1x Authentication Users Security Status Inactivity auto-logout time Control Settings CEC Gateway Enable RS-232 Gateway Enable RS-232 Port 5001 RS-232 Baud rate 115200 RS-232 Data Bits RS-232 Parity None RS-232 Stop Bits Diagnostics Advanced Active Syslog WP-SW2-EN7 – Technical Specifications... -
Page 48: Protocol 3000
Kramer Electronics Ltd. Protocol 3000 Kramer devices can be operated using Kramer Protocol 3000 commands sent via serial or Ethernet ports. Understanding Protocol 3000 Protocol 3000 commands are a sequence of ASCII letters, structured according to the following. • Command format:... -
Page 49: Protocol 3000 Commands
– Keep alive timeout in seconds (1 to 3600) com_id – Machine dependent (number of COM-ROUTE- Remove a communication route #COM-ROUTE-RE ~nn@COM-ROUTE-R Remove a communication REMOVE tunnel connection. MOVE EMOVE ports, only 1 accepted) route tunnel connection: com_id<CR> com_id<CR><LF> #COM-ROUTE-REMOVE 1<CR> WP-SW2-EN7 – Protocol 3000... - Page 50 IN 1 to Off: mode – HDCP mode: the device input: mode LF> #HDCP-MOD 1,0<CR> 0 – HDCP Off HDCP supported - HDCP_ON <CR> 1 – HDCP On [default]. HDCP not supported - HDCP OFF. WP-SW2-EN7 – Protocol 3000...
- Page 51 - Time to Live of the streamed packets. and TTL value group_ip,ttl<CR><LF> #KDS-MULTICAST?<CR> value – Streamer Decoder Aspect Ratio KDS-RATIO? Get aspect ratio. #KDS- ~nn@KDS-RATIO Get Aspect Ratio width:height, for example “16:9” RATIO?<CR> value<CR><LF> #KDS-RATIO?<CR> WP-SW2-EN7 – Protocol 3000...
- Page 52 1019=(Reserved) 1020=(Reserved) 1021=1280x768p@85Hz 1022=1280x800p@60Hz 1023=1280x800p@75Hz 1024=1280x800p@85Hz 1025=1280x800p@120Hz 1026=1280x960p@60Hz 1027=1280x960p@85Hz 1028=(Reserved) 1029=1280x1024p@75Hz 1030=1280x1024p@85Hz 1031=1360x768p@60Hz 1032=1366x768p@60Hz 1033=1400x1050p@60Hz 1034=1400x1050p@75Hz 1035=1400x1050p@85Hz 1036=1440x900p@60Hz 1037=1440x900p@75Hz 1038=1440x900p@85Hz 1039=1600x900p@60Hz 1040=(Reserved) 1041=1600x1200p@65Hz 1042=(Reserved) 1043=1600x1200p@75Hz 1044=1600x1200p@85Hz 1045=(Reserved) 1046=1680x1050p@75Hz 1047=1680x1050p@85Hz 1048=1792x1344p@60Hz 1049=1792x1344p@75Hz 1050=1856x1392p@60Hz 1051=1856x1392p@75Hz 1052=1920x1200p@50Hz 1053=(Reserved) 1054=1920x1200p@75Hz WP-SW2-EN7 – Protocol 3000...
- Page 53 LOGIN allows the user to run commands with an End User or Administrator permission level. In each device, some connections allow logging in to different levels. Some do not work with security at all. Connection may logout after timeout. WP-SW2-EN7 – Protocol 3000...
- Page 54 [(TCP:80,0.0.0.0:0),LISTE The response format lists signal IDs IP address N],[(TCP:5000,0.0.0.0:0), client_port - Client port state – listen or separated by commas. LISTEN], This is an Extended Protocol 3000 established [(TCP:80,192.168.114.3:52 command. 400),ESTABLISHED],[(TC P:5000,192.168.1.100:516 ,ESTABLISHED]<CR> <LF> WP-SW2-EN7 – Protocol 3000...
- Page 55 <port_index> – The port number as printed on the front or rear panel <signal_type> – Signal ID attribute: VIDEO AUDIO RS232 <index> – Indicates a specific channel number when there are multiple channels of the same type WP-SW2-EN7 – Protocol 3000...
- Page 56 (optional - only used when serial_type is 485) date – Format: DD-MM-YYYY. UPG-TIME? Get firmware version last upgrade #UPG-TIME? ~nn@UPG-TIME Get last upgrade date/time data – Format: hh:mm:ss where date/time Add New Command for <CR> date,data<CR><LF> #UPG-TIME?<CR> KDS-7 WP-SW2-EN7 – Protocol 3000...
- Page 57 <signal_type> – Signal ID attribute: VIDEO AUDIO <index> – Indicates a specific channel number when there are multiple channels of the same type. connection_mode – Connecton mode 0 – manual 1 – priority 2 – last connected WP-SW2-EN7 – Protocol 3000...
- Page 58 This is an Extended Protocol 3000 <index> – Indicates a specific channel number command. when there are multiple channels of the same Brackets ‘[‘ and ‘]’ are reserved type. Protocol 3000 characters that define a list of parameters as in [a,b,c,d]. WP-SW2-EN7 – Protocol 3000...
-
Page 59: Result And Error Codes
In case of an error, the device responds with an error message. The error message syntax: • ~NN@ERR XXX<CR><LF> – when general error, no specific command • ~NN@CMD ERR XXX<CR><LF> – for specific command • NN – machine number of device, default = 01 • XXX – error code WP-SW2-EN7 – Protocol 3000... - Page 60 (Reserved) ERR_RESERVED_8 (Reserved) ERR_RESERVED_9 (Reserved) ERR_RESERVED_10 (Reserved) ERR_RESERVED_11 (Reserved) ERR_RESERVED_12 (Reserved) ERR_EDID_CORRUPTED EDID corrupted ERR_NON_LISTED Device specific errors File has the same CRC – not changed ERR_SAME_CRC ERR_WRONG_MODE Wrong operation mode ERR_NOT_CONFIGURED Device/chip was not initialized WP-SW2-EN7 – Protocol 3000...
- Page 61 This limited warranty gives you specific legal rights, and you may have other rights which vary from country to country or state to state. This limited warranty is void if (i) the label bearing the serial number of this product has been removed or defaced, (ii) the product is not distributed by Kramer Electronics or (iii) this product is not purchased from an authorized Kramer Electronics reseller.
- Page 62 SAFETY WARNING Disconnect the unit from the power supply before opening and servicing For the latest information on our products and a list of Kramer distributors, visit our website where updates to this user manual may be found. We welcome your questions, comments, and feedback.
Need help?
Do you have a question about the WP-SW2-EN7 and is the answer not in the manual?
Questions and answers