Advertisement
Scan for full manual
Step 1: Check what's in the box
WP-EN6 Video Encoder
Frame (or frame set) and faceplate
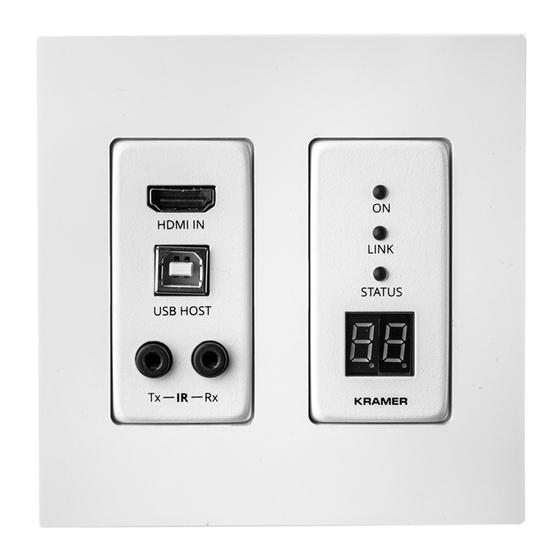
Step 2: Get to know your WP-EN6
#
Feature
1
IR TX on a 3.5mm Mini Jack
2
USB Type B Port
HDMI™ IN Connector
3
4
IR RX on a 3.5mm Mini Jack
5
Reset Button (under wall plate)
6
LINK LED
7
ON LED
8
STATUS LED
9
CHANNEL Display
10
Ring Tongue Terminal Grounding
Screw
11
RS-232 3-pin Terminal Block
Connector (Tx, Rx and common G)
12
Power Supply 2-pin Terminal Block
Connector
13
LAN/POE RJ-45 Connector
WP-EN6 Quick Start
WP-EN6 Quick Start Guide
This guide helps you install and use your
Go to
www.kramerav.com/downloads/WP-EN6
upgrades are available.
FRONT PANEL
Function
Connect to an emitter.
Connect to a USB host, for example, a PC.
Connects to an HDMI source.
Connect to a receiver.
Press briefly to perform a software reset.
Press and hold for 10 seconds to perform a factory reset.
On when a
Flashes during power up and lights when on.
Identifies a device in a system. When sending a P3K FIND-ME command to the
system, the LED of the device to be identified flashes for 5 seconds.
Displays the selected channel. If the channel number exceeds 99, the 100 indicator
turns on (for example, channel 124 appears as "24").
Connect to grounding wire (optional).
Connect to an RS-232 controller device (to control a device on the decoder side)
Connect to a power supply (if required). Connect GND to GND, +12V to +12V.
Connect to the network using recommended Kramer cables. Note that this port
supports power over Ethernet (PoE).
WP-EN6
for the first time.
to download the latest user manual and check if firmware
1 Quick start guide
BACK PANEL
WP-EN6
to
KDS-DEC6
link is established and is transmitting A/V signals.
P/N: 2 9 0 0 - 3 0 1 3 2 8 QS
Installation accessories
Rev: 2
Advertisement
Table of Contents

Related Manuals for Kramer WP-EN6


Summary of Contents for Kramer WP-EN6
- Page 1 Connect to a power supply (if required). Connect GND to GND, +12V to +12V. Connector LAN/POE RJ-45 Connector Connect to the network using recommended Kramer cables. Note that this port supports power over Ethernet (PoE). WP-EN6 Quick Start P/N: 2 9 0 0 - 3 0 1 3 2 8 QS...
- Page 2 (or their equivalent). Step 4: Connect inputs and outputs Always switch OFF the power on each device before connecting it to your WP-EN6. For best results, we recommend that you always use Kramer high-performance cables to connect AV equipment to the WP-EN6.
Need help?
Do you have a question about the WP-EN6 and is the answer not in the manual?
Questions and answers