Advertisement
Scan for full manual
Step 1: Check what's in the box
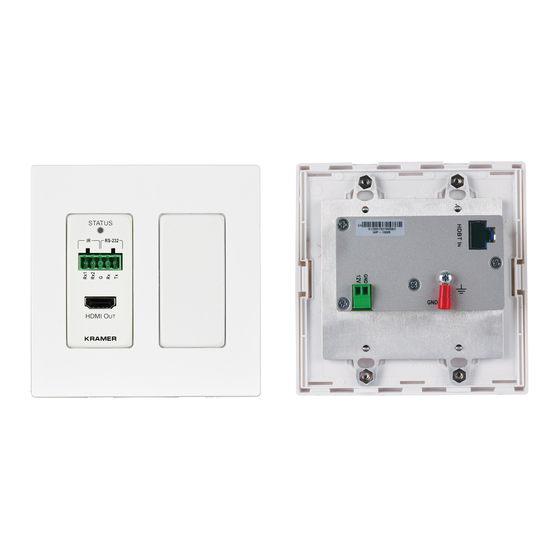
WP-789R HDMI 4K Wall-Plate Line Receiver
1 Power adapter and cord
Step 2: Get to know your WP-789R
#
Feature
HDMI™ OUT Connector
1
2
IR (Tx1, Tx2) Output, 3-pin
Terminal Block Connectors
3
STATUS LED
4
RS-232 (G, Rx, Tx)
3-pin Terminal Block Connector
5
Power Supply 2-pin Terminal
Block Connector
6
Ring Tongue Terminal
Grounding Screw
7
HDBT IN RJ-45 Connector
The terms HDMI, HDMI High-Definition Multimedia Interface, and the HDMI Logo are trademarks or registered trademarks of HDMI Licensing Administrator, Inc.
WP-789R Quick Start
WP-789R Quick Start Guide
This guide helps you install and use your WP-789R for the first time.
Go to
www.kramerav.com/downloads/WP-789R
upgrades are available.
Function
Connect to an HDMI acceptor.
Connect to an external IR emitter cable:
Tx1, G: use for fixed 38kHz non-modulated IR signals.
Tx2, G: use for 20-100kHz wide-range modulated IR signals.
LED Color
Blue
Green
Yellow
White
STATUS LED is off only when the device does not receive power.
Connect to an RS-232 port.
Connect to a power supply (if required). Connect GND to GND, +12V to +12V.
Connect to grounding wire (optional).
Connect to the HDBT OUT connector on a transmitter (for example, TP-780T).
to download the latest user manual and check if firmware
1 Quick start guide
Frame (or frame kit)
HDBT Connected
Source Detected
Yes
Yes
Yes
Yes
Yes
No
Device is powered with no detected connections.
P/N: 2 9 0 0 - 3 0 1 2 9 9 QS
Installation accessories
Acceptor Detected
Yes
No
N/A
Rev: 1
Advertisement
Table of Contents

Summary of Contents for Kramer WP-789R
- Page 1 WP-789R Quick Start Guide This guide helps you install and use your WP-789R for the first time. Go to www.kramerav.com/downloads/WP-789R to download the latest user manual and check if firmware Scan for full manual upgrades are available. Step 1: Check what’s in the box...
- Page 2 Step 3: Install the WP-789R Insert the device into the in-wall box (note that first you need to connect the HDBT cable and power) and connect the parts as shown in the illustrations below: EU/UK Version US-D Version...
- Page 3 Step 4: Connect the inputs and outputs Always switch OFF the power on each device before connecting it to your WP-789R. For best results, we recommend that you always use Kramer high-performance cables to connect AV equipment to the WP-789R.
- Page 4 Safety Caution: There are no operator serviceable parts inside the unit. Warning: Use only the Kramer Electronics power supply that is provided with the unit. Warning: Disconnect the power and unplug the unit from the wall before installing. www.KramerAV.com for updated safety information.


Need help?
Do you have a question about the WP-789R and is the answer not in the manual?
Questions and answers