Advertisement
Quick Links
Scan for full manual
Step 1: Check what's in the box
WP-SW2-EN7
4K AVoIP Encoder
1 Quick start guide
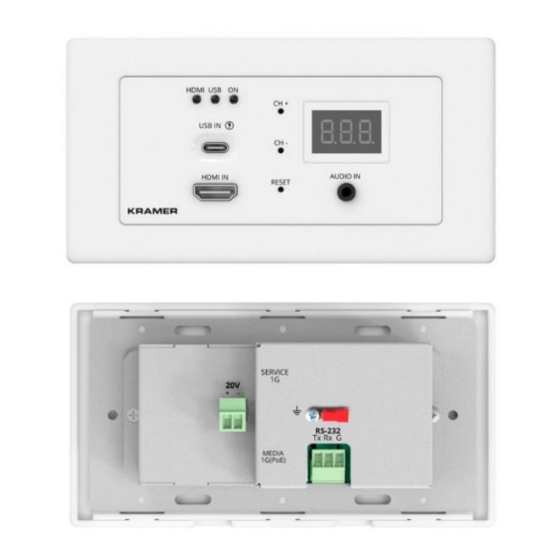
Step 2: Get to know your WP-SW2-EN7
# Feature
1 HDMI IN Connector
2 USB IN
Port
3 HDMI LED
4 USB LED
5 ON LED
WP-SW2-EN7 Quick Start
WP-SW2-EN7 Quick Start Guide
This guide helps you install and use your
Go to
www.kramerav.com/downloads/WP-SW2-EN7
firmware upgrades are available.
Frame (or frame set) and faceplate
Function
Connect to an HDMI source.
Connect to a USB-C source. This port can receive video, USB data and RS-232 commands.
When powered by a Kramer 20V power supply (optional), charges sources that support USB
Power Delivery 2.0 up to 60W.
Lights Green
Flashes Green
Off
Lights Green
Flashes Green
Off
Flashes Red
Lights Green
Flashes Green Fast
Flashes Green Very
Fast (for 60sec)
WP-SW2-EN7
for the first time.
to download the latest user manual and check if
HDMI input is selected, HDMI is connected and signal is received.
HDMI input is selected, HDMI is connected and no signal is received.
The HDMI is not selected or not connected.
USB-C input is selected, USB-C is connected and signal is received.
USB-C input is selected, USB-C is connected, no signal is received.
USB-C is not selected or not connected.
On fallback address acquiring, device 'ON' LED flashes continuously in
slow 0.5/10sec cadence.
When power is on.
FW is downloaded in the background.
A device identification command is sent (Flag me).
P/N: 2 9 0 0 - 3 0 1 5 8 1 QS
Installation accessories
Rev: 3
Advertisement

Related Manuals for Kramer WP-SW2-EN7


Summary of Contents for Kramer WP-SW2-EN7
- Page 1 Connect to a USB-C source. This port can receive video, USB data and RS-232 commands. 2 USB IN Port When powered by a Kramer 20V power supply (optional), charges sources that support USB Power Delivery 2.0 up to 60W. 3 HDMI LED Lights Green HDMI input is selected, HDMI is connected and signal is received.
- Page 2 Block Connector extension (even when no AV signal is extended). Step 3: Mount WP-SW2-EN7 Insert the device into the in-wall box (note that first you need to connect the RS-232 and LAN/POE RJ-45 Connector cables and/or power) and connect the parts as shown in the illustration:...
- Page 3 EU/UK: 2 gang on-wall junction box (use the recommended Kramer on-wall box available at www.kramerav.com/product/WP-SW2- EN7). Step 4: Connect inputs and outputs Always switch OFF the power on each device before connecting it to your WP-SW2-EN7. Note that KVM is supported only when the USB-C port is connected. WP-SW2-EN7 RS-232 Configuration...
- Page 4 Allocating the IP Address WP-SW2-EN7‘s default IP address is 192.168.1.39. By default, DHCP is enabled, and assigns an IP address to the device. If a DHCP Server is not available (for example, in the case that the device is connected directly to a laptop) the device gets the default IP address.
Need help?
Do you have a question about the WP-SW2-EN7 and is the answer not in the manual?
Questions and answers