Table of Contents
Advertisement
Quick Links
Advertisement
Table of Contents

Related Manuals for HBK BraggMETER SI


Summary of Contents for HBK BraggMETER SI
- Page 1 ENGLISH Quick Start Guide FS22SI Industrial BraggMETER SI...
- Page 2 Hottinger Brüel & Kjaer GmbH Im Tiefen See 45 D-64293 Darmstadt Tel. +49 6151 803-0 Fax +49 6151 803-9100 info@hbkworld.com www.hbkworld.com HBK FiberSensing, S.A. Rua Vasconcelos Costa, 277 4470-640 Maia Portugal Tel. +351 229 613 010 Fax +351 229 613 020 info.fs@hbkworld.com www.hbm.com/fs...
-
Page 3: Table Of Contents
TABLE OF CONTENTS Introduction ............Interrogator Setup . -
Page 4: Introduction
INTRODUCTION This document is a quick start guide for operating the FS22 - Industrial BraggMETER SI interrogator from HBK FiberSensing. For more details please refer to the User Manual. This document is available for down load on our website. This document applies to the following equipment:... - Page 5 The FS22 - Industrial BraggMETER SI set includes: Standard format Rack-mountable format - Interrogator - Interrogator - AC-DC power supply unit 24 V - Power cord (Type F plug) - Ethernet cable (L~2m) - Ethernet cable (L~2m) - Mounting blocks with M6 screws...
-
Page 6: Interrogator Setup
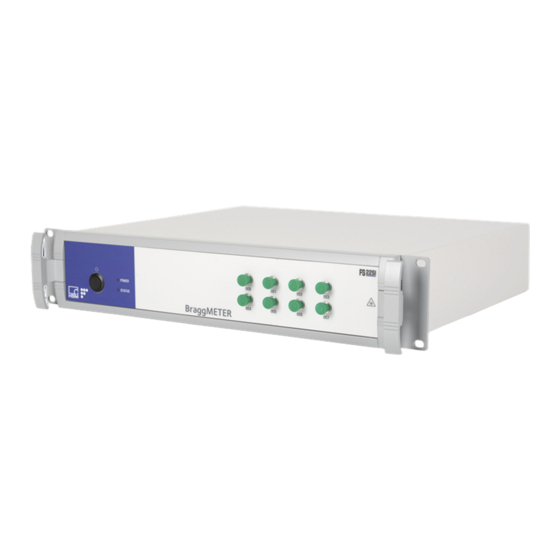
INTERROGATOR SETUP Buttons and Connectors 2.1.1 Standard Format The FS22 - Industrial BraggMETER SI on its Standard format has the following buttons and connectors: Front view Back view Fig. 2.1 The connectors and buttons in Fig. 2.1 are: Optical Output Connectors... -
Page 7: Turn On
Front view Back view Fig. 2.2 The connectors and buttons in Fig. 2.2 are: ON/OFF Button POWER and STATUS LEDs Optical Output Connectors Power Connector Electric fuse Safety Power Button Fans Ethernet Connector Turn On 2.2.1 Power On the Standard format interrogator, connect the provided power adapter to a 100-240 V power line and the adapter to the interrogator’s power connector. - Page 8 For the Rack-Mountable format connect the provided power cable to a 100-240 V power line and to the interrogator’s power connector. Then, switch the safety power button to Notice Powering above the specified limits will damage the equipment. For the Rack-mountable version there is a fuse protection that can be replaced.
-
Page 9: Ethernet
2.2.3 Optical The FS22 - Industrial BraggMETER SI can be purchased either with FC/APC or SC/APC connectors. Select the appropriate connector type and adapter, if needed, to connect the Fiber Bragg Grating (FBG) sensors to the interrogator. -
Page 10: Turn Off
Turn Off To turn off the interrogator, the “ON/OFF” button should be pressed between 2 s to 6 s. The power LED will start blinking acknowledging the shutdown. Power LED blinking at 1 Hz Fig. 2.5 Important Pressing the power button between 6 to 10 s will cancel the shutdown. Notice Pressing the power button more than 10 s will reset the interrogators' IP address to its default value. -
Page 11: Remote Communications
REMOTE COMMUNICATIONS The FS22 - Industrial BraggMETER SI interrogator can be fully controlled using standard SCPI syntax commands. The interrogator has 5 different operational states that answer to the listed commands below. Fig. 3.1 For full information on the commands refer to the interrogator user manual. -
Page 12: Braggmonitor Si Software
BRAGGMONITOR SI SOFTWARE Installation The FS22 - Industrial BraggMETER SI interrogator is provided with the BraggMONITOR SI software. To install the software: Run Setup.exe (as administrator) Follow the described steps and press finish Restart the PC Run BraggMONITOR SI (as administrator) -
Page 13: Connect To The Interrogator
4.2.1 Connect to the Interrogator To establish a connection to the interrogator press the “connect” button (number Fig. 4.1) on the general bar available at the bottom of the software window. Fig. 4.1 FS22SI BRAGGMONITOR SI SOFTWARE... -
Page 14: Prepare Measurement Settings
4.2.2 Prepare Measurement Settings The reflected spectrum of the connected sensors can be checked under the Spectral View tab. Press the corresponding tab, on top of the graphical user interface, to select it (number in Fig. 4.2). Fig. 4.2 The FS22SI has two operation methods in terms of peak detection. The method to use must be selected using the “Ranges”... - Page 15 The definition of the sensors using the conventional method should use the following steps: Define the threshold (number in Fig. 4.2) so that: it is high enough for identifying all peaks, but small enough so that no side lobes are accounted. A good starting value is normally 5dB.
- Page 16 Fig. 4.3 Upon a finished autoscan, independently of the used method, the configuration is popu lated with a list of found sensors (see Fig. 4.4). FS22SI BRAGGMONITOR SI SOFTWARE...
-
Page 17: Set The Configuration
4.2.3 Set the Configuration The configuration of the sensors can be adjusted under the Configuration tab (number in Fig. 4.4). Fig. 4.4 After pressing the “autoscan” button (number in Fig. 4.3) the sensor list is automatically populated with the sensors found on the optical network considering the defined set tings. -
Page 18: Start Acquisition
4.2.4 Start Acquisition Still in the Configuration tab configure: Fig. 4.5 Data storage settings (number in Fig. 4.5): When saving, data is stored in separate files named automatically “BraggMONITOR SI Data [YYYY.MM.DD.hh.mm.ss ; YYYY.MM.DD.hh.mm.ss].txt” File interval -> defines the length of the file in terms of acquisition time. Data folder ->... - Page 19 Fig. 4.6 Data will be plotted in the graph that is updated every second. The sensors to plot can be selected on legend. To start saving data to a data file press the “save” button (number in Fig. 4.6). Important For further information please refer to the user manual available our website.
- Page 20 HBK - Hottinger Brüel & Kjaer www.hbkworld.com info@hbkworld.com...
Need help?
Do you have a question about the BraggMETER SI and is the answer not in the manual?
Questions and answers