Table of Contents
Advertisement
Quick Links
Advertisement
Table of Contents

Related Manuals for ZOLL LifeVest 4000


Summary of Contents for ZOLL LifeVest 4000
- Page 1 Life Vest ® Model 4000 Patient Manual ® PN 20B0047-EUK-Rev M May 1, 2021...
-
Page 2: Table Of Contents
LifeVest 4000 Patient Manual Contents 1: Introduction ........................1-1 About the LifeVest system ...................... 1-1 About this manual ........................1-1 What’s in this manual ......................1-1 Safety information ........................1-2 Environment considerations related to noise and vibration ............ 1-5 ... - Page 3 Contents Removing when you shower or bathe .................. 4-12 Disassembling the electrode belt and garment ..............4-13 Laundering the garment ....................... 4-15 5: Responding to alarms ....................... 5-1 How this chapter is organized ....................5-1 Physiological alarms ....................... 5-1 ...
- Page 4 Names and data used in examples are fictitious. Trademarks ZOLL, LifeVest, and Blue are trademarks or registered trademarks of ZOLL Medical Corporation in the United States of America. All other trademarks and registered trademarks are property of their respective owners.
- Page 5 Technical Support 01625 668811 Queens Avenue Email info@dot-medical.com Macclesfield www.dot-medical.com Cheshire SK10 2BB United Kingdom In Spain, contact: Phone 900 998 427 ZOLL CMS GmbH Emil-Hoffmann-Str. 13 Technical Support 900 998 426 50996 Köln Email lifevest.spain@zoll.com Deutschland www.lifevest.zoll.com Page v...
- Page 6 LifeVest 4000 Patient Manual This page intentionally left blank. Page vi...
-
Page 7: 1: Introduction
Introduction 1: Introduction About the LifeVest system The LifeVest device continuously monitors your heart. If it detects a life threatening rhythm that is too fast, the device delivers treatment to restore normal rhythm. If you are conscious, you can prevent a treatment by using the response buttons when the device alerts you that a treatment is coming. -
Page 8: Safety Information
LifeVest 4000 Patient Manual Safety information This information helps you safely operate the LifeVest device. Read and understand these warnings, cautions, and symbols before using the device. Any serious incident that has occurred in relation to the device should be reported to the manufacturer and the competent authority of the Member State in which the user and/or patient is established. - Page 9 Do not dispose of or incinerate the batteries. The batteries contain lithium ion and must be disposed of properly by ZOLL. Do not force the connector. Allow the connector to align before pushing it in. Forcing the connector may damage it and cause the system to malfunction.
- Page 10 LifeVest 4000 Patient Manual WARNINGS Do not use chlorine bleach, bleach alternatives, fabric softener, anti-static sprays or detergents that include bleach or fabric softener additives when laundering the garment. Using bleach or any of these other prohibited agents to launder the garment may damage it and cause the system to malfunction.
-
Page 11: Environment Considerations Related To Noise And Vibration
A treatment shock from any defibrillator may cause skin burn. The LifeVest uses Blue™ gel to reduce the chance of burn. Intended use locations The intended electromagnetic environments for the LifeVest 4000 are home, small clinic, hospital, and transport. Essential performance The essential performance of the LifeVest is that it detects ventricular fibrillation or ventricular tachycardia, then delivers a defibrillating shock. -
Page 12: Aircraft Use
3, page 3-31. The patient is not expected to do any service on the device. Only ZOLL is to perform service on the device. The device is to be returned to ZOLL for service. -
Page 13: Patient Training
After completing the training, patients sign an agreement that documents receipt of training in the use and care of the LifeVest. In addition, phone support is available for patients by calling ZOLL or a ZOLL representative. Page 1-7... -
Page 14: Electromagnetic Interference
LifeVest 4000 Patient Manual Electromagnetic interference WARNING Use of accessories, transducers, and cables other than those specified or provided by the manufacturer of this equipment could result in increased electromagnetic emissions or decreased electromagnetic immunity of this equipment and result in improper operation. -
Page 15: Wireless Interference
General precaution – If you experience any interference with the LifeVest when in the presence of any other wireless device, move away from the device or stop using the device that is causing the interference. If you continue to have problems, call ZOLL Page 1-9... -
Page 16: Fcc Regulatory Information
27 centimeters (10.6 inches) or more, the charger produces RF exposure that is well below the maximum permissible exposure limits. Changes or modifications to this device not authorized by ZOLL could void the RF compliance and negate your authority to operate the device. -
Page 17: 2: Meet The Lifevest System
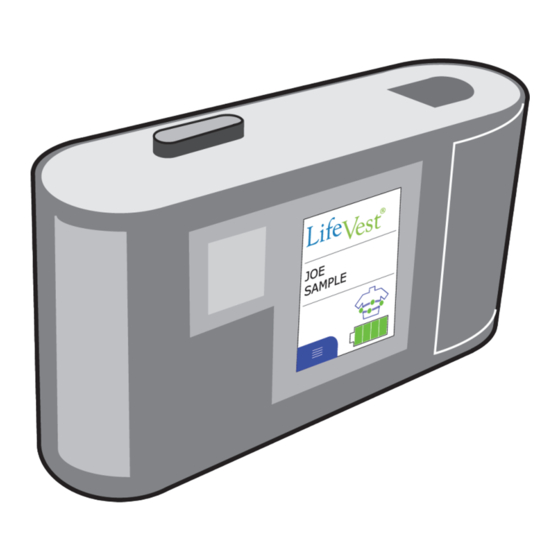
Meet the LifeVest system 2: Meet the LifeVest system Components Item Description Monitor Main unit of LifeVest system. Connects to electrode belt. Monitors your heart rhythm and delivers defibrillating treatment. See details on page 2-2. Garment and Fits around your body and connects to the monitor. Different style garments may be provided. See electrode belt details on page 2-3. -
Page 18: Monitor
LifeVest 4000 Patient Manual Monitor For details about operating and caring for the monitor, see section 3. For details about responding to alarms, see section 5. Item Description Connector Connects to electrode belt. Battery Powers the monitor. To recharge the battery, use the charger; see page 2-4. -
Page 19: Garment And Electrode Belt
Meet the LifeVest system Garment and electrode belt For details on assembling, wearing, and caring for the garment and electrode belt, see section 4. Item Description Garment Worn under your clothing to hold the heart sensors and therapy pads against your chest. Electrode belt Assembles to garment and contains heart sensors, vibration box, and therapy pads. -
Page 20: Charger
Power supply Connects the power supply to the charger. connector Phone jacks Connects the charger to a phone line. Only use if instructed by ZOLL. USB connector Do not use. Do not connect anything to this connector. Ethernet Do not use. Do not connect anything to this connector. - Page 21 Meet the LifeVest system Charger with indicator lights Item Description Charger base Accepts the battery for recharging. Indicator lights Show the status of the charger. For the details on charger operation, see section 3. Battery Shown charging in the charger while the other battery is in the monitor. Power supply Plugs into a standard power outlet to provide power to the charger Power supply...
-
Page 22: Monitor Touchscreen
LifeVest 4000 Patient Manual Monitor touchscreen Shown below is an example of the monitor screen during normal monitoring. Not all of the symbols, controls, and indicators are shown in this example. Some symbols are shown only at certain times. As situations change, the screen will change to advise you and suggest an action to take. -
Page 23: Charger Touchscreen
LifeVest is set up for a wireless connection, but there is no signal. Try relocating the charger to improve the signal. If you continue to see this symbol, call ZOLL. Charger communication may not be functioning properly. Charger can still be used to charge battery. -
Page 24: Help Screens
LifeVest 4000 Patient Manual Help screens If you press a help button on the monitor or charger, you’ll get a help screen. Shown below is an example of a help screen. Item What it means and how to use it Help message Brief message telling you what to do based on the present condition. -
Page 25: 3: Using The Lifevest
Using the LifeVest 3: Using the LifeVest Daily routine This is an overview of the steps involved in the daily use of the LifeVest. Some details are found elsewhere in this manual. Wear the assembled electrode belt and garment. For details about assembling and putting on the electrode belt and garment, see section 4. - Page 26 LifeVest 4000 Patient Manual Put a fully-charged battery into the monitor and follow the normal startup routine. See page 3-3. Change and recharge the battery every 24 hours. See page 3-6. Respond to any alarms. See section 5. Completely remove the LifeVest when you shower or bathe. See section 4.
-
Page 27: Normal Startup Routine
When you hear the gong and feel the vibration in your back, press the response buttons. If you do not hear the gong or feel the vibration within 30 seconds, remove the battery. Reinsert the battery and try again. If the monitor still does not operate normally, contact ZOLL. Page 3-3... - Page 28 LifeVest 4000 Patient Manual The monitor displays your name and battery level. Make sure your name appears on the monitor. If your name does not appear, contact ZOLL immediately. During normal monitoring, most of the time the LifeVest displays a dark screen.
-
Page 29: Taking Care Of The Batteries
24 hours. If help is not available, and you expect power to be out for more than 24 hours, contact ZOLL immediately to have spare batteries sent to you. When the power is restored, plug in your charger as normal. - Page 30 LifeVest 4000 Patient Manual Change and recharge batteries daily WARNING Make sure the battery is fully inserted and latched into the monitor. If the battery is not fully inserted and latched, it may disconnect and you will not be protected.
- Page 31 Using the LifeVest Put the used battery from the monitor into the battery charger. Push the battery in firmly. Read the battery status on the charger. Battery should be charging, testing or charged. If you ever need to unplug the charger, unplug it from the wall outlet first.
-
Page 32: Charger Setup And Use, Charger With Touchscreen
LifeVest 4000 Patient Manual Charger setup and use, charger with touchscreen WARNINGS Use of accessories, transducers, and cables other than those specified or provided by the manufacturer of this equipment could result in increased electromagnetic emissions or decreased electromagnetic immunity of this equipment and result in improper operation. - Page 33 Using the LifeVest Insert the spare battery into the charger. Orient the battery with its connector facing the rear of the charger. Push the battery in firmly. On the charger’s screen, read the battery status. Battery should be charging, charged, or testing.
- Page 34 Charger can still be used to charge battery. Call ZOLL. Charger is set up for a land line phone connection. Charger cannot be used in this mode. If you see this symbol, call ZOLL. Page 3-10...
- Page 35 The battery may charge, but will take longer than normal. still might hold a charge Battery can be used, but should be replaced. Call ZOLL for a replacement battery. Charger has a problem, and Do not leave a battery in the charger. Battery is not being cannot charge the battery.
- Page 36 LifeVest 4000 Patient Manual Charger display dims in the dark When the room gets dark, the charger display gets dim. To return the display to full brightness, either turn on the light in the room or tap the screen. If you want to press a button and the screen is dim, first tap the screen to make it bright.
-
Page 37: Charger Setup And Use, Charger With Indicator Lights
Using the LifeVest Charger setup and use, charger with indicator lights WARNINGS Use of accessories, transducers, and cables other than those specified or provided by the manufacturer of this equipment could result in increased electromagnetic emissions or decreased electromagnetic immunity of this equipment and result in improper operation. - Page 38 LifeVest 4000 Patient Manual Insert the battery into the charger. Orient the battery with its connector facing the front of the charger. Push the battery in firmly. Read the battery status on the charger. Battery should be charging, testing, or charged.
- Page 39 Yellow, blinking, battery. with audible alarm Alarm condition 1. Call ZOLL. Battery has a problem, and may charge, but will take longer than normal. Battery can be used, but should be Battery has a problem, but replaced. still might hold a charge.
-
Page 40: Sending Data Manually
LifeVest 4000 Patient Manual Sending data manually If you get this message, you need to send data manually. Call ZOLL, then follow along with this procedure. Go into the same room where the charger is located. On the monitor, tap the menu button If the screen is dark, press and release the response buttons to activate the screen. - Page 41 Using the LifeVest Tap Send data. On the monitor’s display, look at the symbols above the charger antenna. Signal strength is shown by the number of segments. The more segments, the better. To get a stronger signal, try moving closer to the charger. ...
- Page 42 LifeVest 4000 Patient Manual The monitor shows when data transfer is complete. Tap OK. If the monitor is unable to send data, you’ll get this message. Tap X and try again. If you continue to have a problem sending data, you will get additional instructions from ZOLL.
-
Page 43: How To Read The Signal Strength Symbols
Using the LifeVest How to read the signal strength symbols Data gets sent from the monitor to the charger or the hotspot then to the cell tower. Symbols on the devices show the signal strength. One symbol shows the strength of the monitor signal, the other shows the strength of the cellular signal. Depending on which type of charger you have, you may see these symbols on the charger or monitor. -
Page 44: Monitor Signal Strength Symbol
Try relocating the monitor and charger to another part of the You may see this signal while the monitor house. finds a signal. That is normal. Monitor and charger can still be used normally. If you continue to see this symbol, call ZOLL. Page 3-20... -
Page 45: Cellular Signal Strength Symbol
Monitor and charger can still be used normally. If you continue to see this symbol, call ZOLL. Device is set up for a land line phone In this mode, a phone line can be plugged into the back of... -
Page 46: Recording Your Heart Rhythm
LifeVest 4000 Patient Manual Recording your heart rhythm At times, you may want to record your heart rhythm for your doctor to review. Follow this procedure to record your heart rhythm. Hold the response buttons for 3 seconds. Release response buttons when you see the recording indicator and hear a single gong. -
Page 47: Speak Options
Using the LifeVest Speak options There are three speak options associated with the help screens: Speak when you tap the text area of the help screen. Speak with every help screen. Don’t speak with the help screens. You can also change the volume of these messages. - Page 48 LifeVest 4000 Patient Manual Tap Volume until you hear the desired volume. Volume level 1. Volume level 2. Volume level 3. Tap Mode until you see the speak mode you want. LifeVest speaks when you LifeVest speaks with every LifeVest does not speak.
-
Page 49: Airplane Mode
Using the LifeVest Airplane mode Airplane mode disables the LifeVest from wirelessly transmitting data to avoid interfering with aircraft operation and other electrical equipment. Follow this procedure to set the LifeVest for airplane mode. On the monitor, tap the menu button If the screen is dark, press and release the response buttons to activate the screen. - Page 50 LifeVest 4000 Patient Manual On the home screen, if you see the airplane symbol in the upper right corner, the LifeVest is in airplane mode. When you see the airplane symbol, no signals will be transmitted from LifeVest. The monitor will go out of airplane mode the next time you change the battery, or if you attempt to manually send data.
-
Page 51: System Info Screens
Using the LifeVest System info screens If you ever call for service or support, you may be asked for information about your LifeVest. You may be instructed to go into the system information screens. On the monitor, tap the menu button If the screen is dark, press and release the response buttons to activate the screen. -
Page 52: Support Mode
ZOLL will call and explain that your LifeVest needs to be updated. You will be talked through a simple updating process. You are to remain on the phone with ZOLL until this entire process has been completed. You need to continue to wear the device during this process. ... -
Page 53: To Enter Support Mode
To enter support mode If you are to enter support mode: You will be contacted by ZOLL and they will guide you through this process. Refer to these instructions to follow along as you remain in contact with ZOLL. - Page 54 LifeVest 4000 Patient Manual Tap the next page button Tap Support mode. Tap OK. You’ll see the support mode screen for a few moments. Page 3-30...
- Page 55 Using the LifeVest You’ll then see either a support PIN or an update code. Tell ZOLL which screen you see, then read the number to ZOLL and wait for further instructions. When ZOLL tells you that the update has been completed, tap OK, then tap X until you return to the home screen.
-
Page 56: Periodically Clean And Inspect The System
Don’t use any cleaning solution on the garment. Inspection Inspect your system periodically. If you should notice any of the following conditions, please notify ZOLL as soon as possible: Cracks in the housing of the monitor, battery, or charger. ... -
Page 57: What Family Members Need To Know
Using the LifeVest What family members need to know WARNINGS Only the patient should press the response buttons. The patient’s ability to press the response buttons lets the device know whether or not the patient is conscious and is critical in deciding when to give the patient a shock. If anyone other than the patient holds the response buttons, needed therapy may not be delivered, possibly resulting in serious injury or death. - Page 58 LifeVest 4000 Patient Manual Information for family members Since your family member or friend may be wearing the LifeVest device for a period of time, you may want to understand the daily routine involving the device, as well as warnings and cautions directed to the patient. In that case you should read this entire manual.
-
Page 59: When You Are Finished With The Device
Using the LifeVest When you are finished with the device Call ZOLL and arrange to return the LifeVest system. Battery recycling WARNING Do not dispose of or incinerate the batteries. The batteries contain lithium ion and must be disposed of properly by ZOLL. - Page 60 LifeVest 4000 Patient Manual This page intentionally left blank. Page 3-36...
-
Page 61: 4: Assembling And Putting On The Garment
Assembling and putting on the garment 4: Assembling and putting on the garment About this chapter This chapter contains instructions for: Assembling the electrode belt to the garment Putting on the assembled electrode belt and garment Connecting and disconnecting the electrode belt ... - Page 62 LifeVest 4000 Patient Manual Insert the rear therapy pads into the garment’s rear pockets. The rear pockets are numbered 1. Insert the pads with silver to silver. By that we mean to have the silver sides of the pads (with the green stickers) facing the silver fabric on the pockets.
- Page 63 Assembling and putting on the garment Position and secure the vibration box to the garment. The vibration box goes in position numbered 2. Place the vibration box with the label side facing up. Snap the flap over the vibration box ...
- Page 64 LifeVest 4000 Patient Manual Insert the front therapy pad into the front pocket. The front pocket is numbered 3. Insert the pad with silver to silver. By that we mean to have the silver side of the pad (with the green sticker) facing the silver fabric on the pocket.
- Page 65 Assembling and putting on the garment Attach the ECG electrodes to the garment. Match the colors on the backs of the electrodes to the colors of the Velcro on the garment. Make sure that you have properly assembled the electrode belt to the garment.
-
Page 66: Assembled Electrode Belt And Garment
LifeVest 4000 Patient Manual Assembled electrode belt and garment The assembled electrode belt and garment should look like the following figures. Outside view This side faces away from your body when worn. The foam sides of the electrodes face the back of the garment. -
Page 67: Putting On The Assembled Electrode Belt And Garment
Assembling and putting on the garment Putting on the assembled electrode belt and garment Follow these instructions to put on the assembled garment, then make sure you’re wearing it properly. Before putting on the garment, remove all clothing and undergarments from your upper body. - Page 68 LifeVest 4000 Patient Manual Connect the garment ends together in the front. Make sure that the clips are fully inserted past the slight bumps in the clips. Page 4-8...
- Page 69 Assembling and putting on the garment Look in a mirror to make sure that: The garment is not twisted. Straps are flat against your skin. The electrodes and therapy pads are pressing against bare skin. The silver fabric pockets and silver side of the therapy pads (with green stickers) MUST TOUCH YOUR BODY for the device to work properly.
- Page 70 LifeVest 4000 Patient Manual Check the position of the garment on your body and make sure it’s not too high or too low. To position the garment properly, you may need to adjust the shoulder straps. Move the sliders to position the garment properly, and for a snug fit.
-
Page 71: Connecting And Disconnecting The Electrode Belt
Assembling and putting on the garment Connecting and disconnecting the electrode belt To connect the belt WARNING Do not force the connector. Allow the connector to align before pushing it in. Forcing the connector may damage it and cause the system to malfunction. Line up the connector with the monitor. -
Page 72: Removing When You Shower Or Bathe
LifeVest 4000 Patient Manual Removing when you shower or bathe When you remove the device to bathe or shower, you are not protected by the device. Bathe or shower in the evening, preferably when someone else is home with you. -
Page 73: Disassembling The Electrode Belt And Garment
Assembling and putting on the garment Disassembling the electrode belt and garment Remove the four ECG electrodes from garment. Pull on the electrodes, not on the wires. Remove the vibration box from the garment. Do not use the vibration box as a handle to pull or lift the electrode belt. - Page 74 LifeVest 4000 Patient Manual Wipe the metallic surfaces of the electrodes and therapy pads with a soft cloth dampened with rubbing alcohol. Reassemble the garment and electrode belt as described on page 4-1. Put on the assembled garment and electrode belt as described on page 4-7.
-
Page 75: Laundering The Garment
Assembling and putting on the garment Laundering the garment CAUTION Do not use chlorine bleach, bleach alternatives, fabric softener, anti-static sprays or detergents that include bleach or fabric softener additives when laundering the garment. Using bleach or any of these other prohibited agents to launder the garment may damage it and cause the system to malfunction. - Page 76 LifeVest 4000 Patient Manual This page intentionally left blank. Page 4-16...
-
Page 77: 5: Responding To Alarms
Responding to alarms 5: Responding to alarms How this chapter is organized This chapter is organized by the types of alarms you can have while wearing the LifeVest: Physiological alarms, such as in response to a treatment or asystole. See below. -
Page 78: Siren With Respond Message
LifeVest 4000 Patient Manual Siren with respond message WARNINGS If you get an alert sound and you are awake, always hold the response buttons to prevent receiving a treatment. If you fail to hold the response buttons, you will get a treatment. -
Page 79: If You Get A Treatment
Leave the gel under the therapy electrodes. Do not wipe them dry. Tap OK after reading the message. Call ZOLL and arrange to get a new belt. Tap OK to resume normal monitoring. Check the display for any messages and take the action indicated. ... -
Page 80: Siren With Call For Help Message
If the alarm continues even after you press the response buttons, remove and replace the battery to reset the device. If you continue to get this message, call ZOLL. If you are not conscious, naturally you will not be able to press the response buttons. -
Page 81: Technical Alarms
What it means What to do System has a problem that requires servicing. Write down code number and call ZOLL. You can continue to use the device. Tap OK to return to normal operation. Note the code beginning with the number 1. - Page 82 You should continue to use the device. Note the code 102 on the screen. System has a more severe service problem. Write down the code number and call ZOLL You CANNOT use the device. immediately. Note the code beginning with the number 2.
-
Page 83: Informative Alarms
Yellow battery symbol means that battery Continue to use and recharge battery as condition cannot be determined, but battery normal. may continue to function normally. Call ZOLL for a replacement battery. Page 5-7... - Page 84 LifeVest 4000 Patient Manual Message What it means What to do Electrode belt is not connected to monitor. Connect the electrode belt to the monitor. Monitor is not receiving a signal from the Adjust your garment and electrode belt so that electrode belt.
- Page 85 Responding to alarms Message What it means What to do Therapy pad is not making contact with your Make sure the therapy pads are inserted skin. correctly, with their metal sides (with green stickers) against your skin. Make sure the therapy pads and mesh pockets are pressing against your skin.
- Page 86 LifeVest 4000 Patient Manual Message What it means What to do Device is checking to see if the belt is sending No action required. Just wait while this screen a clear signal. is displayed. You have received a treatment. Continue to wear the LifeVest device.
- Page 87 If you continue to get this message with the belt connected, call ZOLL. Data should be sent manually as soon as Contact ZOLL for instructions about how to possible. send data. Either a treatment was delivered or the Tap OK to return to normal operation.
- Page 88 LifeVest 4000 Patient Manual Message What it means What to do Too much gel is on your skin. Leave the gel that is under the therapy pads, but wipe the gel from the skin that is not under the therapy pads.
-
Page 89: Belt Problem Message
Responding to alarms Belt problem message This screen shows which ECG electrodes (the round ones) are causing problems. If you get this message with yellow icons, along with a voice prompt stating to Check electrodes, see page 5-14. The symbols help you to determine the problem. You may get any combination of these symbols: Electrode off skin: Electrode is not making good contact with skin. -
Page 90: Check Electrodes Message
Nothing is between the ECG electrodes and your skin, such as clothing or one of the cables. Garment and belt fit snugly, with the electrodes pressing against your skin. Electrode cable is securely connected into the monitor. If you continue to get this message, call ZOLL. Page 5-14... -
Page 91: Check Belt Message
ECG electrode (the round ones, not on the therapy pads). Put the garment on and connect the electrode belt to the monitor. While you’re wearing the LifeVest, tap the help button reminders about what to do. If problems continue, call ZOLL. Page 5-15... -
Page 92: Therapy Pad Problem Message
LifeVest 4000 Patient Manual Therapy pad problem message This screen shows when the therapy pads (the large rectangular ones) are causing problems by not making good contact with your skin. Remember that there are three therapy pads: one in front and two in back. - Page 93 For details about putting on the garment and electrode belt, see section 4. To help prevent stretching, launder the garment every 1 or 2 days. Follow the instructions for how to launder the garment in section 4. If problems continue, call ZOLL. Page 5-17...
- Page 94 LifeVest 4000 Patient Manual Therapy pad may not be inserted correctly into its pocket Remove the battery from the monitor, then remove the garment and electrode belt from your body. Make sure the therapy pads are inserted correctly, their metal sides (with green stickers) facing the metal mesh, which faces your body.
-
Page 95: Add Gel
Responding to alarms Add gel After you receive a treatment to correct an abnormal rhythm, you may see this message telling you to add gel. Follow the instructions below to add gel. While you’re wearing the LifeVest, tap the help button for reminders about what to do. -
Page 96: Replace Belt
LifeVest 4000 Patient Manual Replace belt After you receive a treatment to correct an abnormal rhythm, you may see this message telling you to replace the belt. Continue to wear the belt until you get the replacement belt. The belt is still functional and can provide additional treatment if needed. -
Page 97: Too Much Gel
Responding to alarms Too much gel After you add gel to the electrode belt, you may see this message telling you there is too much gel between the therapy electrodes. Follow the instructions below to remove the excess gel. While you’re wearing the LifeVest, tap the help button for reminders about what to do. - Page 98 LifeVest 4000 Patient Manual This page intentionally left blank. Page 5-22...
-
Page 99: 6: Using The Activities Options
Using the activities options 6: Using the activities options Introduction This section covers two activities options that your prescriber can request while you’re wearing the LifeVest. These options are the health survey and walk test. Before you do either of these options for the first time, read through and understand this section of the manual. -
Page 100: Health Survey Option
LifeVest 4000 Patient Manual Health survey option Your prescriber may request that you take the health survey as another way to use the LifeVest to gather information about your condition. How does it work? The purpose of the health survey is to have the LifeVest display a series of questions about your health and allow you to answer on the monitor. -
Page 101: How To Know If You Are To Take The Health Survey
Using the activities options How to know if you are to take the health survey If you get this message when you change the battery, you are to take the health survey. If you have any questions, please contact your prescriber. Tap OK. -
Page 102: Answering The Health Survey Questions
LifeVest 4000 Patient Manual Answering the health survey questions During the health survey, the LifeVest will ask you questions about your health, and you will enter your answers on the LifeVest. The LifeVest steps you through the process. As you are taking the health survey, the LifeVest prompts you as to what to do next. - Page 103 Using the activities options Use the buttons to scroll through the answers. Choose an answer. The answers shown here are just examples. Your screens may show different answers. To hear an answer, tap the screen in the answer area. ...
- Page 104 LifeVest 4000 Patient Manual When you get this message, you have finished the health survey. Tap OK. Page 6-6...
-
Page 105: Taking The Health Survey Later
Using the activities options Taking the health survey later Follow this procedure if you chose “later” when you got the message telling you to complete the health survey. Note that your menus might look slightly different than what is shown here. The procedure and buttons that you are to tap are the same. - Page 106 LifeVest 4000 Patient Manual Tap Other activities. Note: If your prescriber did not request that you take any of the activities, you will not see the “other activities” option on your screen. Tap Health survey. You’re now ready to take the health survey.
-
Page 107: Health Survey Messages
Using the activities options Health survey messages As you take the health survey, you may get one of these messages. If so, here is what the message means and what you should do. If you get any other messages, see Section 5, Responding to alarms. Message What it means What to do... -
Page 108: Walk Test Option
LifeVest 4000 Patient Manual Walk test option Your physician prescriber may order the walk test as one of the ways to use the LifeVest to gather information about your condition. How does it work? The purpose of the walk test is to walk for 6 minutes while the LifeVest monitors your heart and counts your steps. - Page 109 Using the activities options It is also important that you only walk for 6 minutes as part of this walk test. Listen for the voice prompt that tells you to “stop walking” after 6 minutes. When you hear this voice prompt, please stop walking. During the walk test, it is OK if you need to stop and rest at any time.
-
Page 110: Warnings Specific To The Walk Test
LifeVest 4000 Patient Manual Warnings specific to the walk test WARNINGS If you get the siren alert, stop walking and press the response buttons. When performing the walk test, do not continue walking if the monitor broadcasts an alert sound. Stop walking and press the response buttons as you normally would. -
Page 111: How To Know If You Are To Take The Walk Test
Using the activities options How to know if you are to take the walk test If you get this message when you change your battery, your physician prescriber has asked that you perform a walk test. Throughout the walk test procedure, you must wear the LifeVest, with it connected normally. -
Page 112: Answering The Pre-Walk Questions
LifeVest 4000 Patient Manual Answering the pre-walk questions Before you take the walk test, you’ll be asked two questions about how you feel. One about your shortness of breath level, another about your level of tiredness. After the walk, you’ll answer the same two questions again. - Page 113 Using the activities options Read the question. If you want to hear the question spoken, tap the screen in the question area. Note: You can change the speak option so you hear each question screen as soon as it appears, without tapping the screen. You can also change the speak volume.
- Page 114 LifeVest 4000 Patient Manual Answer scale Nothing at all Very, very slight Very slight Slight Moderate Somewhat severe Severe Very severe Very, very severe Confirm your answer. If the answer shown is correct, tap OK. To go back to the previous screen and change your answer, tap Change.
-
Page 115: Taking The Walking Portion Of The Walk Test
Using the activities options Taking the walking portion of the walk test After answering the two questions, you’re ready to do the actual walking portion of the walk test. You will walk for 6 minutes while wearing the LifeVest. You should be as comfortable as possible while walking. - Page 116 LifeVest 4000 Patient Manual You will get a voice prompt to start the walk test. Begin walking. Continue walking for 6 minutes. You will get a voice prompt after each minute of the walk test. The progress bar shows how far along you are in the walk test.
- Page 117 Using the activities options After 6 minutes, you will get this message, along with a voice prompt telling you to stop walking. When you hear the voice prompt telling you to stop walking, the walk test has ended and you can stop walking. Tap OK.
-
Page 118: Answering The Post-Walk Questions
LifeVest 4000 Patient Manual Answering the post-walk questions You will be asked two questions after the walk test. The questions will appear on the LifeVest. With each question, choose the answer that best describes how you feel. You’ll see this screen after the walking portion of the walk test. This screen reminds you that you will be asked two questions after taking the walk test. - Page 119 Using the activities options Choose an answer. To hear an answer spoken, tap the screen in the answer area. You can select an answer from zero through 10, according to the answer scale below. Select the answer that most closely describes how you feel. ...
- Page 120 After completing the walk test, sit down and rest before resuming your normal activities. If you have any questions about these instructions, call ZOLL. If you have any questions about your medical condition, call your health care provider.
-
Page 121: Taking The Walk Test Later
Using the activities options Taking the walk test later Follow this procedure if you chose “later” when you got the message telling you to complete the walk test. Note that your screens might look slightly different than what’s shown here. The procedure is the same. - Page 122 LifeVest 4000 Patient Manual Tap Other activities. Note: If your physician prescriber did not request that you take any of the activities, you will not see the “other activities” option on your screen. Tap Walk test. You’re now ready to take the walk test.
-
Page 123: Walk Test Messages
Using the activities options Walk test messages As you take the walk test, you may get one of these messages. If so, here is what the message means and what you should do. If you get any other messages, see Section 5, Responding to alarms. Message What it means What to do... - Page 124 LifeVest 4000 Patient Manual This page intentionally left blank. Page 6-26...
-
Page 125: Appendix A: Quick Charts
Quick charts Appendix A: Quick charts Daily routine Assemble electrode belt and garment Put on LifeVest system Normal startup routine Recharge batteries daily Page A-1... - Page 126 LifeVest 4000 Patient Manual Remove LifeVest system before bathing or showering Change garment as needed Disassemble electrode belt and garment Manually send data to your doctor If you get a treatment Change speak options Page A-2...
- Page 127 Quick charts Airplane mode When you’re finished with device If you get an alert Page A-3...
- Page 128 LifeVest 4000 Patient Manual Responding to a gong alert This is just a partial list. For complete list and further details, see section 5. Page A-4...
-
Page 129: Appendix B: Glossary
Glossary Appendix B: Glossary Arrhythmia Abnormal heart rhythm. Asystole Heart stops beating. Cardioversion Restoration of normal heart rhythm by electrical treatment. defibrillation ECG electrodes Electrocardiogram electrodes, used to monitor heart rate. Electrode A solid electrical conductor through which an electric current enters and leaves a body. - Page 130 LifeVest 4000 Patient Manual This page intentionally left blank. Page B-2...
-
Page 131: Appendix C: Symbols
Battery is charging. Charger with indicator lights only. Battery is fully charged, ready for use in the monitor. Charger with indicator lights only. Alarm condition 1. Battery has a problem but still might hold a charge. Call ZOLL. Charger with indicator lights only. - Page 132 Battery low: Battery is low, a critical situation. Change battery as soon as possible and recharge battery. Tap for help. Battery may be defective: LifeVest cannot determine battery condition. Call ZOLL for service. Tap for help. Menu button: Tap to see menu.
- Page 133 LifeVest can resume normal monitoring mode. Recording: LifeVest is recording your ECG signal (manually activated). Service required: Device has a problem and requires service. Call ZOLL. Battery: Do not incinerate. Battery: Do not short circuit.
- Page 134 LifeVest 4000 Patient Manual Laundering symbol: Indicates to iron when needed with a maximum heat setting of 110°C (230°F). Laundering symbol: No anti-static spray. Laundering symbol: No fabric softener. Manufacturing date. Manufacturing location. May also show manufacturing date. Expiration date.
- Page 135 Symbols Power supply electrical information: Alternating current (AC). Power supply electrical information: Direct current (DC). Therapy pad label: Place this side (foil side) of the therapy pad next to your skin. Indicates the need for the user to consult the instructions for use for important cautionary information such as warnings and precautions that cannot, for a variety of reasons, be presented on the medical device itself.
- Page 136 LifeVest 4000 Patient Manual Symbol for temperature limitation. Upper and lower limits of temperature are indicated next to the horizontal lines. Indicates the range of humidity to which the medical device can be safely exposed. Symbol for emits RF energy.
-
Page 137: Appendix D: Software Licensing Statement
Appendix D: Software licensing statement Certain software components (referred to herein as “Open Source Components”) that are used by the LifeVest 4000 wearable defibrillator are licensed by ZOLL Medical Corporation (referred to herein as “ZOLL Medical”) under various open source license agreements. As required by the terms of these open source... - Page 138 LifeVest 4000 Patient Manual This page intentionally left blank. Page D-2...
- Page 139 Index Index battery care, 3-5 battery charged symbol, C-1 A battery charger, 2-4 abnormal heart rhythm, 5-2 indicators, 2-4 AC power symbol, C-5 battery charger indicator lights, 3-15 activities options, 6-1 battery charger touchscreen indicators, 3-11 add gel, 5-19 battery charging symbol, C-1 add gel or replace belt battery defective symbol, C-2 message, 5-9...
- Page 140 LifeVest 4000 Patient Manual quick reference, A-2 connector, power supply, 2-4, 2-5 changing contact ZOLL, v electrode belt, 5-20 contents of this manual, ii chapters of this manual, 1-1 controls charge time monitor, 2-2 battery, 3-5 copyright, iv charger, 2-4...
- Page 141 Index electrode belt and garment, disassembly green therapy pad symbol, C-2 quick reference, A-2 electrode gel, 5-19 H electrodes hand lotion to the four ECG electrodes, 4-7 color code, 4-5 health survey, 6-2 electromagnetic interference, 1-8 later, 6-7 defined, B-1 messages, 6-9 emergency number now or later, 6-3...
- Page 142 LifeVest 4000 Patient Manual symbols, C-3 no cell signal symbol, C-1 licensing statement, D-1 noise alarm logo message, 3-3 check electrodes, 5-14 lotion noise alarms, 5-13 on ECG electrodes, 5-15 noise and vibration, 1-5 noisy ECG signal, 5-8 M normal startup routine, 3-3...
- Page 143 Index batteries, 3-6 shutdown quick reference, A-1 device, 3-35 recording signal strength symbols, 3-19 heart rhythm, 3-22 signal strength, antenna symbol, 2-7 recording symbol, C-3 siren alarm, 5-1 recycling respond, 5-2 batteries, 3-35 skin red battery message, 5-7 burn, 1-5 red battery symbol, C-2 irritation, 1-5 red sensor symbol, 5-13, C-2...
- Page 144 LifeVest 4000 Patient Manual T VF. See ventricular fibrillation vibration, 1-5 tactile stimulator on belt, 2-3 at startup, 3-3 TE (therapy electrodes), 2-3 vibration alarm, 5-1 technical alarms, 5-5 vibration box, 2-3 telephone jacks, 2-4 position, 4-3 therapy pad symbols, 5-16, C-2 VT.
Need help?
Do you have a question about the LifeVest 4000 and is the answer not in the manual?
Questions and answers
What is the item that looks like a phone that came with the life vest system?
The device that resembles a phone in the ZOLL LifeVest 4000 system is the monitor unit. It includes the battery, an LCD screen for message display, and two response buttons.
This answer is automatically generated
Life vest was taken off without removing battery first. Does this cause any problems with vest can my husband simply put it back on.