Table of Contents
Advertisement
Advertisement
Table of Contents

Related Manuals for Intermatic HA07


Summary of Contents for Intermatic HA07
- Page 1 Model HA07 Master Controller SETUP AND USER GUIDE...
- Page 2 HomeSettings HA07 Wireless Master Controller Congratulations! Congratulations! You have purchased an versatile system for controlling lights and appliances in your home. The HomeSettings Wireless Control system lets you run your house more efficiently, and provides you with safety, convenience, and flexibility.
- Page 3 • Manual override. Lets you manually use the switches it controls like an ordinary switch if you want to bypass wireless control by the HA07. The HA07 Master Controller also includes the following features: •...
-
Page 4: Table Of Contents
OFF at a specific time ... Setting up other events at a later time ... Making adjustments to events ... Everyday use of the HA07 Controller ... Choosing the operating mode ... Manual use ... Copyright © 2007 Intermatic, Inc. - Page 5 Additional features... Replicating network and channel settings on another controller ... Duplicating the network only ... Resetting the controller ... Resetting the network only ... Resetting channels only ... Resetting network and channels together... Deleting modules from a scene ... Removing modules from ALL ON and ALL OFF control ...
-
Page 6: Installing The Batteries
How to use this booklet How to use this booklet How to use this booklet Before you begin setting up your HA07, read this booklet to get an overview of the process. Some of the steps require you to press and release a specific button. -
Page 7: Hardware Overview
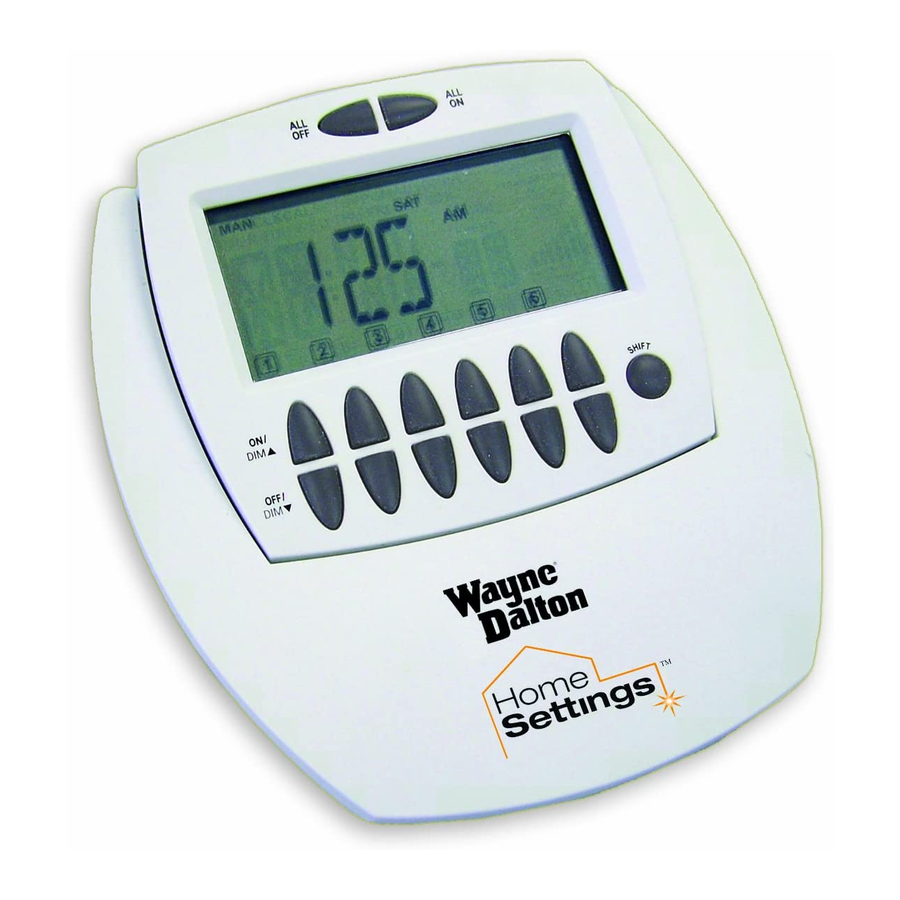
Hardware overview Hardware overview Hardware overview Before you begin setting up and using your HA07 Master Controller, open the cover and familiarize yourself with its display and buttons. All OFF/All ON All OFF/All ON Channel Channel Button Pairs Button Pairs... -
Page 8: Setting Up Your Network
HA07 Master Controller. Modules must be assigned to the master controller before any programming or remote control functions can be accomplished. Before setting up your network or programming the buttons on the HA07 Master Controller, make sure you do the following: • •... -
Page 9: Let The Software Guide You
• • Instructions for optional operations, letting you make use of the full capabilities of the HA07 master controller, is provided at www.homesettings.com. Later on, if you want to come back and change an item of programming you’ve set during the following session, you can go directly to the specific function and follow only those directions. -
Page 10: Deleting Or "Excluding
(For non-HomeSettings modules, refer to the instructions provided by the manufacturer.) Raise the cover on the HA07 Master Controller. Bring the HA07 Master Controller within 6 ft. of the module. Put the HA07 into EXCLUSION mode by pressing and releasing the DELETE button on the HA07. -
Page 11: Adding Or "Including
Put the HA07 into INCLUSION mode by pressing and releasing the INCLUDE button on the HA07. This time, the word “INCL” will appear on the screen and “TRANSMITTING” will begin to flash in the upper right corner. NOTE: If TRANSMITTING stops flashing, just press the INCLUDE button again. -
Page 12: Removing Modules From The Network
HomeSettings HA07 Wireless Master Controller Removing modules from the network As a separate procedure, you can remove or “exclude” a module from your network— something you would do if you were moving it to a new location (when moving a module, you should first exclude it, then include it at the new location) or if you simply didn’t plan to use it any more. -
Page 13: Programming Channel "Scenes
A “scene” is one or more modules that are set to specific levels and controlled by a specific pair of ON/DIM and OFF/DIM buttons on the HA07 Master Controller. For example, you could set up handy scenes that contain: •... - Page 14 HomeSettings HA07 Wireless Master Controller On the HA07 Master Controller, simultaneously press and hold both ON/DIM and OFF/DIM buttons of the channel you want to set. After 3 seconds, the screen displays “LEARN”. Release the ON/DIM and OFF/DIM buttons after “LEARN”...
-
Page 15: Activating All On / All Off For Non-Dim Modules
You can add a maximum of 16 modules to the same scene, or create a new scene with different or some of the same modules. To do so, repeat Steps 1-10. Activating ALL ON / ALL OFF for non-dim modules In their original setting, the ALL ON and ALL OFF buttons only control modules that DIM (e.g., HA03, HA05, or HA06). - Page 16 HomeSettings HA07 Wireless Master Controller Press and hold both ALL ON and ALL OFF button until the screen displays the word “ALLSET”. Press and hold the INCLUDE button on the HA07 Master Controller. The screen adds “INCL”. Press and release the PROGRAM button on the non-dimming module you want to include.
-
Page 17: Setting System Time And Date
Mode button repeatedly until the correct item is on screen, then proceed to reset. Things you should know about time The HA07 Master Controller is a more sophisticated timekeeper than a simple clock. It can also: • •... -
Page 18: Step-By-Step Instructions
With the HA07 Master Controller set up correctly, you never have to make manual time adjustments. Before you begin, raise the cover on the HA07 to provide access to the timesetting buttons. NOTE: The procedure will “time out” if you don’t press any buttons for 10 seconds. - Page 19 Press MODE to accept the minutes you have set. The screen displays “CAL” in small letters at the top of the screen— for CALENDAR mode—and displays “MM-dd- yy” or an actual date . Press the ENTER button. The screen flashes the month. Press the + or –...
-
Page 20: Setting For Daylight Saving Time
HomeSettings HA07 Wireless Master Controller Setting for Daylight Saving Time The HA07 Master Controller is preset to automatically adjust for daylight saving time. • If you DO want to keep this setting: • If you DO NOT want the Controller to... -
Page 21: Setting For The Zone For The Location
“ZONE” and “CENTer”. Setting for the Zone for the location The HA07 Master Controller can accommodate how far north or south you the device is located, adjusting for differences in sunrise and sunset. This is useful if you want to turn lights on and off at dawn and dusk. -
Page 22: Setting Exact Sunrise/Sunset Times (Optional)
Setting exact sunrise/sunset times (optional) When you choose the zone for where you live, the HA07 uses an approximate time for sunrise and sunset, adjusting it automatically as the seasons change (earlier sunset in winter, etc.) You can set the exact sunrise/sunset times, which are available in the newspaper or on the Internet. - Page 23 Press the ENTER button when correct. The display flashes between SUNSET and a time. Press the + or – button. The screen flashes the time it has been displaying. Press the + or – buttons again to change the flashing time to the correct SUNSET time for the location.
-
Page 24: On At Sunrise Or Sunset
HomeSettings HA07 Wireless Master Controller Programming timer “events” Programming timer events Programming timer events An “event” is a program in the HA07 that controls one or more scenes at a set time and/or day. There are four kinds of events: •... - Page 25 Continue pressing the + button until the screen displays SNST (sunset) or SNUP (sunup)— whichever you want. This example uses SNST. Press and release the + button until the day or series of days you want the timer to turn ON is blinking.
-
Page 26: Off At Sunrise Or Sunset
HomeSettings HA07 Wireless Master Controller OFF at Sunrise or Sunset Before you begin If there are any dimmer-controlled lights in the scenes you will control with this event, set them at the dimmed level where you want them. Press the ENTER button to accept your settings and to move to setting the “OFF”... - Page 27 time, and with the event number blinking. This is a new event. Press the + button. The screen changes and flashes the days of the week. Continue pressing the + button until the screen displays SNST (sunset) or SNUP (sunup), whichever you want.
-
Page 28: On At A Specific Time
HomeSettings HA07 Wireless Master Controller ON at a specific time Before you begin If there are any dimmer-controlled lights in the scenes you will control with this event, set them at the dimmed level where you want them. Press the ENTER button to accept your settings. - Page 29 Press the + button. The screen changes and flashes the days of the week. Continue pressing the + button until the day or series of days you want the timer to turn OFF is blinking. You can select: • Every day •...
- Page 30 HomeSettings HA07 Wireless Master Controller OPTIONAL: If this ON event will control scenes using dimming modules and you want to protect dimming levels already set, press and release the ALL ON button. The screen changes from 7 dimmer bars to 4 dimmer bars.
-
Page 31: Off At A Specific Time
OFF at a specific time Before you begin If there are any dimmer-controlled lights in the scenes you will control with this event, set them at the dimmed level where you want them. If necessary, press the MODE button repeatedly until the top of the screen displays “PGM”. - Page 32 HomeSettings HA07 Wireless Master Controller Press the ENTER button to accept the hour you have set. The screen flashes the minutes. Press the + or – button to set the hours you want (“11:30 PM” in this example). Press the ENTER button to accept the minutes.
-
Page 33: Setting Up Other Events At A Later Time
Setting up other events at a later time Follow the instructions on the previous pages to set up the two kinds of events: Choose the parts of the routines that apply to your new event. For example, follow steps for: •... -
Page 34: Making Adjustments To Events
HomeSettings HA07 Wireless Master Controller Making adjustments to events Any time you want to make adjustments to the settings of any event you have set up, go back to the four master procedures: Astronomic-controlled (sunrise or sunset)— explained on page 24. -
Page 35: Everyday Use Of The Ha07 Controller
Everyday use of the HA07 Controller Everyday use of the HA07 Controller Choosing the operating mode Once you’ve completed setup, the HA07 is easy to use. Press the MODE button to cycle through the operation methods available. The top of the screen displays the MODE you’ve selected:... -
Page 36: Additional Features
HomeSettings HA07 Wireless Master Controller Additional features Additional Functions Additional Functions The HA07 Master Controller allows you to create two different types of copies of the primary remote controller: • Duplicating both Network and Channel settings will copy all network information and scene... -
Page 37: Replicating Network And Channel Settings On Another Controller
To make a copy of the primary controller: On the PRIMARY controller: On the SECONDARY controller (if HA07): Press and hold the INCLUDE button for 5 seconds. The screen will flash the word “COPY”. -
Page 38: Duplicating The Network Only
• • NOTE: If “NOT SUCCESSFUL” appears on the HA07 screen, repeat these steps until the procedure is successful. Press and hold the INCLUDE button for 5 seconds. The two LEDs will flash at the same time. -
Page 39: Resetting The Controller
Resetting the controller If needed, you can reset the NETWORK and CHANNEL SETTINGS individually or both together. NOTE: When resetting a controller, for best results, each module within the system should be individually reset also. Resetting the network only Press and hold the INCLUDE and DELETE buttons at the same time for 10 seconds. -
Page 40: Resetting Channels Only
HomeSettings HA07 Wireless Master Controller Resetting channels only Follow the same procedure as Resetting the network only, except press the Channel 2 ON/DIM▲ and OFF/DIM▼ buttons in Step 2. The screen will display “CHAN CLEAR”. Resetting network and channels together... - Page 41 On the HA07 Master Controller, simultaneously press and hold both ON/DIM and OFF/DIM buttons of the channel you want to remove. After 3 seconds, the screen displays “LEARN”. NOTE: “LEARN “will time out if you don’t press any buttons for 10 seconds.
-
Page 42: Removing Modules From All On And All Off Control
HomeSettings HA07 Wireless Master Controller Removing modules from ALL ON and ALL OFF control Use the following procedure to exclude modules from control by your ALL ON and ALL OFF buttons: Press and hold both ALL ON and ALL OFF button until the screen displays the word “ALLSET”. - Page 43 Troubleshooting Troubleshooting The Troubleshooting issues addressed below are the most common problems encoubntered. For the latest listing of troubleshooting issues, go to www. intermatic.com/[do we have a place?] Issue Every time I try to INCLUDE or DELETE modules to my...
- Page 44 HomeSettings HA07 Wireless Master Controller Issue I am trying to turn on a module associated to channel 1, but it will not turn on. My programmed events will not automatically execute. • Check to be sure there is power supplied to the module.
- Page 45 Consult the dealer or an experienced radio/TV technician for help. NOTICE! Changes or modifications not expressly approved by Intermatic Inc. could void the user’s authority to operate the equipment. THE term “IC” before the radio certification number only signifies that Industry Canada technical specifications were met.
- Page 46 HomeSettings HA07 Wireless Master Controller Installation Notes _____________________________________________________________ _____________________________________________________________ _____________________________________________________________ _____________________________________________________________ _____________________________________________________________ _____________________________________________________________ _____________________________________________________________ _____________________________________________________________ _____________________________________________________________ _____________________________________________________________ _____________________________________________________________ _____________________________________________________________ _____________________________________________________________ _____________________________________________________________ _____________________________________________________________ _____________________________________________________________ _____________________________________________________________ _____________________________________________________________ _____________________________________________________________ _____________________________________________________________ Copyright © 2007 Intermatic, Inc.
- Page 47 Setup and User Guide Installation Notes _____________________________________________________________ _____________________________________________________________ _____________________________________________________________ _____________________________________________________________ _____________________________________________________________ _____________________________________________________________ _____________________________________________________________ _____________________________________________________________ _____________________________________________________________ _____________________________________________________________ _____________________________________________________________ _____________________________________________________________ _____________________________________________________________ _____________________________________________________________ _____________________________________________________________ _____________________________________________________________ _____________________________________________________________ _____________________________________________________________ _____________________________________________________________ _____________________________________________________________ Providing a brighter solution.™...
- Page 48 Intermatic, Inc. 7777 Winn Road Spring Grove, Illinois 60081-9698 www.intermatic.com Intermatic Customer Service: 815-675-7000 (8 a.m. through 4:30 p.m. CT, Monday through Friday) ©2007 Intermatic, Inc. 158--00421...
Need help?
Do you have a question about the HA07 and is the answer not in the manual?
Questions and answers