Table of Contents
Advertisement
Quick Links
http://waterheatertimer.org/Digital-control-centers-and-manuals.html#PE103
Risk of Fire or Electrical Shock
WARNING
• Disconnect all power before installing the time switch or connected loads.
• Follow local electrical and safety codes, National Electric Code (NEC) and Occupational Safety and Health Act Codes (OSHA).
• More than one disconnect or circuit breaker may need to be turned off to de-energize all conductors.
• If the power disconnect point is out of sight, lock it in the OFF position and tag it to prevent unexpected application of power.
• The time switch must be grounded.
• Do not exceed maximum current carrying capacity.
• Always replace the plastic insulator to its original position before powering the time switch.
• Make sure there is no wire insulation under the terminal plate on time switch connector. Firmly tighten terminal screws.
Federal Communications Commission (FCC) Notice for PE103/P1403ME Controller
This device complies with part 15 of the FCC rules. Operation of this device is subject to the following two conditions: (1) This device may not
cause harmful interference, and (2) This device must accept any interference, including interference that may cause undesired operation.
This equipment has been tested and found to comply with the limits for a Class A digital device, pursuant to Part 15 of the FCC Rules.
These limits are designed to provide reasonable protection against harmful interference when the equipment is operated in a commercial
environment. This equipment generates, uses and radiates radio frequency energy and, if not installed and used in accordance with
instructions, may cause harmful interference to radio communications. Operation of this equipment in a residential area is likely to cause
harmful interference that requires the user to correct at their own expense.
Description
The PE103/P1403ME timer is a programmable pool and spa three-circuit device used for
two-speed pumps and auxiliary equipment. The timer features a programmable Seasonal
Adjust offset that automatically adjusts filter pump ON/OFF schedules according to
season.
At initial power up, the timer is in a setup state that requires users to program the time,
date, year, Daylight Saving Time (DST) option, Seasonal Adjust offset, and low speed
event. Optional high speed and auxiliary circuit ON/OFF events can also be configured
at initial startup. After the setup events are programmed, the timer advances to AUTO
Mode, where relays can be automatically turned ON and OFF according to programmed
events. The relays can also be manually turned ON/OFF by pressing the applicable button
under the active load.
Seasonal Adjust Overview
The Seasonal Adjust feature is a user-configured offset (10-minute intervals between 10 and
120 minutes) that increases/decreases the OFF time of the pump. The the timer adds the
offset value to the high and low speed OFF events in March, May, and July. Then the timer
subtracts the offset to the OFF events September, November and January 1st. This ensures
that the pump runs longer in summer swim months and shorter in fall and winter months to
accommodate pool usage.
NOTE: The timer divides the offset equally between the high speed event and the low speed
event. If only the low speed event is used, the complete offset value is added/subtracted to
the low speed event.
NOTE: If you have a single speed pump, be sure to only set the low speed. The high speed
event is not applicable to single speed pumps.
Connecting the PE103/1403ME Wiring
The single speed or two-speed pump and optional auxiliary component wires must be
connected to the applicable terminals on the PE103/P1403ME timer. Refer to Figure 2 to
connect the PE103/P1403ME wiring.
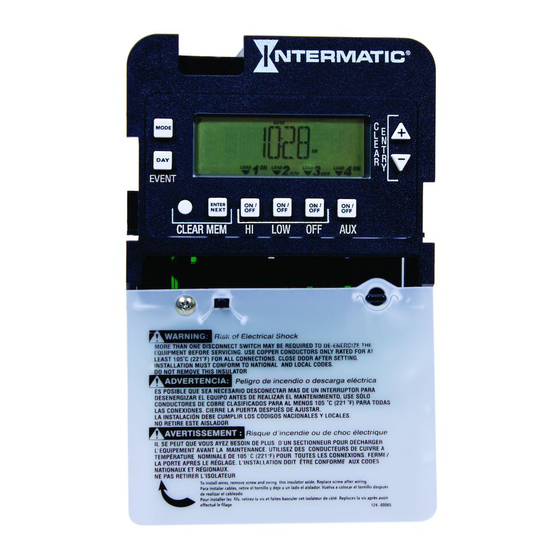
INSTALLATION AND SETUP INSTRUCTIONS
MODEL PE103/P1403ME
Pool and Spa Two-Speed
Pump Motor Controller
MODE
DAY
LOAD
EVENT
ENTER
NEXT
CLEAR MEM
NO-1 COM1 NO-2 COM2 NO-3 COM3
AC
IN
Figure 1 Front View of the Timer
C
+
E
L
N
E
T
A
-
1
2
3
4
R
R
LOAD
LOAD
LOAD
Y
OFF
OFF
OFF
OFF
ON/
ON/
ON/
ON/
OFF
OFF
OFF
OFF
HI
LO
OFF
AUX
NO-4 COM4
Advertisement
Table of Contents

Subscribe to Our Youtube Channel
Related Manuals for Intermatic PE103


Summary of Contents for Intermatic PE103
- Page 1 Connecting the PE103/1403ME Wiring The single speed or two-speed pump and optional auxiliary component wires must be connected to the applicable terminals on the PE103/P1403ME timer. Refer to Figure 2 to connect the PE103/P1403ME wiring.
- Page 2 SPEED PUMP SPEED PUMP Figure 2 PE103/P1403ME 120 and 240 VAC wiring for 2-speed and single speed pumps. Verifying Wire Installation Verify that the timer wires are connected properly. Press the LO button on the controller to verify that LO appears on the screen. If your pump uses high speed, press the HI button to verify HI appears on the screen.
- Page 3 The screen displays AUTO (Auto Mode) as shown in Figure 8. The initial setup is NEXT complete. CLEAR MEM Figure 7 Setting the LO speed pump ON event Adjusting PE103/P1403ME Program Settings All programs and events set during Initial Setup can be adjusted as needed. Follow this procedure to adjust a setting. AUTO MODE 1.
- Page 4 LIMITED ONE-YEAR WARRANTY If within the warranty period specified, this product fails due to a defect in material or workmanship, Intermatic Incorporated will repair or replace it, at its sole op- tion, free of charge. This warranty is extended to the original household purchaser only and is not transferable. This warranty does not apply to: (a) damage to units caused by accident, dropping or abuse in handling, acts of God or any negligent use;...
Need help?
Do you have a question about the PE103 and is the answer not in the manual?
Questions and answers
pe103 is the ON/OFF AUX button a manual override?
Yes, the ON/OFF AUX button on the Intermatic PE103 acts as a manual override for the auxiliary circuit.
This answer is automatically generated